
Photography Composition Framework: See, Feel, Technique
Updated 26 Sep 2026
Table of Contents Show
PHOTOGRAPHY STARTS BEFORE THE CAMERA
Before you choose a camera setting or a compositional rule, notice what made you stop. What caught your attention, and what do you want the photograph to communicate? Let that response guide your framing and technical choices.
This framework connects the Academy’s ten composition lessons through intention, restraint, observation and judgement. These four ways of thinking work together, helping you recognise what matters, decide what to include and assess whether the photograph expresses what you intended.
Why the framework exists
Composition begins with noticing something worth photographing. It might be a gesture, a relationship, a patch of light or a feeling you cannot yet put into words. Recognising that response gives your decisions a purpose.
Rules and techniques can help you explore what works. The rule of thirds, leading lines and framing are useful tools to practise, but following them cannot tell you whether a photograph communicates what mattered to you.
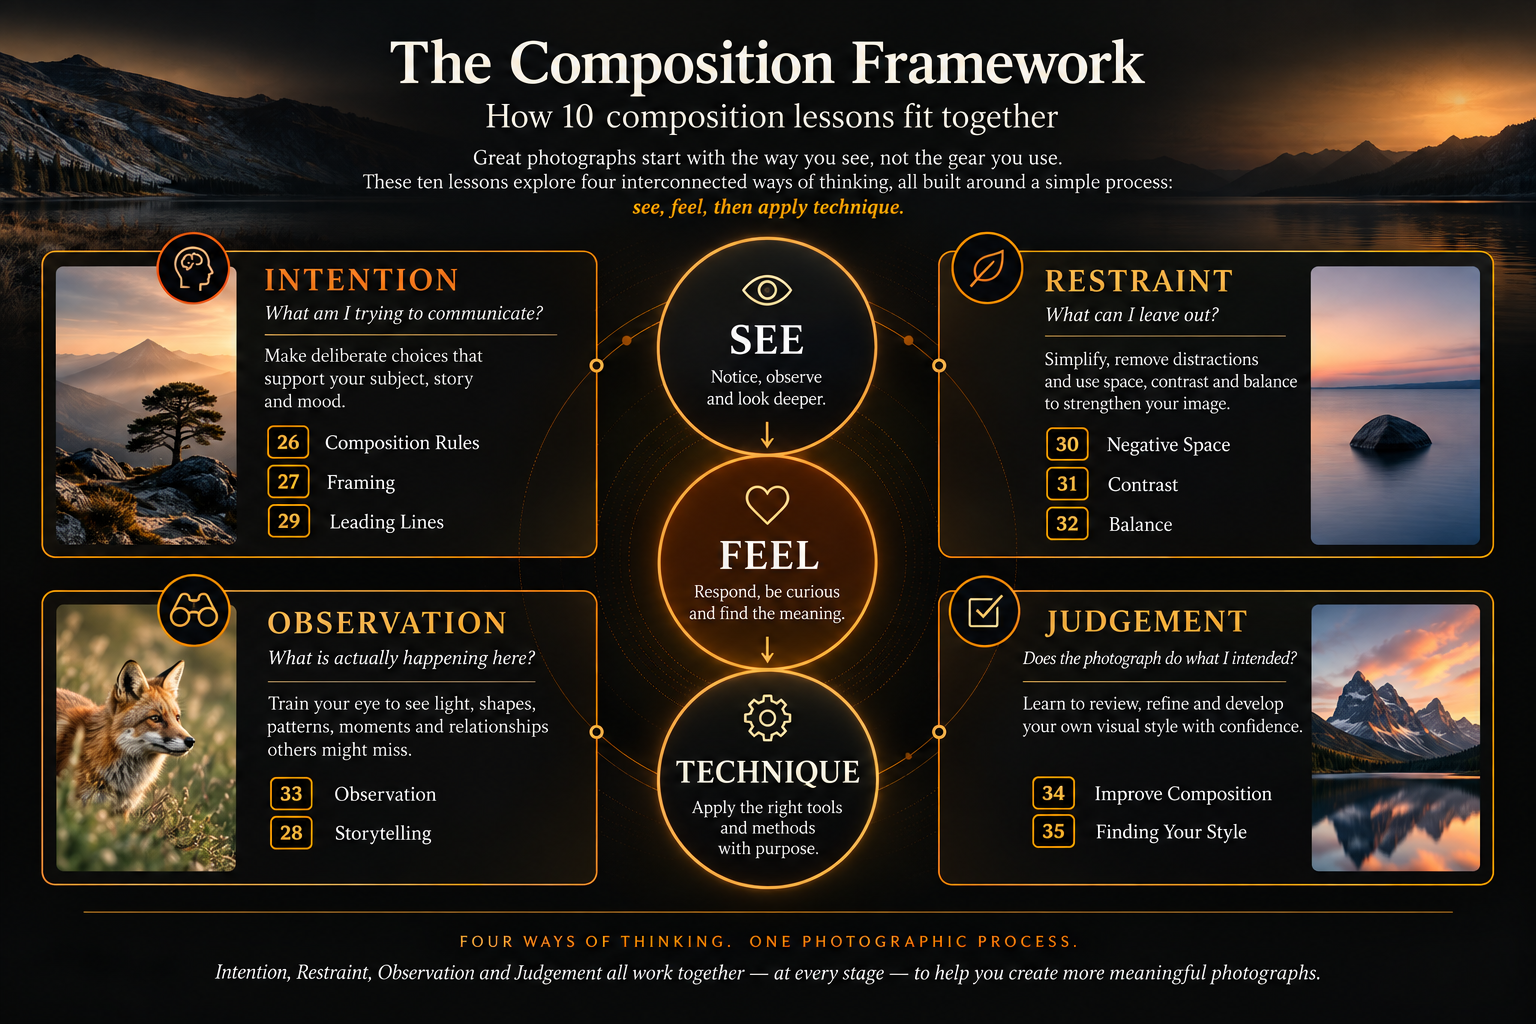
SEE → FEEL → TECHNIQUE connects your response to the choices you make. Notice what draws your attention. Ask what the photograph is really about. Then choose the position, framing and camera settings that help express it.
With practice, these decisions can become instinctive. You can return to them when reviewing the photograph: did your choices preserve what made you stop?
The composition framework - SEE → FEEL → TECHNIQUE connects your response to the choices you make. Notice what draws your attention. Ask what the photograph is really about. Then choose the position, framing and camera settings that help express it.
⏱️ CHAPTERS
00:00 - Introduction: Why Photography Is Taught Backwards
00:20 - Lesson 00: Photography Starts Before the Camera
01:02 - The Taoist Parable of the Two Walls
02:43 - Wu Wei: Deliberate Non-Forcing in Photography
02:52 - The Trap of Trying to Force a Photograph
03:18 - Name the Feeling, Not Just the Subject
03:45 - Technique Serves Intent (Why Fluency Matters)
04:20 - Principle 1: Intention - What Must the Viewer Feel?
04:40 - Principle 2: Restraint - Controlling Visual Weight
04:55 - Principle 3: Observation - Stop Manufacturing, Start Watching
05:10 - Principle 4: Judgement - Developing Your Own Standards
05:32 - The 5-Minute Rule: Stop Hunting, Start Seeing
Four ways of thinking. One photographic process.
See, feel, then apply technique. Explore the connected themes below and select a lesson to read more.
and look deeper.
and find the meaning.
with purpose.
Intention
What am I trying to communicate?
Make deliberate choices that support what matters to you in the photograph.
Restraint
What can I leave out?
Consider what space, contrast and visual weight contribute, and what can be left out.
Observation
What is actually happening here?
Notice light, shapes, moments and relationships. Stay receptive as the scene changes.
Judgement
Does the photograph do what I intended?
Review what the image communicates and decide what to keep, change or explore next.
Four ways of thinking
Intention, restraint, observation and judgement work together throughout photography. You may notice something new while framing, reconsider your intention or realise during review that a simpler approach would have worked better. You can return to any of these questions whenever it helps.
Intention
What am I trying to communicate?
Recognise what matters to you in the scene. The photograph might be about a person or place, but it could equally concern distance, stillness, tension or a relationship. Use composition to support that meaning.
Explore how compositional tools, the frame’s boundaries and visual pathways affect what receives attention.
Lessons 26 Composition Rules · 27 Framing · 29 Leading Lines
Restraint
What can I leave out?
Look at what each part of the frame contributes. A change of position, a quieter background or more space may give what matters room to be felt. Sometimes a busy frame carries the experience you want to express.
Consider space, contrast and visual weight together. Judge their contribution by the photograph you are making.
Lessons 30 Negative Space · 31 Contrast · 32 Compositional Balance
Observation
What is actually happening here?
Watch how light, gestures and relationships change. Let what you notice influence the photograph, even when it takes you away from your original plan.
Time spent observing can reveal possibilities you initially missed. Stay ready to act when a moment unfolds. A photograph may suggest a story, a mood or a relationship without explaining everything.
Lessons 33 Observation · 28 Storytelling
Judgement
Does the photograph do what I intended?
Look at the photograph you actually made. Identify what supports its meaning and what, if anything, weakens it. Compare a possible change with the original before deciding whether to keep it.
Feedback can help you recognise what another person sees. Use it to inform your decision while retaining responsibility for the photograph. Across a body of work, these choices can help you recognise your developing visual style.
Lessons 34 Improving Composition · 35 Finding Your Style
All ten composition lessons
Follow lessons 26–35 in numerical order when working through the course. Each lesson explores a particular aspect of composition; the themes show how those ideas connect. You can also return to an individual lesson when reviewing your photographs or preparing for practice.
Why the films group lessons differently
The written lessons follow the Academy’s numbered course sequence. The accompanying films bring related lessons together so you can explore each theme across several aspects of composition.
Photography Starts Before the Camera introduces the framework. Four further films explore the connected themes:
• Intention — Lessons 26, 27 and 29
• Restraint — Lessons 30, 31 and 32
• Observation — Lessons 33 and 28
• Judgement — Lessons 34 and 35
For example, the Observation film connects noticing what is happening with recognising the story or relationship a photograph might express. That is why it brings lesson 33 together with lesson 28.
The lesson numbers and course order stay the same. Follow 26–35 through the course, and use the films to explore the connections between them.
The Light & Logic connection
Light & Logic explores the thinking behind this framework: noticing before reaching for the camera, making room for what matters and learning to judge your own photographs. The Academy lessons turn these ideas into choices you can practise and review.
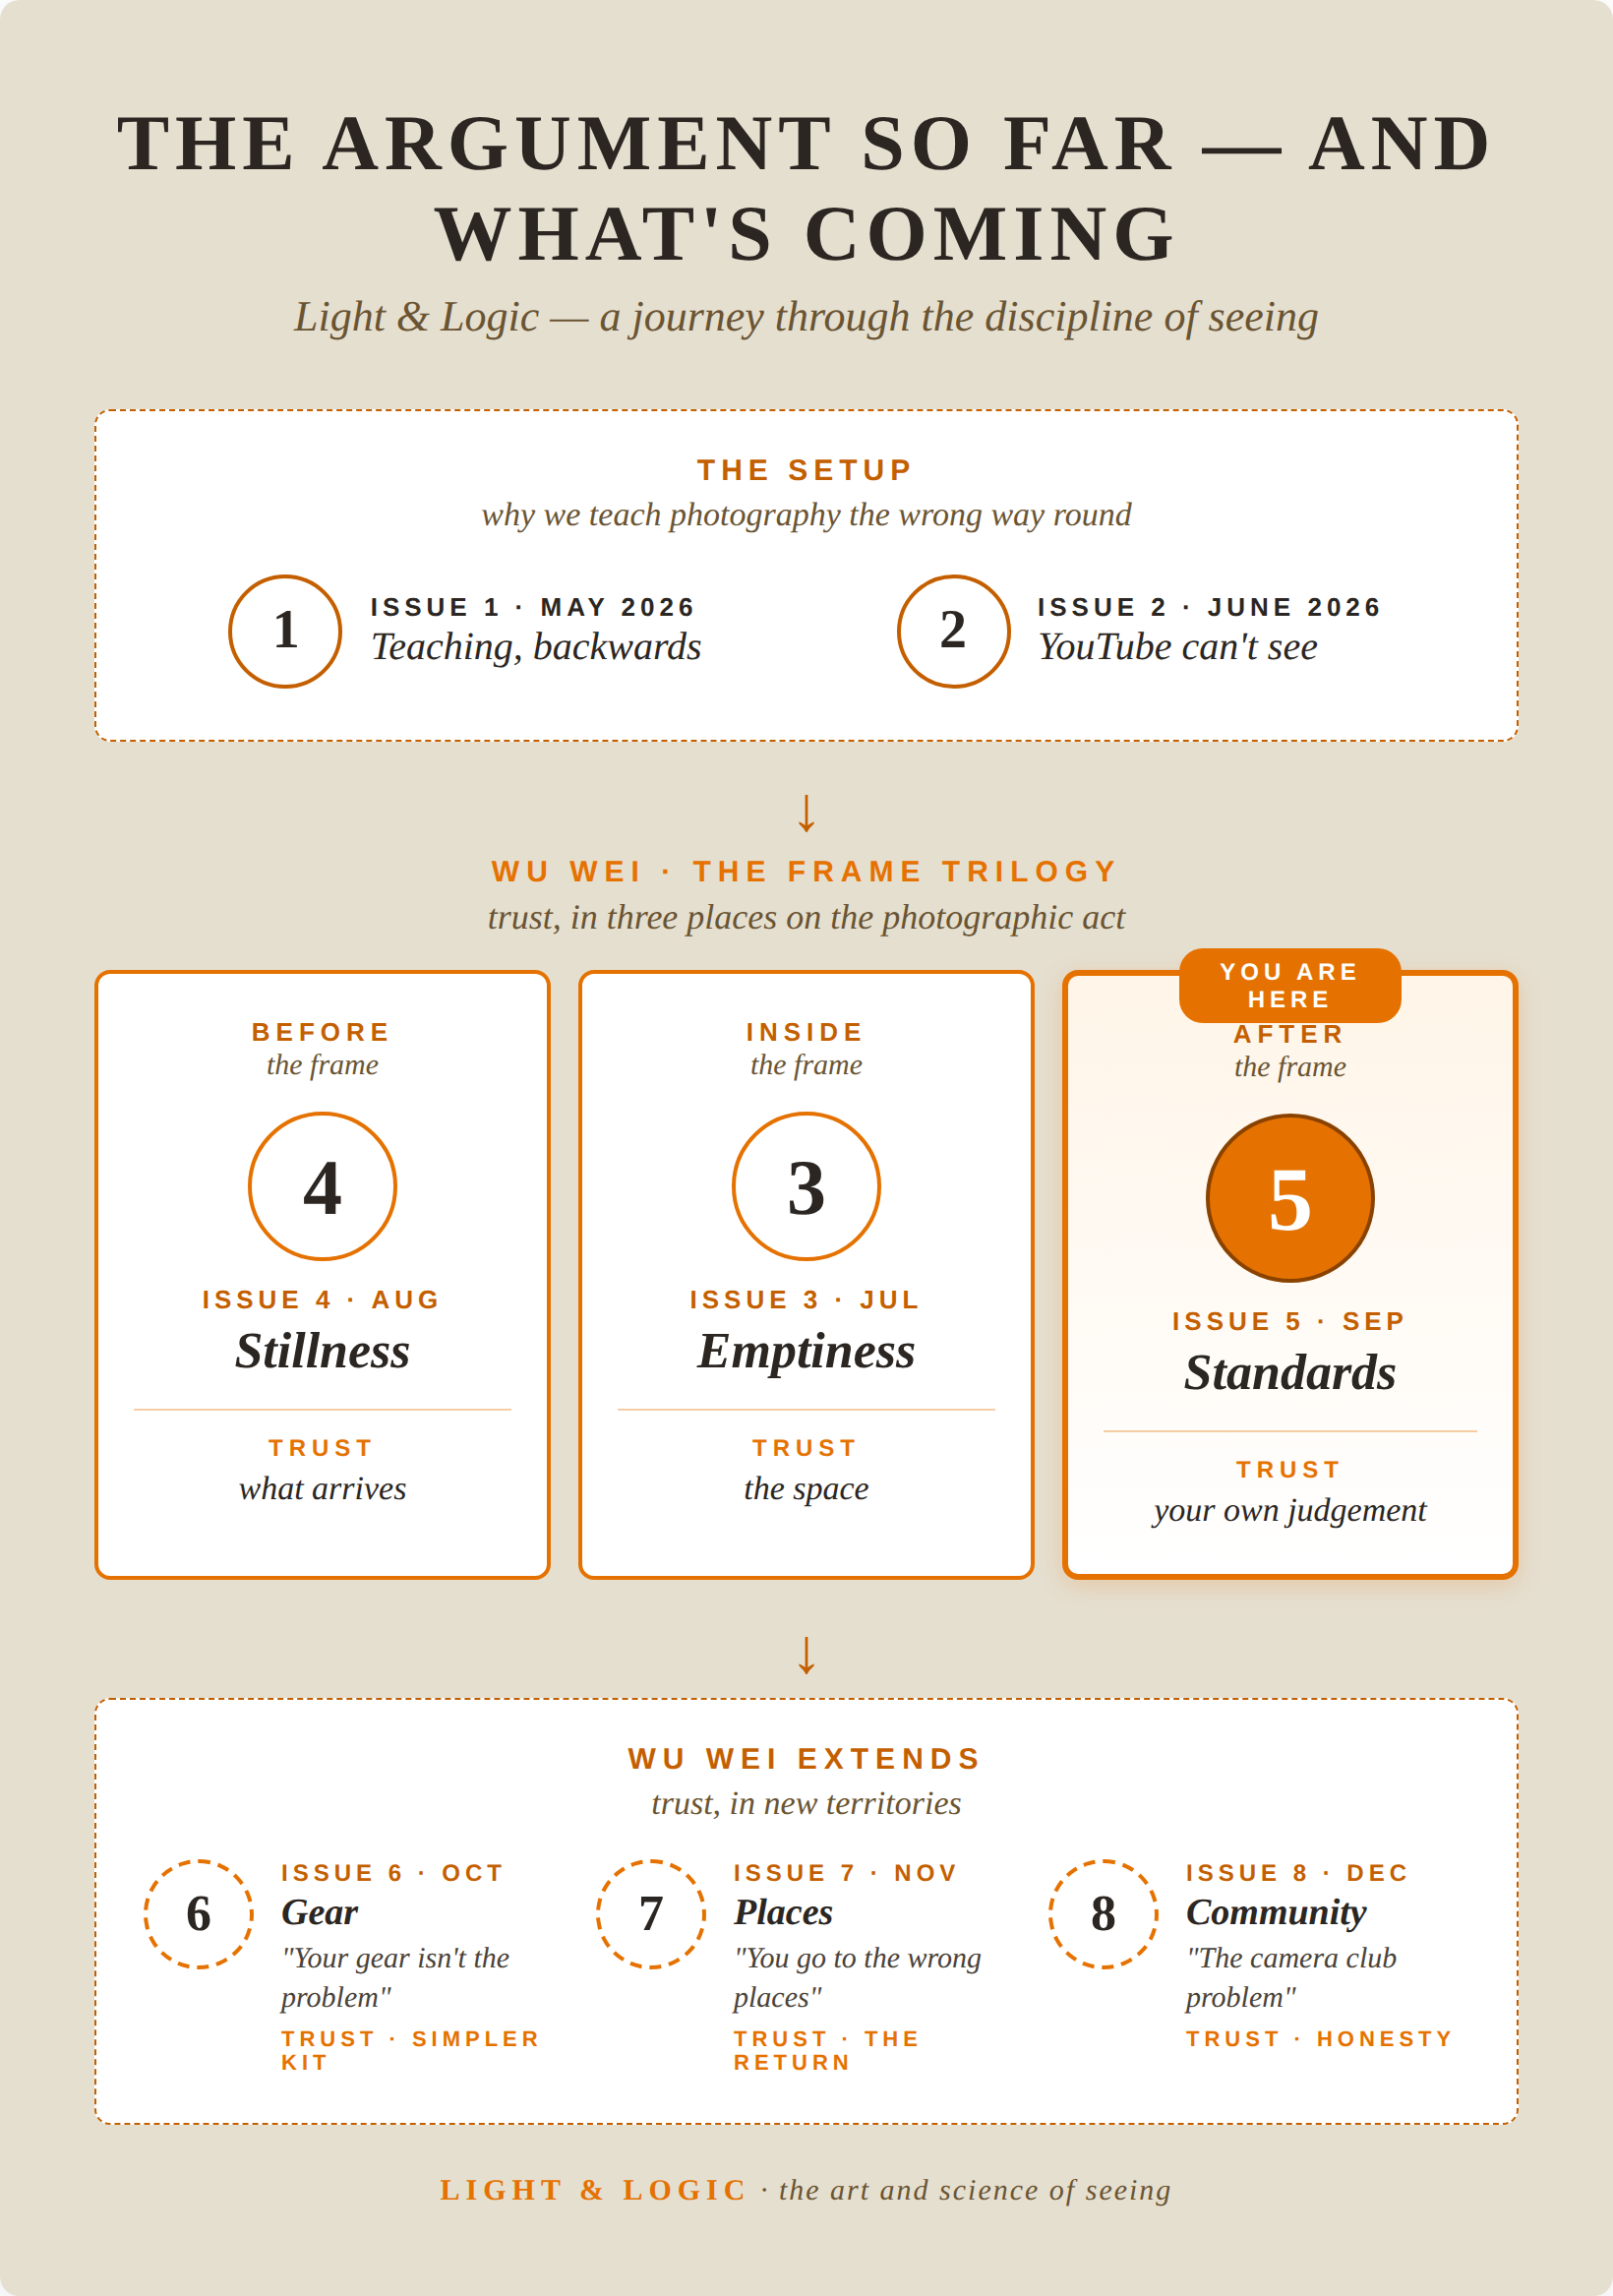
These five editions provide further reading:
• Most photography teaching has it backwards — Begin with seeing and intention, then use technique to support your response.
• YouTube can’t see your photographs — Connect what you watch with practice, feedback and a specific next step in your learning.
• Your photographs have too much in them — Consider what space and subtraction contribute to a photograph.
• You’re making your photographs too soon — Give yourself time to notice changing light and relationships while remaining ready to respond.
• You don’t know what a good photograph looks like — Develop a personal standard for reviewing, editing and deciding when a photograph is finished.
For a related reflection, read The Way of Wu Wei Philosophy. Its parable, adapted from Solala Towler’s Tales from the Tao, explores receptiveness and avoiding unnecessary force. In photography, that leaves room for observation and response while still drawing on preparation, practice and technical skill.
Using the framework in the field
Try these questions with a scene that catches your attention. Give yourself time to look when circumstances allow, and stay ready when a moment is unfolding.
See
What made you stop?
Notice the light, shapes, gestures, spaces or relationships that attracted you. Look beyond the first obvious subject. What changes as you watch or move?
Feel
What is the photograph really about?
Try to name the response you want to preserve. It might be stillness, uncertainty, energy, distance or curiosity. You do not need a polished explanation, but recognising what matters can help you decide what belongs in the frame.
Technique
Which choices support that response?
Choose your position, framing, focal length and camera settings with that purpose in mind. Consider what shutter speed does to movement, what aperture keeps in focus and how exposure affects the tones you want to retain.
If a choice weakens what first interested you, look again. You can return to seeing and feeling at any point.
Review
Did the photograph preserve what mattered?
Look at the resulting image and identify what supports your intention. If something interferes, compare one possible change with the original. Keep the change only if it helps; a successful photograph may need no further adjustment.
Review brings you back to the central process of SEE → FEEL → TECHNIQUE and helps inform your next photograph.
A simple practice
Make two photographs of the same scene, changing one choice—for example, your position, the amount of space or the shutter speed. Compare them and finish this sentence:
“This version better expresses what interested me because…”
Use something visible in the photograph to explain your decision. The purpose is to understand what your choice changed.
Start with Lesson 26
Take these questions into the first composition lesson. Explore the tools with a photograph in mind, try a choice and judge what it contributes.
Begin with Composition Rules, then follow lessons 26–35 in order. Return to this framework whenever you want to reconnect a technique with what you are trying to express.

Photography composition FAQs
What is composition in photography?
Composition in photography is how the elements within a frame relate to one another. Your viewpoint, framing, timing and use of space influence what a viewer notices and how the photograph feels. Composition begins with recognising what interests you, then making choices that help express it.
What makes a good photography composition?
A good composition supports what the photograph is trying to communicate. The placement of elements, light, space and visual weight contribute to its meaning or feeling. A photograph can work through simplicity, complexity, stability or tension. Judge those choices by their effect on the actual image rather than how closely they follow a grid.
What are the seven rules of composition in photography?
There is no single agreed list of seven composition rules. Seven commonly taught techniques are the rule of thirds, leading lines, framing, symmetry, balance, negative space and repetition. Each offers a way to explore a photograph. Use a technique when it supports your intention, and compare alternatives rather than treating the list as a checklist. Explore these tools in Lesson 26 — Composition Rules.
Do you have to follow the rule of thirds?
No. The rule of thirds is an optional guide that divides a frame into nine equal rectangles and suggests placing important elements near the dividing lines or their intersections. Central placement, symmetry or a subject close to an edge may better express your intention. Compare the alternatives and consider what each placement contributes.
How can beginners improve their photography composition?
Beginners can improve composition by practising one deliberate choice at a time. Photograph the same scene twice, changing your position, framing or another compositional decision. Compare the results and explain which better expresses what caught your attention. Check the edges and background as well as the main area of interest. Repeat the exercise with a specific lesson from your review.
What does See, Feel, Technique mean in photography?
SEE → FEEL → TECHNIQUE is the central process in Alan Ranger’s Composition Framework. See means noticing what draws your attention. Feel means recognising the response or meaning you want to preserve. Technique means choosing the position, framing and camera settings that support it. You can return to observation whenever the scene or your understanding changes.
What is the difference between framing and composition?
Framing concerns the boundaries of the photograph: what you include, exclude and position within its four edges. Composition encompasses how all those elements work together, including their spacing, visual weight and relationships. A frame within a frame, such as a doorway or branches, is one optional framing technique. Lesson 27 — Framing explores these decisions.
How much negative space should a photograph have?
There is no required percentage of negative space in a photograph. The amount depends on what the space contributes to the image, such as isolation, scale, stillness or uncertainty. Compare tighter and more spacious framings, then choose the relationship that supports your intention. Space can carry meaning in its own right, as explored in Lesson 30 — Negative Space.
Can you practise photography composition with a phone?
Yes. A phone lets you practise observation, viewpoint, framing, timing and the relationship between elements. Move closer, step back or change your angle, then compare how the photograph changes. Different cameras offer different technical controls, but you can develop compositional judgement with the camera you already have.
How do you know when a photograph is finished?
A photograph is finished when further changes no longer help it express what matters to you. Identify what already works, then compare any proposed adjustment with the original. Keep changes that serve the photograph and reject those that weaken it. Feedback can reveal something you missed, while the final decision remains yours. Continue with Lesson 34 — Improving Composition.