
Headshots at Home: A DIY Lighting and Backdrop Guide
Table of Contents Show
Headshots at Home: A DIY Lighting and Backdrop Guide
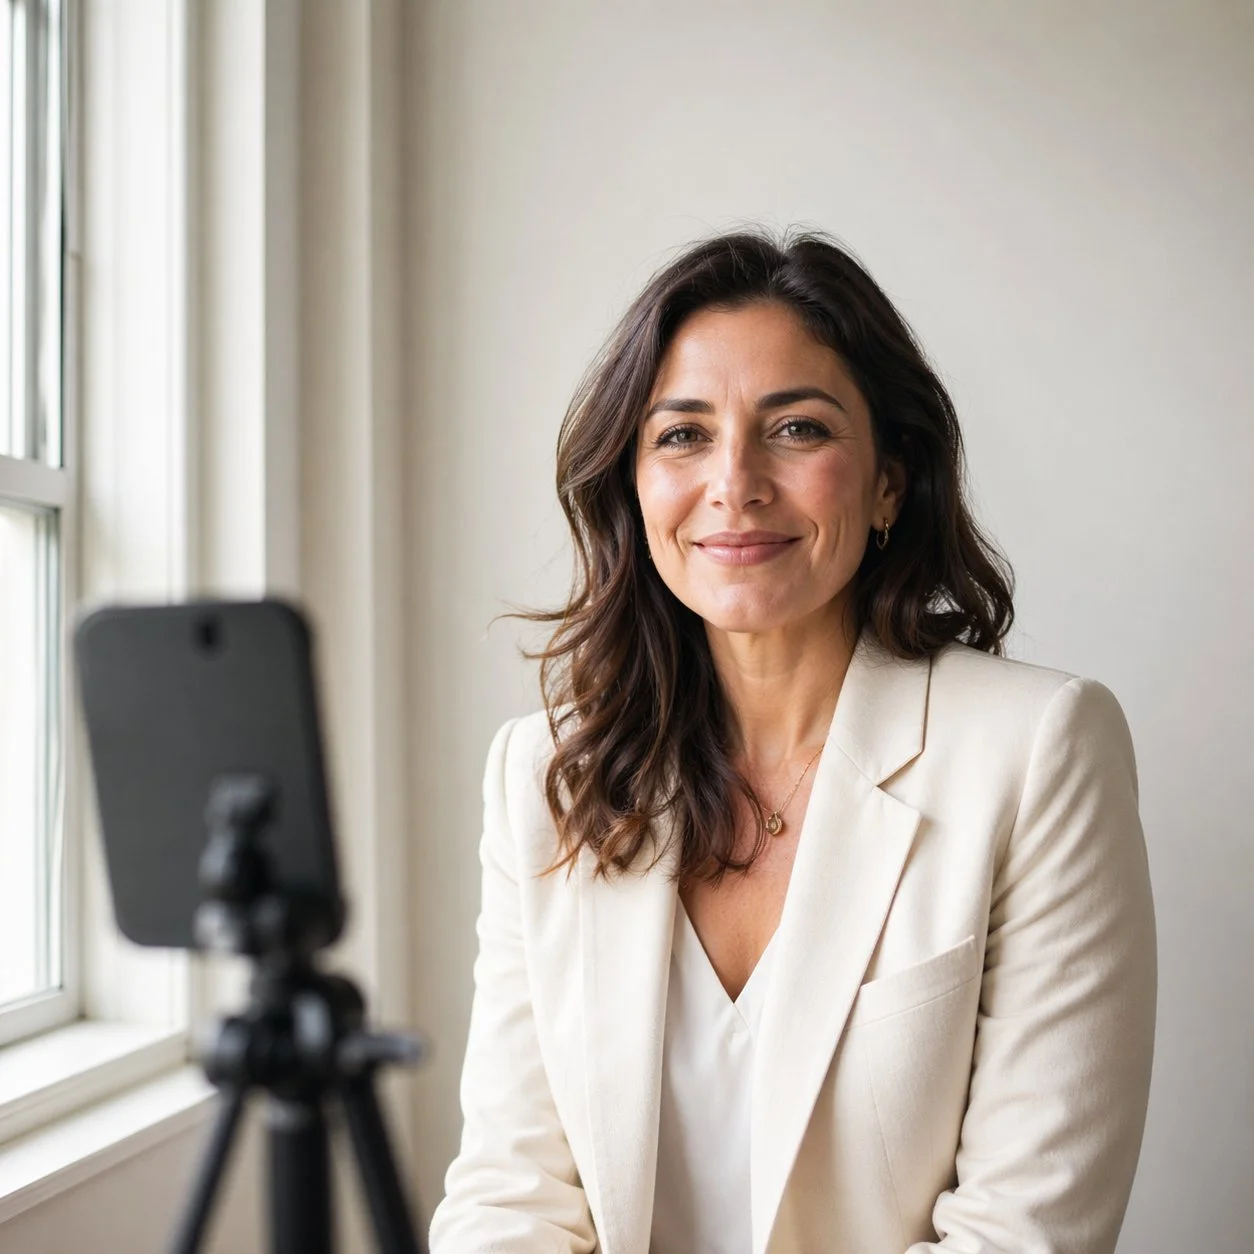
Woman photographed at home using soft window light for a professional headshot
You do not need a studio to shoot a headshot that works on LinkedIn. You need one good window, one white surface, and about fifteen minutes of setup. This guide walks you through exactly how to get it right.
I teach portrait lighting to people who have never used anything more advanced than their phone, and the same thing happens every time. The minute they see a headshot taken next to their own kitchen window alongside one taken under harsh overhead lights, they understand the whole game in thirty seconds. Light is ninety percent of the job. Everything else is tidying.
So before you spend a penny on ring lights, softboxes or AI headshot generators, read the next two thousand words. You probably already own everything you need.
Quick comparison — where your DIY headshot will be taken
A practical summary of the three most reliable home setups, what each one needs, and where each one sits on the effort vs. result curve.
Three home headshot setups compared
A practical summary of the three most reliable DIY approaches, what each one needs, and where each sits on the effort vs. result curve.
| Setup | What You Need | Time to Set Up | Result Quality | Best For |
|---|---|---|---|---|
| £0 Window Only | Window, phone, white towel or sheet, plain wall | 10 minutes | Good enough for LinkedIn and most professional sites | Beginners |
| £30 Reflector + Tripod | Above kit plus a 5-in-1 reflector and phone tripod | 15 minutes | Noticeably sharper, more flattering fill light | Serious DIY |
| £150 LED + Backdrop | Above kit plus a constant LED panel and portable backdrop | 20 minutes | Near-studio quality, works in any light conditions | Repeat Shoots |
What Makes a Headshot Look Professional
Before we touch any gear, it helps to know what a recruiter or client actually reacts to when they look at a headshot. It is not your camera. It is these three things, in this order:
Light on the face. Soft, even, coming from a sensible angle, with no competing colour temperatures.
A clean background. Nothing distracting behind you. No radiators, no plug sockets, no framed wedding photo of your aunt.
An expression that reads as confident and approachable. Neither a stiff passport-photo glare nor a forced grin.
Get those right and a three-year-old phone will outshoot a £3,000 camera used badly. The rest of this guide is about getting those three things right at home.
The Single Best Light Source You Already Own
Your biggest window.
That is the entire secret. Not a ring light, not a softbox, not an LED panel. A window. Specifically, a window with soft, indirect daylight coming through it.
Why window light works so well
A window is a large light source relative to your face, which is exactly what flatters skin. Small hard light sources create hard shadows. Big soft light sources wrap gently around the features and soften every line. That is why studio photographers spend hundreds of pounds on softboxes that are, essentially, artificial windows.
You already have the real thing.
Which window, and when
Here is where UK-specific advice matters:
North-facing windows are the gold standard. They never get direct sun, so the light stays soft and even all day. If you have a north-facing window at home, use it first.
East, west and south-facing windows all work, but only when the sun is not shining directly through them. Wait until the sun has moved past, or hang a white bedsheet or sheer curtain over the glass to diffuse it.
Overcast days are a gift. A fully cloudy British sky acts as a giant natural softbox. The UK weather that usually frustrates landscape photographers is genuinely ideal for headshots. Pick any bright overcast day between roughly 10am and 2pm and your job is half done.
Do not try to mix window light with a ceiling bulb or a desk lamp. The colour temperatures will fight each other and you will end up with a yellow cheek and a blue forehead. Turn every indoor light off before you shoot.
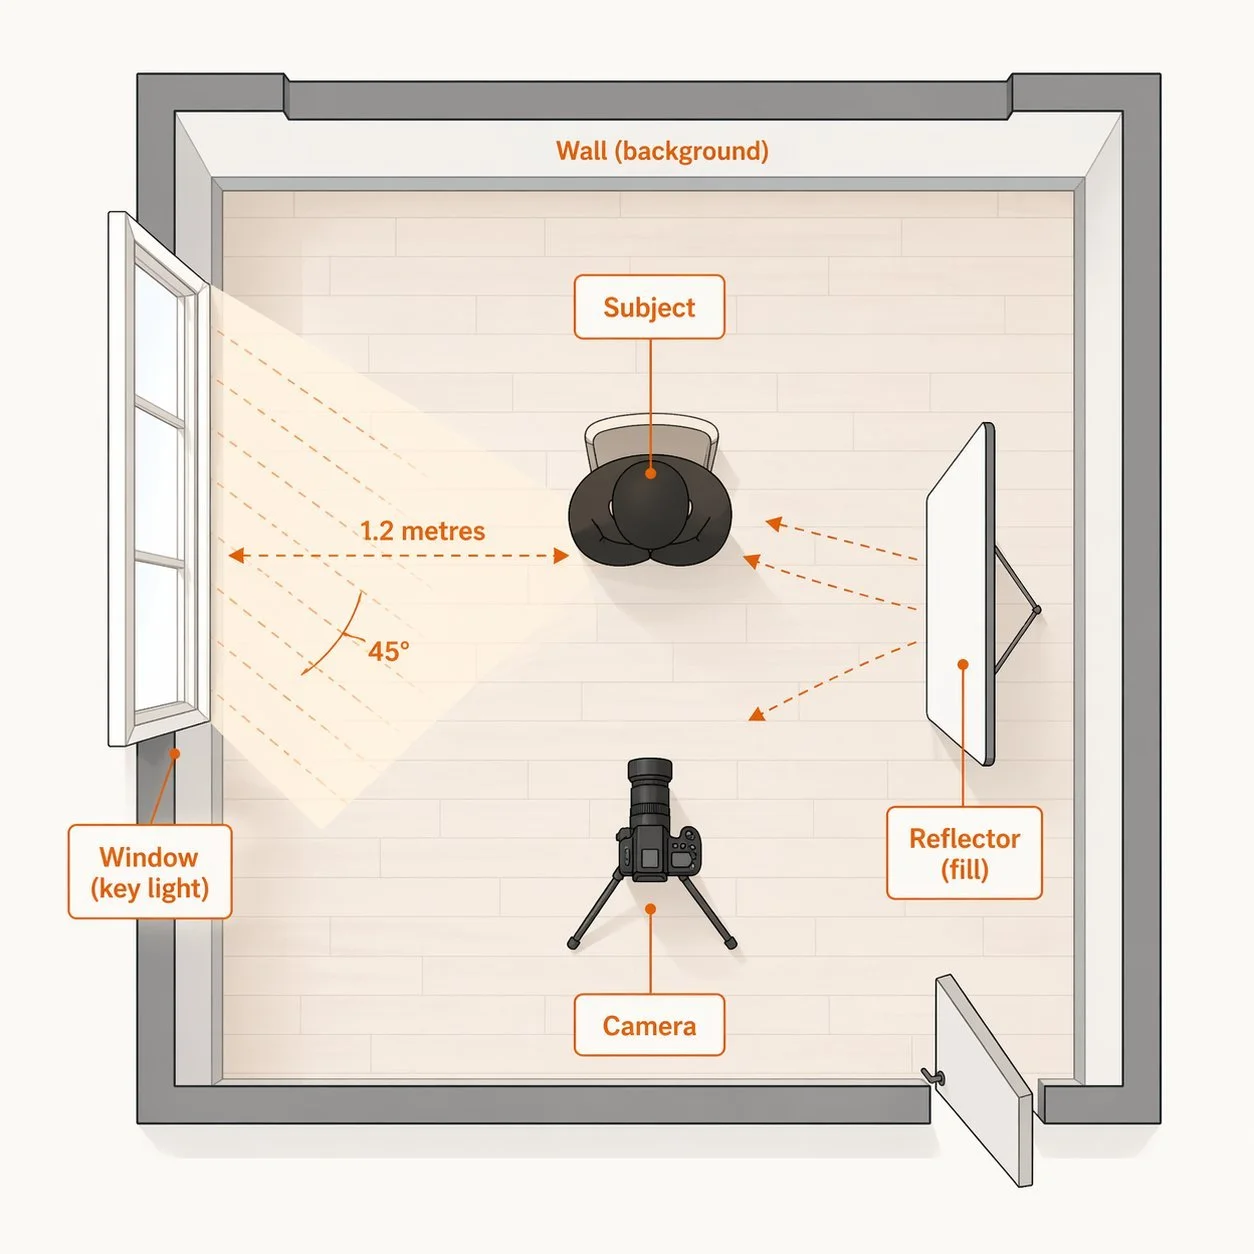
Overhead diagram showing how to set up a home headshot using window light as the key light, with a white reflector on the opposite side and a camera positioned in front of the subject
How to Position Yourself Relative to the Window
Here is the setup I teach on every workshop, because it works for almost every face:
Stand roughly three to four feet from the window, with the window to one side of you.
Turn your body so your shoulders are at about a 30-degree angle to the camera.
Turn your face a little further than your shoulders, so you are looking almost directly into the window.
The window is now your key light, lighting roughly two-thirds of your face.
On the opposite side — the shadow side — place something white to bounce light back. A foam board, a white towel pinned to a chair, even a large white pillowcase.
That is it. That single setup produces what lighting people call a loop lighting pattern — a small, soft shadow from the nose that loops down toward the corner of the mouth. It is the single most flattering pattern for ninety percent of faces.
The white surface opposite is your fill. It will not brighten the shadow side to match the lit side — that would make you look flat — but it will put enough light into the shadow to keep your eye socket from going black.
The Three Kit Tiers for Home Headshots
You do not need to buy anything. But if you want to buy a little, here is what actually helps, in order of impact per pound.
Tier 1 — £0 setup (you already own this)
Your phone or any camera that can shoot in portrait mode
A window
A white towel, pillowcase or sheet of A2 paper as a reflector
A plain wall behind you
A chair to rest your phone on (use books to raise it to eye level)
A timer on your phone to trigger the shot
This genuinely works. You will get a headshot that looks better than seventy percent of what I see on LinkedIn.
Tier 2 — £30–£50 setup
Add:
A 5-in-1 collapsible reflector (around £20). This replaces the towel and gives you five different surfaces — white for soft fill, silver for brighter fill, gold for warming, black for subtraction, and a diffuser panel.
A basic phone tripod or mini tripod (£10–£25). Gets your camera at proper eye level and keeps it rock steady for self-timer shots.
Tier 3 — £150 setup
Add:
A constant LED panel (around £70–£120). Adjustable brightness and colour temperature. Useful when you want to shoot in the evening, in winter, or on a very dull day.
A plain portable backdrop (£30–£50). A collapsible fabric backdrop in grey or warm beige means you can shoot against a clean background regardless of what your walls look like.
That is the entire sensible progression. Anything beyond Tier 3 — studio strobes, softboxes, beauty dishes — is for people who shoot headshots as a job. For your own headshot, it is genuinely overkill.
What to buy and when — the three kit tiers
A buying guide for photographers who want to upgrade their home headshot kit gradually, with the impact per pound clearly shown.
| Item | Tier | Typical Cost | What It Does | Worth Buying? |
|---|---|---|---|---|
| White towel or A2 paper | Tier 1 | Free | Bounces light into shadow side of face | Already Own |
| 5-in-1 collapsible reflector | Tier 2 | £15–£25 | Five surfaces (white, silver, gold, black, diffuser) in one | High Value |
| Phone or mini tripod | Tier 2 | £10–£25 | Eye-level framing, rock-steady self-timer shots | Essential Next |
| Constant LED panel | Tier 3 | £70–£120 | Shoot anytime regardless of weather or daylight | If Shooting Often |
| Portable fabric backdrop | Tier 3 | £30–£50 | Clean consistent background anywhere in the house | If Repeat Shoots |
| Studio strobes, softboxes | Beyond Tier 3 | £250+ | Full professional control, studio-quality light | — |
Camera Settings That Actually Matter
If you are using a phone, you can honestly skip this section. Portrait mode does the work for you. If you are using a camera with manual control, here is the short list.
Aperture: f/4 to f/5.6 for a phone or crop-sensor camera. f/2.8 to f/4 for a full-frame. You want enough depth of field to keep both eyes sharp but enough separation to blur the background.
Shutter speed: At least 1/125 of a second if you are handholding. 1/60 is fine on a tripod with a still subject.
ISO: As low as your window light allows — usually 200 to 800 indoors.
White balance: “Daylight” or “cloudy” preset. Do not leave it on Auto if you want consistent skin tones across a sequence of frames.
Focus point: The near eye. Always the near eye.
Focal length: 50mm to 85mm equivalent. Wider than 35mm distorts facial features. Phones using portrait mode simulate this — do not use the standard selfie camera, which is wide and unflattering.
Posing Yourself Without a Photographer
This is the bit most DIY headshot guides skip. Here is what actually works when you are shooting yourself.
Set your phone or camera on a tripod at your own eye level. Not chin height, not forehead height — exactly eye level. Chin height makes you look shorter and heavier. Forehead height makes you look servile.
Use a self-timer or a remote. Ten seconds gives you time to relax your face between frames. Phone apps like Camera+ and the native iOS camera both do this.
Mark a spot on the floor with a piece of tape. Stand on the mark. Check a test shot. Adjust the mark if needed.
Shoot in bursts of three to five. Your expression naturally settles on about the third frame. The first two almost always look tense.
Take a hundred frames, not ten. Storage is free. Keep shooting until you have three or four you genuinely like.
The biggest single mistake people make shooting themselves is sucking in their chin or thrusting their face forward. Neither looks good. The fix: tilt your forehead very slightly toward the camera while keeping your chin relaxed and level. It feels ridiculous. It photographs well. Try it once and you will see.
Step-by-Step: Your Home Headshot Session
How to shoot a headshot at home — 7 steps
A complete step-by-step walkthrough from room setup to final frame. Allow about 30 minutes for your first session.
1 Find your window and clear the room▼
Pick the biggest window in your home with indirect daylight. A north-facing window is ideal. Turn off every other light in the room — ceiling lights, lamps, everything. Mixed colour temperatures will ruin your skin tones.
2 Set up a clean background▼
Find a plain wall opposite the window. White, light grey or warm beige works well. Check the background is clear of radiators, plug sockets, picture frames or clutter. If your walls are busy, hang a plain bedsheet — iron it first, wrinkles show.
3 Position yourself relative to the window▼
Stand three to four feet from the window with the window to one side. Turn your shoulders at about a 30-degree angle to the camera. Turn your face a little further, so you are looking almost straight into the light.
4 Add a reflector on the shadow side▼
Place something white opposite the window to bounce light back into the shadow side of your face. A foam board, a white towel pinned to a chair, or a sheet of A2 paper all work. Keep it close — within two feet of your face — for best effect.
5 Set up your camera at eye level▼
Your phone or camera must be at your eye level — not chin height, not forehead height. Use a tripod, a stack of books, or a shelf. If using a phone, use the rear camera, not the selfie camera, and set it to portrait mode. Use the timer so you can relax between frames.
6 Shoot in bursts of three to five▼
Set the timer to 10 seconds. Take a test shot. Check the framing, focus and exposure. Then shoot at least 20 to 30 frames in short bursts, varying your expression subtly each time. Small, genuine expressions beat big forced smiles.
7 Review, edit lightly, and pick three▼
Review on a proper screen, not just the phone. Shortlist five or six. Edit lightly — brightness, contrast, gentle sharpening around the eyes. Resist heavy filters or skin smoothing. Keep the final image recognisably you. Pick your best three and use them.
Common Mistakes and How to Fix Them
Mixed colour temperatures. Overhead bulb plus window equals one yellow cheek and one blue cheek. Turn everything off except the window.
Direct overhead light. Creates raccoon-eye shadows under the brow and chin. Never shoot directly under a ceiling light.
Standing too far from the window. Light falls off fast. Three to four feet max.
Using the selfie camera. Phone selfie cameras use wide-angle lenses that distort your face. Always use the rear camera and a timer.
Background clutter. Radiators, plug sockets, a glimpse of washing up in the kitchen. Clear the background or move.
Over-editing. Heavy filters, aggressive skin smoothing, plastic-looking retouching. Recruiters spot it in a second and it reads as dishonest.
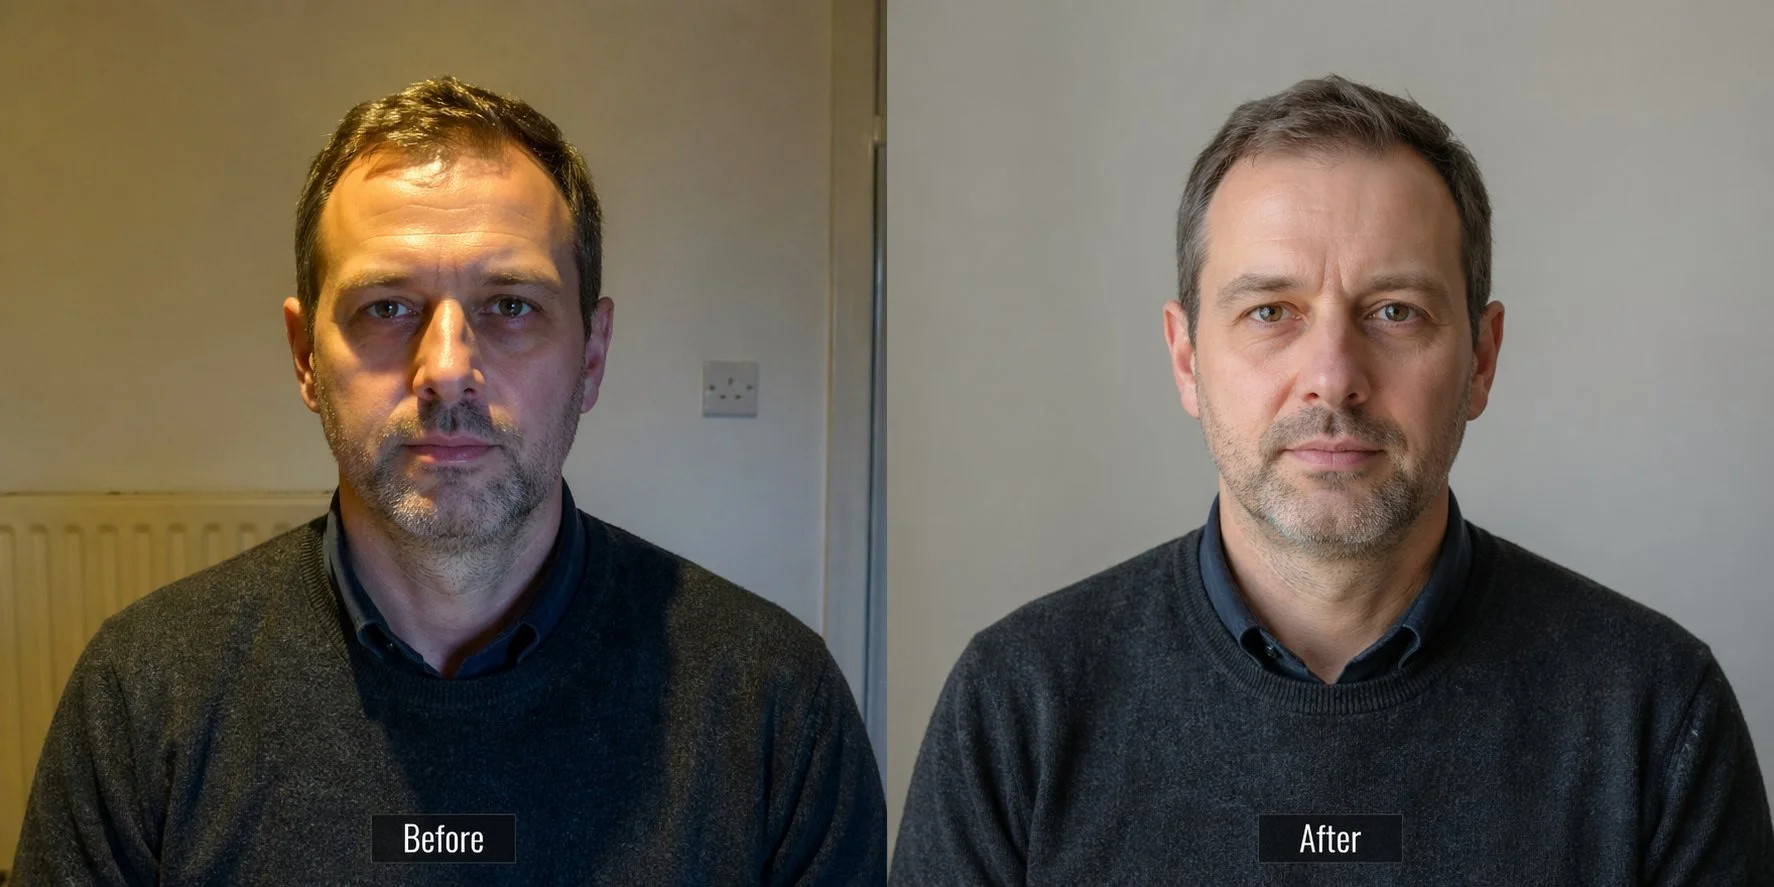
Before and after comparison showing a home headshot taken under harsh overhead lighting on the left, versus the same subject photographed with soft window light on the right
When DIY Is Not Enough — and What About AI Generators?
Honest answer: there are situations where a home headshot will not be enough, and there are AI tools promising to bridge the gap. Let me walk through both.
When to book a real photographer
You are a barrister, a senior executive, or applying for a role where appearances are part of the job
You need consistent headshots across an entire team or company
You have a tight deadline and cannot afford trial-and-error
You need multiple looks, multiple outfits, and full professional retouching in one sitting
A good UK headshot photographer costs somewhere between £150 and £400 for a solo session. If the headshot is the front door of your professional life, that is reasonable money.
What about AI headshot generators?
You will have seen the ads. Upload a few selfies, get a “professional-looking” AI headshot back for £20. Three honest problems with this approach:
Recruiters and clients can spot AI portraits. They have a distinctive flat, plastic quality and a tell-tale over-symmetry that people recognise immediately.
Many platforms now flag AI-generated profile photos. LinkedIn is already moving in this direction.
Some AI generators fabricate features — slightly different jawlines, altered eye shape, removed freckles. You end up with a photo that looks like someone else.
For a LinkedIn profile where trust matters, a real window-light photo of your actual face is worth more than any AI-generated composite. Even if it is technically less polished, it is unmistakably you. And “unmistakably you” is what headshots are meant to convey.
Watch This Video for a Visual Walkthrough
The video below, from UK photographer Gavin Hoey on the Adorama TV channel, shows the window-light approach in action in a small home studio. It covers the same principles discussed here with live demonstrations of light placement and reflector use.
Frequently Asked Questions
Frequently Asked Questions
The questions I get asked most often on workshops about shooting headshots at home, answered practically.
Can a phone really take a professional-looking headshot?▼
Yes. Modern phone cameras with portrait mode produce headshots that hold up perfectly well on LinkedIn, company websites and most professional use cases. The camera is not the limiting factor. Light, background and expression are. Get those right with a phone and you will beat most badly-lit DSLR shots you see online.
What is the best time of day for a home headshot?▼
For the UK, between 10am and 2pm on a cloudy or lightly overcast day is ideal. Direct sunlight streaming through a window creates hard shadows. Overcast British weather acts as a natural softbox and gives you soft, even light without you needing to do anything.
Which direction should my window face?▼
North-facing windows are the gold standard because they never receive direct sunlight. East, west and south-facing windows all work but need managing — either wait for the sun to move past, or diffuse the light with a white bedsheet or sheer curtain. Avoid shooting directly into a window that the sun is hitting.
Do I need a proper reflector or can I use something from the house?▼
A white towel, a large white pillowcase or a sheet of A2 white paper will do the same job as a £20 reflector for your first few shoots. If you find yourself shooting headshots regularly, a collapsible 5-in-1 reflector is a sensible upgrade because it gives you five different surfaces in one portable package.
How do I stop mixed colour temperatures ruining the photo?▼
Turn every indoor light off. Overhead bulbs, lamps, even the TV in the corner. Mixing daylight with tungsten bulbs produces a photo where one cheek looks yellow and the other looks blue, and it is almost impossible to fix cleanly in editing. Clean, single-source daylight is always the easier path.
Should I use the selfie camera on my phone?▼
No. Selfie cameras use wide-angle lenses that distort facial features — your nose looks larger, your face looks rounder. Always use the rear camera, set it on a tripod or stack of books at eye level, and trigger it with the timer or a remote. The improvement is immediate and obvious.
Are AI headshot generators a viable alternative?▼
Not for a professional profile where trust matters. AI-generated headshots have a distinctive flat, over-smooth quality that recruiters and clients increasingly recognise. Some also subtly alter your features. For a LinkedIn profile or company website, a real window-light photograph of your actual face is worth more than any AI composite.
When should I book a professional photographer instead?▼
Book a pro if you need consistent headshots for an entire team, if you are in a senior executive role where appearance is part of the job, if you have a tight deadline, or if you need multiple looks and full retouching in one sitting. Expect to pay £150 to £400 for a solo session in the UK.
Continue Learning
Continue Learning
Three related articles and one course from the Alan Ranger Photography Academy to take your portrait skills further.
Final Thought
Headshots at home are not a compromise. Done well, they beat studio portraits shot badly, and they cost nothing. The principles in this guide — soft window light, a clean background, a confident expression, eye-level framing — are the same principles that professional portrait photographers use every day in studios that cost thousands to build.
Learn to see the light in your own home. Practice once a month. Take a hundred frames. Pick three. You will never need to pay for a headshot again unless you want to.
And if you do want to step up your portrait work properly, the Alan Ranger Photography Academy beginner portrait course goes deeper into posing, lighting patterns, and studio technique.