
UK Garden Wildlife Photography: Birds, Bees, and Beyond
UK Garden Wildlife Photography: Birds, Bees, and Beyond
Table of Contents Show
The wildlife photography most people imagine — Scottish stags in autumn rut, kingfishers from a riverside hide, ospreys plunge-fishing — requires travel, expensive long lenses, and patience over multiple visits to remote locations. Most amateur photographers don't have the time, the gear, or the access. But there is a complete world of wildlife photography sitting outside almost every UK kitchen window, accessible without leaving the property, and reachable with a 70-200mm or 100-400mm zoom that many photographers already own. Garden wildlife is where most UK wildlife photographers should actually start — and where many would be better staying.
This guide is the practical companion to my broader bird photography guide (which covers wild bird photography across multiple settings) and my wildlife photography practice assignment. Both are useful foundations. This article is the layer that sits beneath them: how to make your garden — even a small urban garden with a single feeder and a 70-200mm lens — into a productive wildlife photography studio that delivers strong frames across spring, summer, and autumn.
Why your garden is the right place to start
Three reasons garden wildlife outperforms remote-location wildlife for most amateur photographers:
Repeat access. The single biggest determinant of wildlife photography success is time spent watching one location. A remote hide gives you four hours, twice a year. Your garden gives you four hours every weekend for as long as you live there. Repetition builds the kind of patient, intimate observation that one-off visits can't replicate.
Controllable infrastructure. You can position feeders where the light is good. You can place perches where the background is clean. You can move things if they're not working. Wild locations offer none of that — you take what's there or you leave with nothing.
Realistic gear. A 70-200mm zoom in a small UK garden produces results that would require a 500-600mm lens in a wild setting. The shorter focal length is enough because the subject is close. This is the wildlife photography that doesn't require a £5,000 super-telephoto and a tripod that needs its own car seat.
Across more than twenty years of teaching photography I've watched many clients return from expensive wildlife-photography weekends with a handful of mediocre frames, while the ones who set up a feeder six metres from their kitchen window and worked it patiently across a summer came back with stronger material. The difference isn't talent or equipment — it's repetition, and the garden is where repetition is genuinely possible.
The four UK garden wildlife shot types
Every productive UK garden wildlife photograph fits one of four shot types. Same Applied Learning framework I use elsewhere — pick one shot type per session, commit to it, save the others for next time.
The four UK garden wildlife shot types — pick one per session, set up for it, work it patiently for at least an hour before switching. Trying all four in one session reliably delivers nothing strong in any of them.
The four shot types peak at different times of day, demand different gear setups, and reward different approaches. The mistake most amateur garden wildlife photographers make is trying to chase all four in a single session — moving between feeder, flowerbed, and pond every fifteen minutes — and producing nothing strong in any category. Pick one. Set up for it. Work it patiently for an hour minimum. Move to the next shot type next session.
Setting up the garden as a photography studio
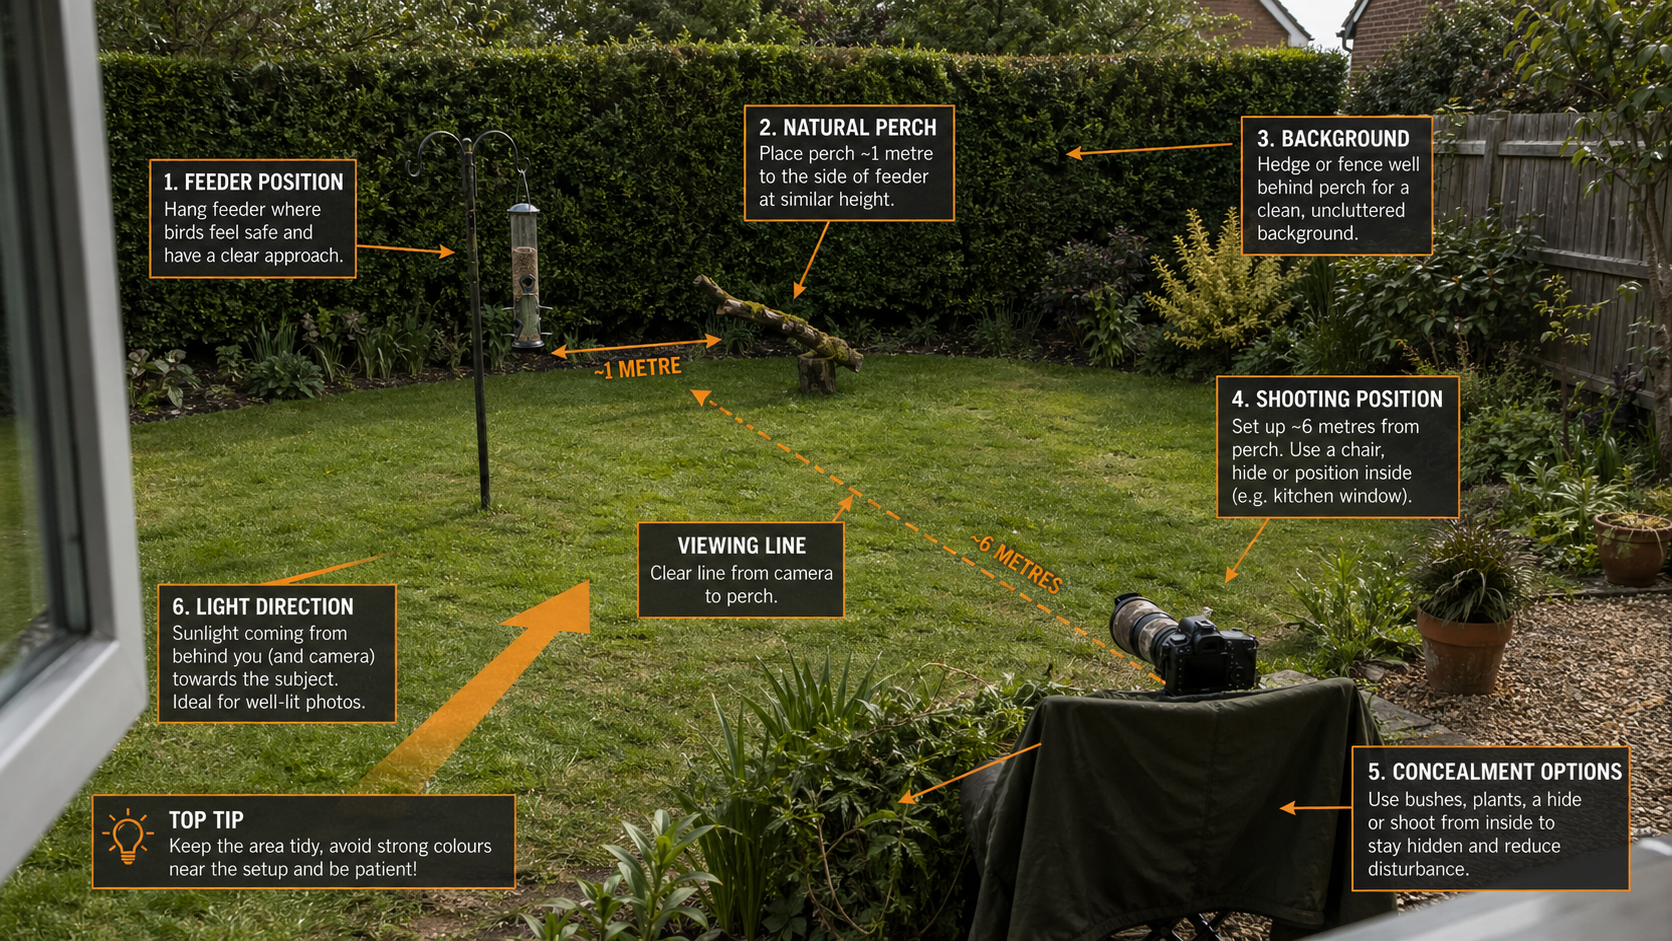
The single biggest leverage point in garden wildlife photography is infrastructure. A garden with thoughtful feeder positioning, attractive perches, and clean backgrounds will outproduce a garden with three times the food but no setup discipline. Five things to get right:
Feeder positioning. Place feeders within six metres of your shooting position (kitchen window, conservatory, garden hide, or seated chair). Closer than that and birds become wary; further and your 200mm zoom runs out of reach. Feeders need to be near vegetation cover so birds feel safe approaching, but not so deep into vegetation that the birds themselves are obscured.
Perch placement. Birds visiting feeders rarely make great photographs on the feeder itself — plastic feeders, metal cages, and wooden dowels read as artificial in the final frame. The trick used by every garden wildlife photographer is to place natural-looking perches (mossy branches, lichen-covered twigs, attractive seasonal stems) close to the feeder. Birds use these perches as staging posts before approaching the food. Block other landing options where possible — the more limited the perch options, the more reliably birds use the one you've chosen. Reposition perches to suit the changing light direction across the day.
Background management. The background is as important as the perch. Aim for clean, distant, evenly-lit backdrops that will go nicely out of focus at f/4 to f/5.6. Tree trunks, light-coloured wooden fences, busy hedge texture, and bright sky are background killers. A solid hedge five to ten metres behind the perch is usually ideal — close enough to be visible, far enough to render as smooth blur. If your only available background is poor, hang a piece of plain green or brown fabric on the fence behind the perch and the problem disappears.
Light direction. Plan around the sun. Position your feeder/perch setup so that morning sunlight hits the perch from behind your shooting position — front-lit birds with a catch-light in the eye is the standard goal. South-facing gardens produce trickier light through midday; east-facing gardens deliver the best morning conditions for bird photography. Track how the light moves across your garden through the day for a week, then position the setup for the time of day you'll mostly be shooting in. Same composition discipline as my composition rules article.
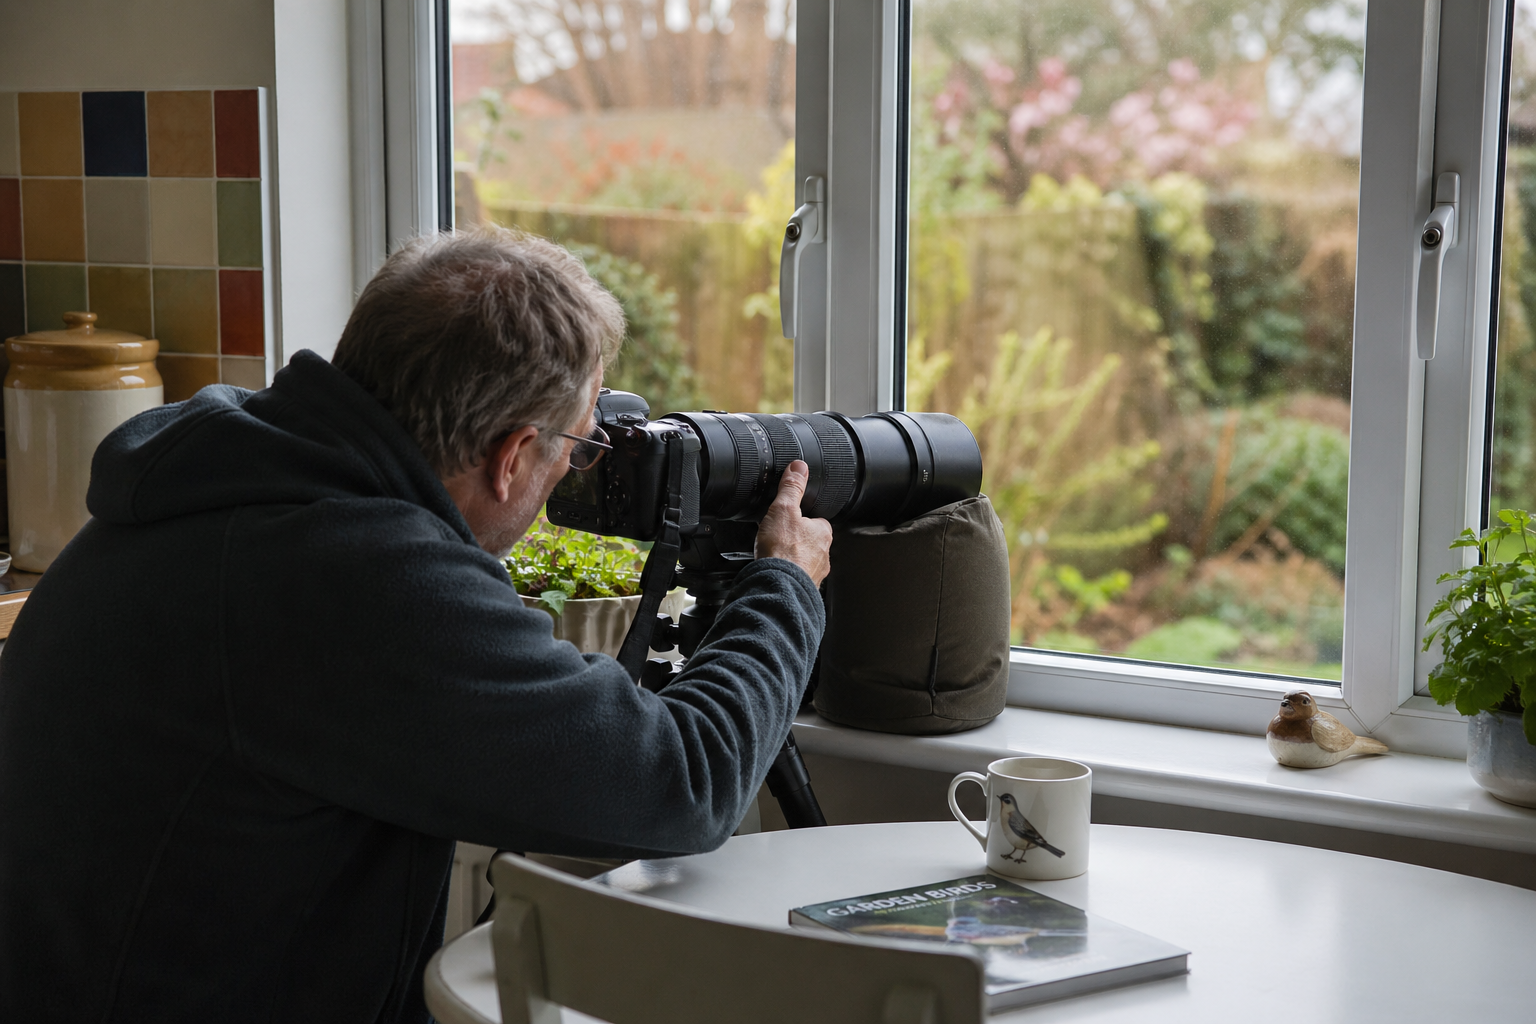
Concealment. Many garden birds tolerate a stationary photographer behind a window or seated in a chair after a few sessions of habituation. For more nervous species — sparrowhawks, jays, fledgling visits — a pop-up hide or even a camouflaged garden chair can transform what's possible. Don't underestimate how quickly birds learn to ignore a static photographer who returns to the same spot at the same time every day.
Time-of-day framework
The four UK garden wildlife shot types peak at different times. Knowing which species are active when lets you plan productive 60-90 minute sessions rather than randomly hoping something turns up:
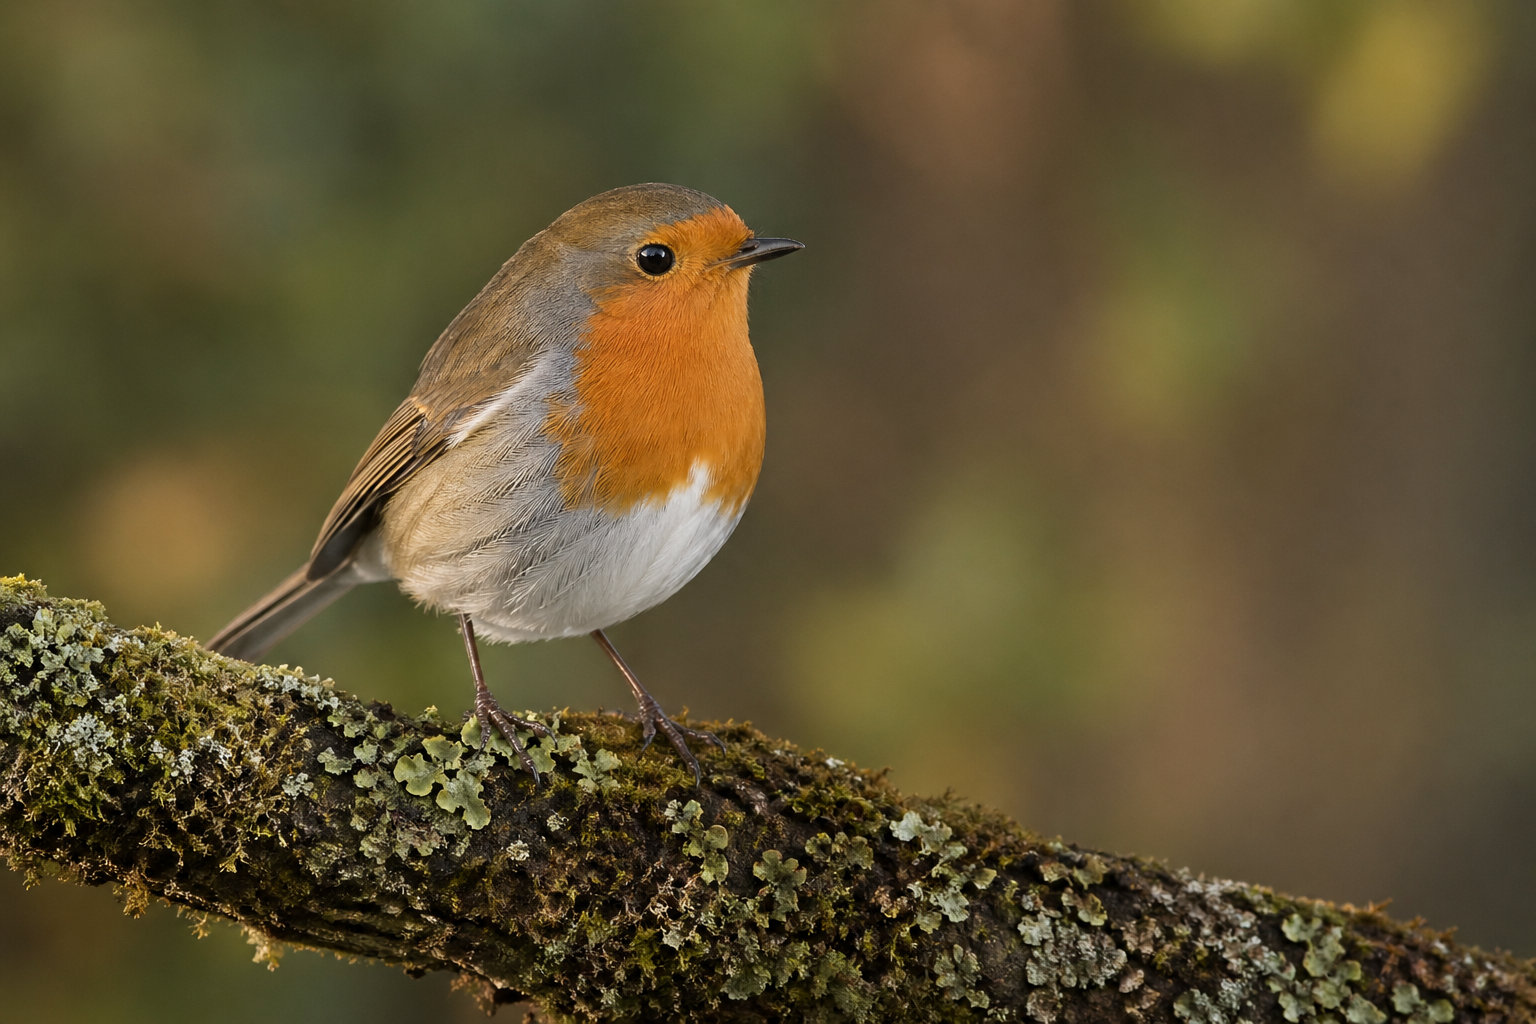
First hour after dawn (around 5am-7am in May/June). Bird photography prime time. Early-morning feeding is the most reliable activity window of the day, particularly for songbirds. Light is low, directional, and warm. Robins, blue tits, great tits, sparrows, dunnocks, blackbirds, song thrushes — all most photographable in this window.
Mid-morning to early afternoon (10am-2pm). Pollinator prime time. Bees, butterflies, hoverflies, and other insects are most active when temperatures are highest and flowers are most open. Macro work on the 90mm or 100mm macro lens — see my macro photography guide and macro for beginners for the underlying technique. Light is harsher than morning, so work the shaded edges of borders rather than direct-sun centres.
Late afternoon (4pm-6pm). Second songbird window — pre-roost feeding before dusk. Less productive than the dawn hour but useful if you can't make 5am. Pond life (dragonflies, damselflies) is also still active in this window through summer.
Dusk and last light (8pm-10pm in summer). Small-mammal window. Hedgehogs emerge after dark in summer; foxes are most visible at dusk and dawn; bats begin emerging from their roosts. Photography is challenging at low light levels — high ISO, fast lenses, sometimes flash needed — but the species are uniquely accessible at this time and almost no other wildlife photography requires only stepping into your back garden.
Working the 70-200mm or 100-400mm
The lens question dominates wildlife photography forums, and the answer for garden work is far more forgiving than for wild-location work. Most UK gardens are small enough that the gap between a 200mm zoom and a 500mm super-telephoto is much narrower than people assume.
What each lens actually delivers in a UK garden — starting points, not absolute rules. Most UK gardens are small enough that the gap between a 200mm zoom and a 500mm super-telephoto is much narrower than wildlife forums suggest.
Get closer rather than zoom longer — reducing distance to subject delivers more image quality than increasing focal length.
Three lens-related principles worth internalising:
Get closer rather than zoom longer. The single biggest improvement in image quality comes from reducing the distance between camera and subject, not from increasing focal length. Move the perch closer if possible, work from a position closer to the feeder, set up a hide nearer to the action — all of these beat upgrading to a longer lens.
Crop in post is not the enemy. Modern 24-45 megapixel sensors give enough resolution that a sensible crop from a 200mm frame produces print-quality output. Don't avoid the crop; plan for it. Frame slightly wider than you'd think you need, and crop in editing for the strongest composition.
Aperture choice matters more than focal length choice. An f/4 zoom at 200mm with the right perch placement will outperform a darker f/6.3 super-telephoto every time in a small garden. Wide apertures separate subject from background; depth-of-field is your real creative control.
The garden wildlife shoot workflow
The practical rhythm that turns garden setup infrastructure into consistent keepers. Six steps from prep to editing.
Spring and summer UK garden wildlife calendar
Different species peak in different months across the UK garden wildlife year. Knowing what's available when lets you plan target sessions rather than waiting for whatever shows up. Headline species through the productive months:
April. Spring nest-building begins in earnest — blue tits, great tits, robins, blackbirds collecting nesting material. Frogspawn in ponds (March-April peak). Early bumblebee queens emerging on warm days. First butterflies of the year (peacocks, small tortoiseshells, brimstones).
May. Peak nest-feeding — adults shuttling food to chicks, regular feeder visits with insects in their beaks. Tadpoles in ponds. Damselflies and early dragonflies emerging. Bee diversity at peak — honeybees, bumblebees, solitary bees all active.
June. Fledglings appear at feeders — young blue tits, robins, sparrows learning the landscape, often photographing better than adults because they're less wary. Dragonfly peak begins — emperor dragonflies, common darters, broad-bodied chasers. Butterfly diversity rising — meadow browns, gatekeepers, ringlets.
July. Butterfly peak (peacocks, red admirals, painted ladies on buddleia). Hoverflies abundant. Garden insects at maximum diversity. First broods of fledglings still visible alongside adults preparing for second broods. Hedgehog activity peaking — warm summer dusks are prime hedgehog photography window.
August. Garden butterfly peak continues. Late dragonfly diversity (migrant hawkers, common darters). Foxes with cubs visible at dawn/dusk. Late summer fledglings and second-brood activity. Long warm evenings extend the dusk small-mammal window.
September. Last warm-month activity — late butterflies (red admirals can persist into October on warm days), dragonflies declining but still present, garden birds returning to feeders as natural food becomes scarcer. Worth photographing through to first frosts.
Common garden wildlife photography mistakes
Trying to photograph all four shot types in one session. Pick one per session — feeder/birds, pollinator, pond, or small mammals. Working all four delivers nothing strong in any of them.
Photographing birds on the feeder rather than on natural perches. Plastic feeders read as artificial in the final frame. Place attractive perches near the feeder; the birds will use them as staging posts.
Ignoring the background. Cluttered tree-trunk backgrounds, busy hedge texture, and bright sky behind subjects ruin otherwise strong frames. The background deserves as much consideration as the perch — sometimes more.
Using a feeder that's too close to dense cover or too exposed. Birds need to feel safe — close to escape cover but not buried in it. Six to eight metres from a hedge or shrub is usually right.
Shooting through dirty glass. Window photography is genuinely viable, but the glass must be properly clean, you must shoot perpendicular to it (not at an angle), and you should turn off interior lights to avoid reflections. A dirty window costs you sharpness in a way no lens upgrade fixes.
Buying a 600mm lens before mastering a 200mm. The biggest gains in garden wildlife photography come from setup discipline, not focal length. A photographer who can compose, manage backgrounds, and work patiently with a 200mm produces stronger work than one with three lenses and no setup process.
Forgetting that ethical practice matters. Don't bait wild birds in ways that endanger them, don't stress nesting birds for photographs, don't disturb hedgehogs at the cost of their welfare. Garden wildlife photography is most rewarding when the wildlife genuinely thrives in your space — the photography becomes a side-effect of the conservation rather than a competing goal.
A UK wildlife photographer at work
The video below — "Wildlife Photography for Beginners: 5 Tips" by Paul Miguel on the Paul Miguel Photography channel — covers fundamentals (background, perches, light, patience, ethics) that translate directly to garden setups. Paul is a West Yorkshire-based professional wildlife photographer with over 20 years of experience and his channel bio explicitly mentions "loving everything from local garden wildlife to the wild landscapes of Iceland." About 12 minutes and a strong starting framework before your first serious garden session.
Garden wildlife photography FAQ
Key takeaways
Garden wildlife is where most UK wildlife photographers should actually start — repeat access, controllable infrastructure, realistic gear requirements.
Pick one of the four shot types per session — feeder/bird, pollinator, pond, or small mammal/fledgling. Trying all four delivers nothing strong in any of them.
Setup is the biggest leverage point — feeder positioning, natural perches, background management, light direction, concealment.
Time-of-day framework matters — dawn for songbirds, midday for pollinators, dusk for hedgehogs and foxes.
A 70-200mm zoom is enough in most UK gardens — closer subjects beat longer focal lengths every time.
Crop in post is not the enemy — frame wider than you need and crop for composition.
Plan around the spring/summer calendar — different species peak in different weeks across April through September.
Ethical practice matters — the wildlife photography is a side-effect of habitat improvement, not a competing goal.
Continue learning
Conclusion and summary
UK garden wildlife photography rewards setup infrastructure more than gear, repetition more than location-hopping, and patience more than focal length. The technical floor is genuinely accessible — a 70-200mm zoom in a small UK garden, six metres from a thoughtfully-placed feeder with attractive perches and a clean background, will produce frames that would require a £5,000 super-telephoto and a multi-day trip to a wild location to match. The four-shot-type framework — feeder/bird, pollinator, pond, small mammal — gives you a year-round practice across the spring and summer UK calendar, and the discipline of working one shot type per session at a time produces stronger results than trying to chase everything that moves.
The framework to internalise: setup first, gear second. Position feeders for light and proximity. Place natural perches near them. Manage backgrounds actively. Plan sessions around time-of-day windows for the species you want — dawn for songbirds, midday for pollinators, dusk for small mammals. Work one shot type per session and commit to it for an hour minimum before changing. Get closer rather than buying longer. Crop in post when needed. Watch the calendar and target species through their peak weeks. None of this requires expensive equipment; all of it requires the willingness to set up a garden as a deliberate photography studio rather than just a place where wildlife happens.
If you'd like to develop garden wildlife photography under structured guidance, my private photography lessons are the natural fit — garden wildlife is genuinely teachable in your own garden with your own setup, and a one-on-one session can transform your specific space into a productive photography studio in a way no general advice can. For broader hands-on garden photography (flowers, formal gardens, ornamental planting alongside wildlife) my garden photography workshops cover the wider craft. Across more than twenty years of teaching photography, the photographers I've watched improve fastest with garden wildlife are the ones who set up their space deliberately, kept showing up at the same time each week, and worked one shot type properly rather than chasing everything at once. The framework above is the starting point. The garden is the studio. The repetition is the practice.