
UK Waterfall Photography: A Complete Field Guide 2026
Table of Contents Show
UK Waterfall Photography: A Complete Field Guide 2026
The UK has more accessible waterfalls per square mile than almost anywhere else in Europe — Wales alone has Pistyll Rhaeadr at 240 feet, the cascading slot of the Fairy Glen, and dozens of moss-bound cascades hidden in Snowdonia's gorges; the Lake District has Aira Force, Stock Ghyll Force and Scale Force; the Yorkshire Dales have Aysgarth, Hardraw and Janet's Foss; the Peak has Three Shires Head and Padley Gorge. The combination of high rainfall, ancient geology, and reliable overcast diffused light makes the UK an exceptional training ground for waterfall photography. What separates the holiday-snap waterfall from a print-wall photograph isn't the camera or even the shutter speed — it's three earlier decisions: when to go, what shot type to commit to, and which filter actually matters most. Spoiler: it's the polariser, not the ND.
This guide is the intermediate decision layer for UK waterfall work — the companion to my beginner long-exposure how-to (which covers the technical foundation), my ND filter usage article, and the intentional blur practice assignment. Read those for the technique. This article is about the decisions you make on the day: which conditions to chase, which of the four waterfall shot types to pursue, and how the polariser-led workflow turns a flat documentary frame into a print.
Why UK waterfalls reward intermediate technique
Waterfalls are forgiving subjects on the surface — point a tripod, slow the shutter, take the picture. They're also among the easiest subjects to photograph poorly, because the obvious approach (slow shutter, generic composition) is the same thing every visitor with a phone produces. The intermediate move is to read the waterfall as a system: how the rainfall is filling it that week, how the light is hitting the rock face, where the polariser angle removes glare from the wet stones, which of the four canonical shot types this particular waterfall actually wants.
UK waterfalls specifically offer two advantages that don't exist elsewhere. The first is reliable diffused overcast light most of the year — waterfalls hate direct sun (it produces ugly hot spots on white water and blown highlights), and the UK delivers soft even light by default. The second is enormous variation in flow: the same waterfall after three days of rain is a different photograph from the same waterfall in a dry August. Reading flow is to UK waterfall photography what reading tide is to seascape work.
When to go: rainfall, season, and access
Flow rate is the first decision of waterfall photography, the way tide state is the first decision of seascape photography. Three rules for UK waterfalls:
Two to three days after sustained rain is the sweet spot. Heavy rain plus immediate visit equals brown water, debris, and over-full cascades that lose detail. Two to three days of drainage gives you peak clean flow with good detail in the white water.
Spring and autumn beat summer and winter. Spring delivers strong flow from snowmelt and the start of growing-season green moss. Autumn delivers warm foliage colour against white water — the most photographed and most photogenic combination. Summer often has thin flow and harsh light when sun does break through. Winter can deliver iconic ice formations but access becomes treacherous.
Overcast bright is the gold-standard light. Direct sun on a waterfall produces blown highlights on white water and unmanageable contrast. Light overcast (the kind of grey day where shadows are soft but the scene isn't gloomy) is the friendliest condition. Heavy overcast also works but adds a colour cast you'll need to correct in post.
Access matters too. Most major UK waterfalls are on public footpaths or accessible National Trust / National Park land, but a few sit on private land with permitted access, and a handful require permission. Always check before you go; respect signage. The Countryside Code applies — leave no trace, no leaving the marked path to scramble for a "better" angle if it damages vegetation, and no flying drones in National Parks without authorisation.
UK waterfall conditions matrix — what each combination of rainfall and light gives you. Plan your visit around the row that matches what you actually want, not the day that happens to be free.
The four waterfall shot types
Every strong waterfall photograph fits one of four shot types. Like the seascape framework, the decision of which one to pursue is made before you leave the car — it drives lens choice, filter strategy, tripod position, and what counts as a keeper. The most common mistake is trying all four in one visit and committing to none.
The full-fall classic. Wide composition showing the entire waterfall — top to bottom — anchored by foreground rock, foliage or stream. Wide-angle lens, polariser plus 6-stop ND, exposure 1 to 4 seconds. The "this is what the waterfall looks like" shot. The hardest to make distinctive because everyone shoots it.
The intimate cascade detail. Telephoto crop on a single section — a curtain of water over a specific rock, a green moss-lined chute, a single ribbon of cascade. Mid-telephoto (70–200mm), polariser, no ND or 3-stop ND, exposure 1/4 to 1 second. The shot type that produces the most prints because nobody else has that exact frame.
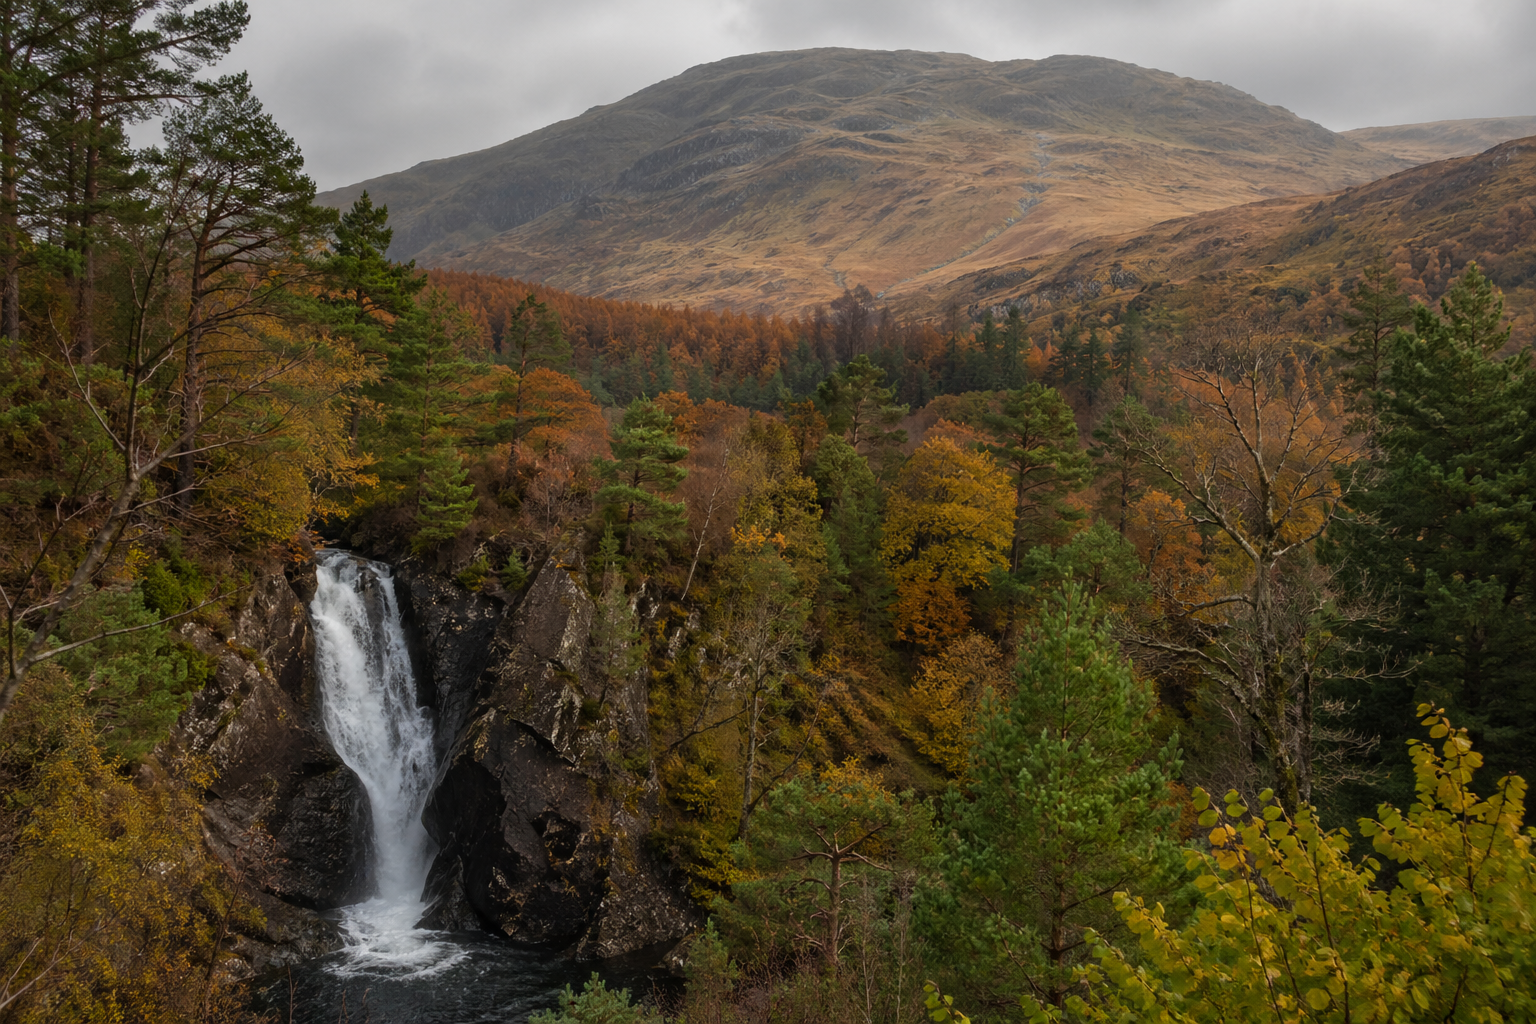
The environmental wide. Waterfall as one element in a wider landscape — gorge surround, autumn forest context, mountain backdrop. Standard zoom or wide, polariser plus mid ND if needed, exposure 1/2 to 2 seconds. Tells the story of where the waterfall sits, not just the waterfall itself. Underused and powerful.
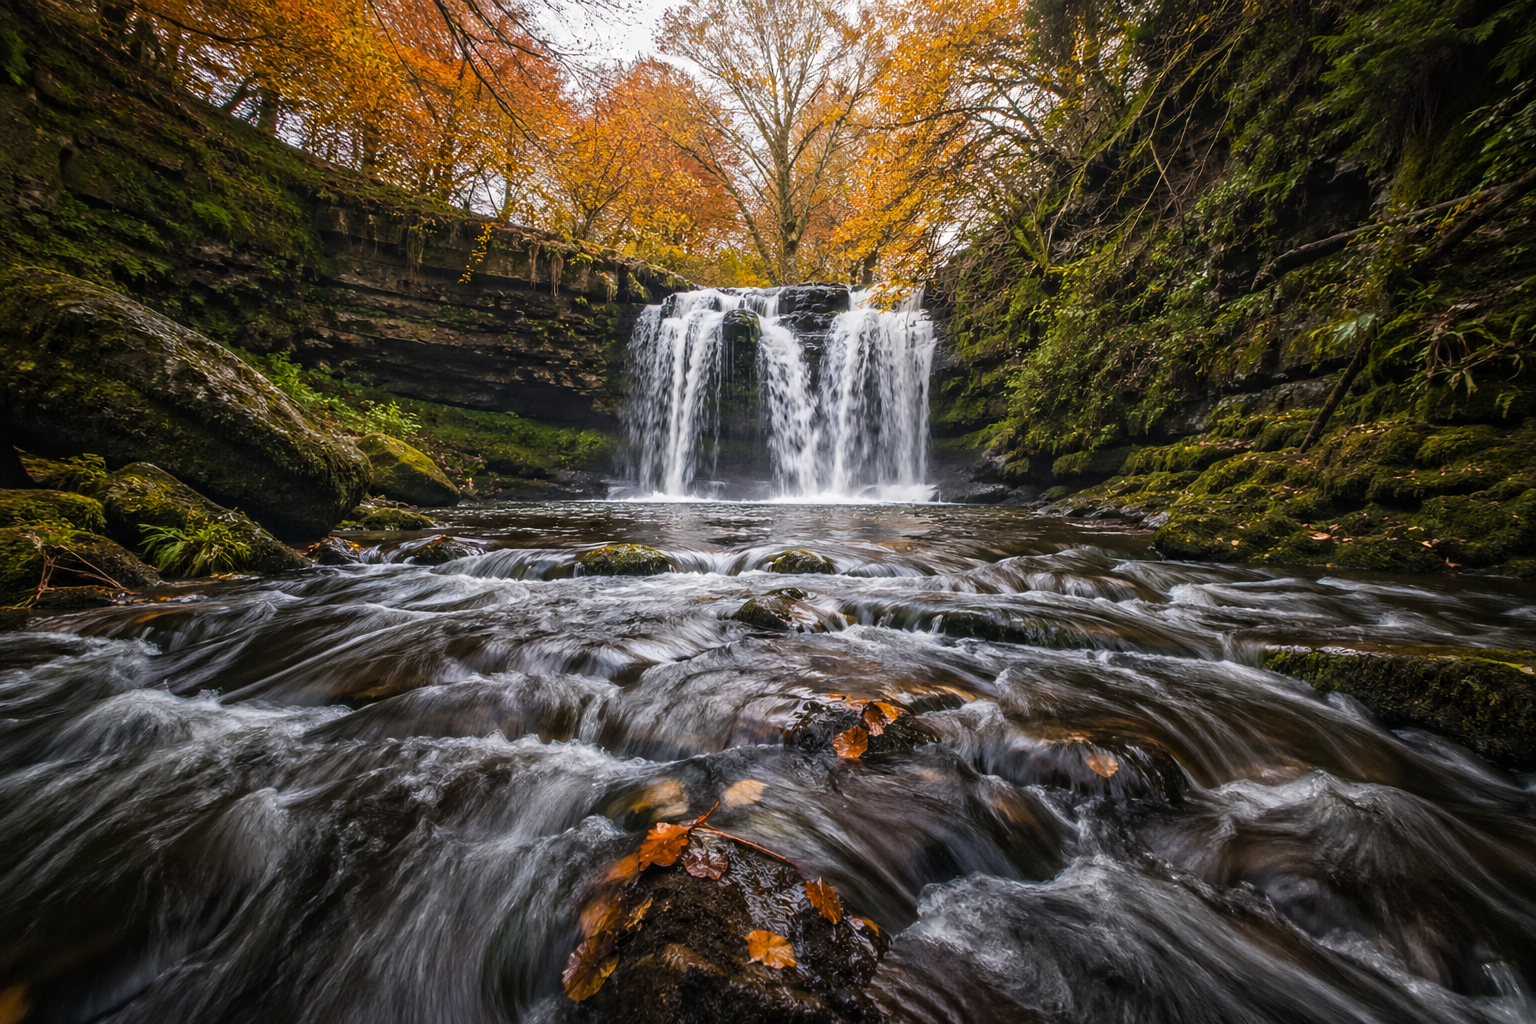
The layered foreground stream. Camera low and close to flowing water below the waterfall, waterfall in mid-ground, sky or canopy as background. Wide-angle, polariser, often focus-stacked for front-to-back sharpness, exposure 1 to 2 seconds. The most graphically dynamic shot type — leading lines from the foreground stream pull the eye into the waterfall behind. Worth practising even when small waterfalls are the only option.
Waterfall settings by shot type — starting points, not absolute rules. Bracket around these values for the specific scene, but use them to make the lens, filter and shutter decision before you leave the car.
Why the polariser matters more than the ND
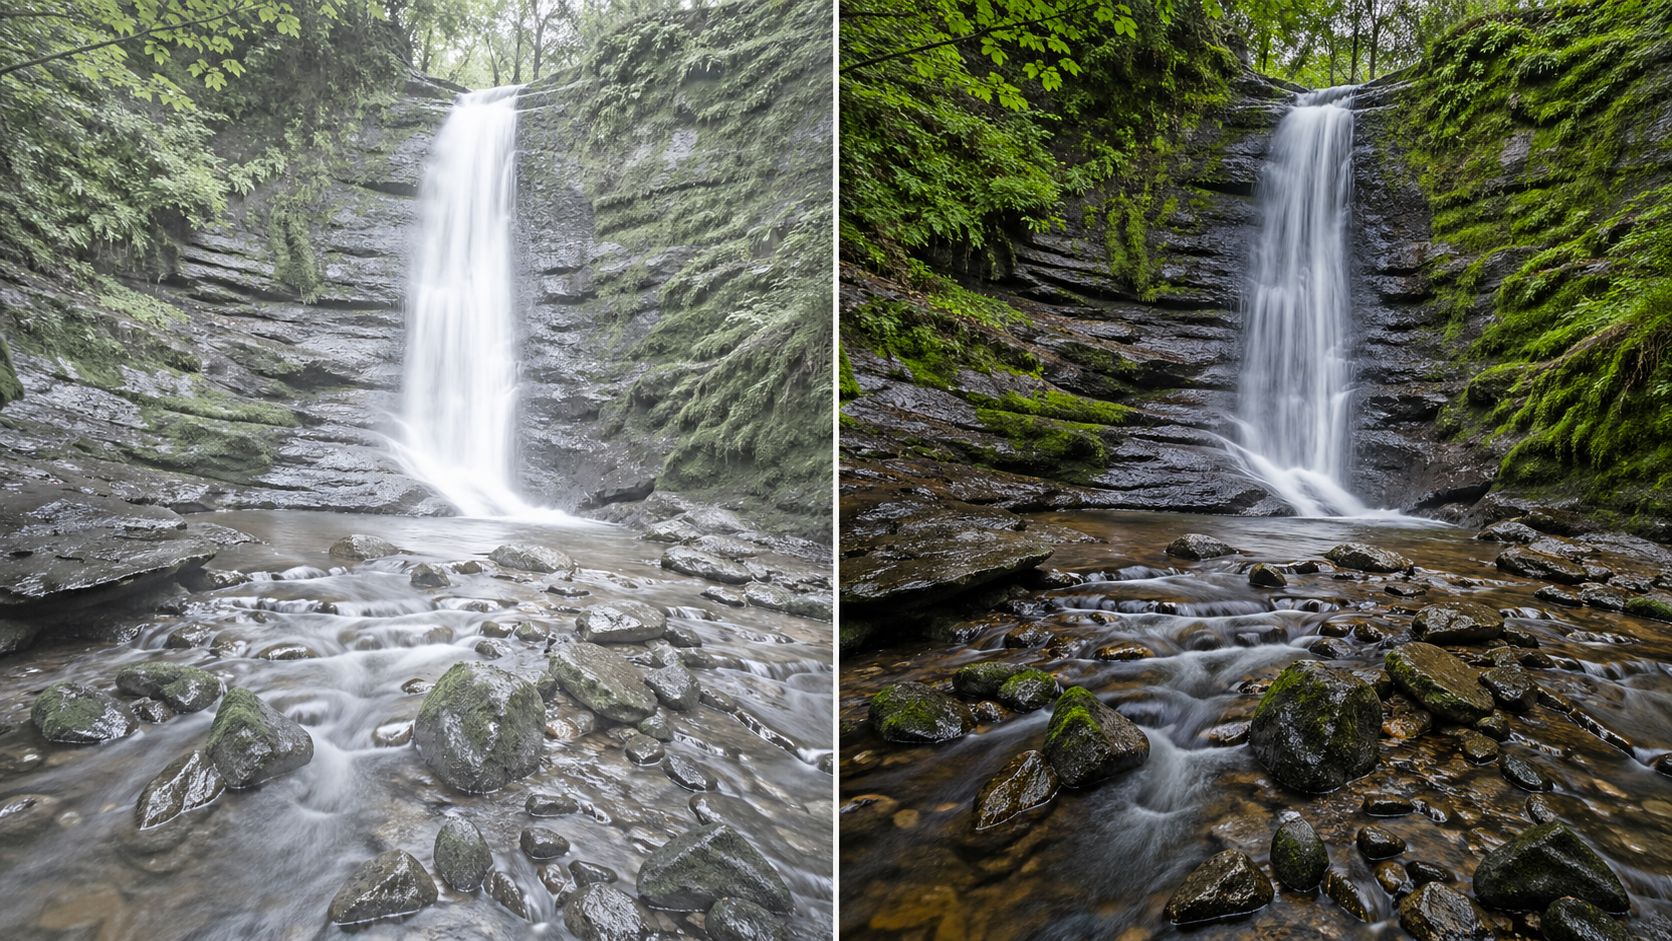
The internet's default waterfall advice — "use a 10-stop ND for that silky water look" — is wrong for UK conditions about 80% of the time. The polariser is the more important filter for waterfalls, not the ND. Three reasons:
The polariser cuts glare off wet rock. Wet sandstone, slate, granite and limestone all reflect highlights from any sky brightness, even on overcast days. Without a polariser, the rock around the waterfall reads grey-silver-washed-out. With a polariser rotated correctly, the rock saturates back to its natural colour, the water gains depth, and contrast lifts.
The polariser saturates surrounding greens. UK waterfall settings are usually green — moss, ferns, leaves, lichen. A polariser deepens and saturates those greens dramatically. The colour difference between with/without polariser on a Padley Gorge or Fairy Glen frame is more than any post-processing can recover.
The polariser provides 1.5–2 stops of light reduction by itself. Often that's enough to push your shutter into the 1/2 to 2-second silky-water range without needing an ND at all. In overcast UK light, polariser-only is the most common waterfall setup.
The ND filter is still useful — for full-fall classic shots in brighter light, or to push exposure to 4+ seconds for the most extreme silky look — but it's a secondary tool. For the underlying filter mechanics see my Kase filters article for my current system. The polariser-led approach: fit the polariser first, rotate to find the angle that maximises rock saturation and minimises water glare, then add ND only if you still need more shutter time.
The waterfall shoot workflow
UK waterfall photography rewards process discipline. The workflow below is built around polariser-first filter use, deliberate shot-type commitment, and proper safety in often-slippery gorge conditions. A solid tripod with low-angle capability is non-negotiable for the layered foreground-stream shot type, and useful for everything else.
See a UK waterfall photographer at work
The video below — "How to take a Long Exposure B&W photo (inc. editing and printing)" by Nigel Danson on the Nigel Danson channel — is filmed on location at an iconic waterfall in Glencoe, Scottish Highlands. Nigel is a UK Nikon ambassador based in the Peak District and one of the most-watched UK landscape educators on YouTube. The video covers shooting decisions in the field, the conversion to black and white, and the print workflow at the end — about 14 minutes and worth every one of them before your next waterfall trip.
UK waterfall location framework
Five UK regions deliver the bulk of strong waterfall photography opportunities. Each has its own character, its own shot-type strengths, and its own safety profile.
North Wales — Snowdonia and the Conwy Valley. Pistyll Rhaeadr (240 feet, the tallest single drop in Wales), Aber Falls, Swallow Falls, and the slot-cascade gem of Fairy Glen at Betws-y-Coed. Best for full-fall classic and intimate cascade detail. I run Pistyll Rhaeadr workshops and Fairy Glen long-exposure workshops in this region. See also my Snowdonia landscape photography piece for the wider context.
The Lake District. Aira Force, Stock Ghyll Force, Scale Force, Skelwith Force, Lodore Falls. Mostly accessible cascade-style waterfalls with strong autumn potential. Layered foreground-stream shots particularly strong here. My Lake District workshop runs in all four seasons; see also my Lake District photography deep-dive.
Yorkshire Dales. Aysgarth Falls (three-tier classic), Hardraw Force (England's tallest single-drop unbroken waterfall), Janet's Foss (mossy enclosure). Best for environmental wide compositions and intimate cascade detail.
Peak District. Three Shires Head, Padley Gorge cascades, Lumsdale Falls. Smaller-scale photography — the layered foreground-stream shot type dominates. Padley Gorge is exceptional for autumn.
Scottish Highlands. Glencoe waterfalls, Falls of Falloch, Falls of Bruar, Eas a' Chual Aluinn (Britain's tallest at 658 feet, but remote). The most dramatic UK waterfalls and the hardest-to-reach.
Common waterfall mistakes
One shutter speed for everything. A 4-second exposure flattens water into featureless white. A 1/2-second exposure preserves visible water structure and reads more dynamic. Bracket shutter speeds (1/4s, 1s, 4s) before picking a final frame — most keepers come from the middle range.
Skipping the polariser. Already covered, but worth repeating. The polariser is the most important filter for UK waterfall work, not the ND.
Direct sun on the waterfall. Blown highlights on white water are unrecoverable. If sun is on the falls, either wait for cloud cover, shoot a different waterfall facing a different aspect, or come back another day. Direct sun on a waterfall is a failed shoot 90% of the time.
Standing too far back. Most amateur waterfall frames are made from the standard tourist viewpoint with a standard zoom at 35mm. Move closer, get lower, use a polariser, change the relationship between foreground stream and waterfall. The strongest waterfall photographs are usually made from positions other people don't bother walking to.
Ignoring the surround. The waterfall isn't the only element in the frame. Wet rock, moss, ferns, foliage, sky, surrounding gorge geometry — all carry weight. Frames where the surround is intentional read as photographs; frames where the surround is incidental read as snaps.
Forgetting lens cloth and rocket blower. Spray off any moving water lands on your front element within minutes. Without a microfibre and a rocket blower in your jacket pocket, every frame after the first ten is a soft-spotted mess.
UK waterfall safety and access
UK waterfalls produce a small but predictable number of injuries and the occasional fatality each year. Almost every incident traces to one of three causes:
Wet rock. Mossy, lichen-covered or wet sandstone is as slippery as wet ice. Boots with a moulded rubber compound (Vibram Megagrip or equivalent), walking poles, and the discipline to test every step before weighting it. The bottom of every UK waterfall has a wet zone — assume the perimeter is slippery even where it looks dry.
Flash flood after upstream rain. Steep-sided gorges (Fairy Glen, Padley Gorge, Lumsdale, Three Shires Head) can rise from ankle-deep to chest-deep in 20 minutes after heavy upstream rain you can't see from where you're standing. Check the weather forecast for the entire upstream catchment, not just your immediate location, and never set up below an undercut bank or in a confined slot during unstable weather.
Public footpath vs private land. Most major UK waterfalls have established public access, but a few sit on permitted-access private land where signage matters. Never cross fences. Never enter "no public access" areas for a "better angle". Photographs are not worth a trespass complaint or a damaged relationship between local landowners and visiting photographers.
If you're new to UK waterfall photography, working with a guide who knows the safe ground compresses several years of trial and error into one weekend. My Pistyll Rhaeadr workshops, Fairy Glen long-exposure workshops, and Lake District workshops all include the access decisions and safety calls that you're otherwise learning alone, in groups of four to six photographers.
UK waterfall photography FAQ
Key takeaways
Flow is the first decision, not shutter speed. Two to three days after sustained rain is the sweet spot for most UK waterfalls.
Pick one of the four shot types per visit — full-fall classic, intimate cascade detail, environmental wide, or layered foreground-stream. Trying all four gets you none.
Polariser before ND. The polariser is the most important filter for waterfall work — cuts wet-rock glare, saturates greens, often provides enough light reduction by itself.
Bracket shutter speeds — 1/4s, 1s, 4s. The keeper is usually in the middle range, not the extreme.
Avoid direct sun on the falls. Overcast bright is the gold-standard UK waterfall light.
Wet rock kills — moulded rubber boots, walking poles, test every step. No photograph is worth a broken ankle in a remote gorge.
The strongest frames are usually made from positions other people don't walk to — closer, lower, with the polariser engaged.
Continue learning
Conclusion and summary
UK waterfall photography rewards intermediate technique and process discipline more than equipment or extreme conditions. The country's combination of high rainfall, ancient gorges, reliable diffused overcast light, and accessible public footpath networks makes it one of the best waterfall training grounds in Europe. The photographers who come home with prints they're proud of are the ones who check the rainfall the week before, time their visit to the two-to-three-day post-rain sweet spot, commit to one of the four shot types before they arrive, fit the polariser first and the ND only if needed, and bracket shutter speeds rather than committing to a single exposure length. The keeper is rarely the four-second silky-flat frame; it's almost always the middle shutter range that preserves visible water structure.
The framework to internalise: flow first, shot type second, polariser-first filter use, bracket shutter speeds, respect the surround. Four shot types cover the genre — full-fall classic, intimate cascade detail, environmental wide, and layered foreground-stream. The polariser matters more than the ND for UK conditions. Safety comes before photography, especially in slippery gorges and during unstable weather where flash floods are a genuine risk. Five UK regions (North Wales, Lake District, Yorkshire Dales, Peak District, Scottish Highlands) deliver the bulk of strong waterfall opportunities — your nearest one is almost always better than a four-hour drive to a "famous" location, because you can return in different rainfall and seasons until you've fully read it.
If you'd rather learn this framework on actual UK waterfalls with a guide who knows the safe ground and the polariser angles, my Pistyll Rhaeadr Welsh waterfall workshops, Fairy Glen long-exposure workshops, and Lake District workshops all include the field decisions and safety calls that you're otherwise learning alone. Groups stay small (four to six photographers), and the polariser-first approach is taught on location where it sticks. For everything else, your nearest UK waterfall, three days after the next sustained rain, with a polariser and the four-shot-type framework above, is more than enough to come home with frames you'll actually want to print.