
Guide to Transferring Photos from an iPhone to a Windows PC
Table of Contents Show
Guest post disclaimer
This article was contributed by an external author and reviewed by Alan Ranger Photography before publication
In my guide to a photo editing workflow for beginner photographers, I discussed importing and organising captured material as a key stage in the subsequent processing of RAW negatives. However, this is important not only when working with client photographs, but also with personal and family pictures taken on an iPhone.
This article brings together all the available ways to transfer photos from an iPhone to a Windows computer. In addition, I will show you a tool that can genuinely simplify the process of organising family photographs.
Why Is It Important to Transfer Photos from an iPhone to a Computer?
Photos taken on a phone are, above all, moments from our lives that we want to preserve forever. They are not simply images from the past, but memories, emotions and feelings, and losing them can feel like losing part of our personal history. That is why it is important not to keep them only on a smartphone, but to transfer them to a computer regularly.
Here are the main reasons why this is so important:
- Protection against loss. An iPhone can be lost, stolen, hacked or simply stop working. In such situations, photos stored only on the device may be lost permanently.
- Freeing up device storage. Photos and videos quickly take up gigabytes of space. Transferring them to a computer helps prevent the storage from becoming full and causing problems with the phone's operation.
- Creating a backup. Keeping copies of photos on a computer or external drive reduces the risk of data loss caused by an iCloud failure or accidental deletion.
- Convenient long-term storage. It is easier to organise an archive on a computer by arranging photos into folders, years, events or projects without being limited by the iOS structure.
- More convenient processing and editing. A PC provides access to a wider range of photo-processing software than a smartphone.
- Less dependence on cloud services. Storing photos only in iCloud or other cloud services involves subscriptions, storage limits and dependence on an internet connection.
- Quick access to a large archive. It is easier to work with thousands or tens of thousands of images on a computer.
The problem is that, because the ecosystems are different, transferring photos to a Windows PC may not be as convenient as it is on a Mac. In addition, there is not just one method but several. The best option depends on the situation and the technical resources available.
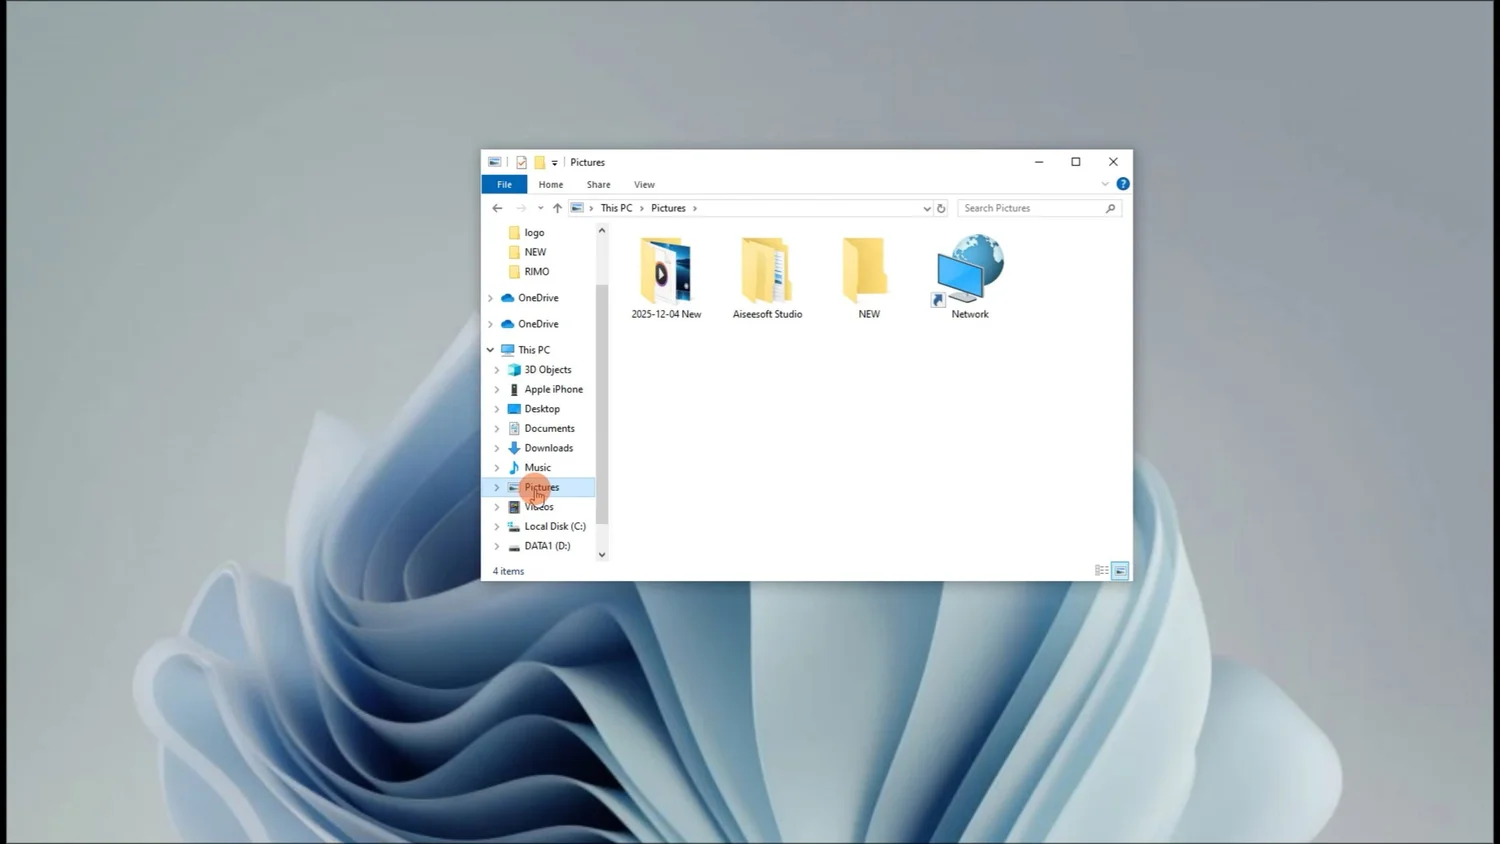
Transferring Photos from an iPhone Using Windows File Explorer
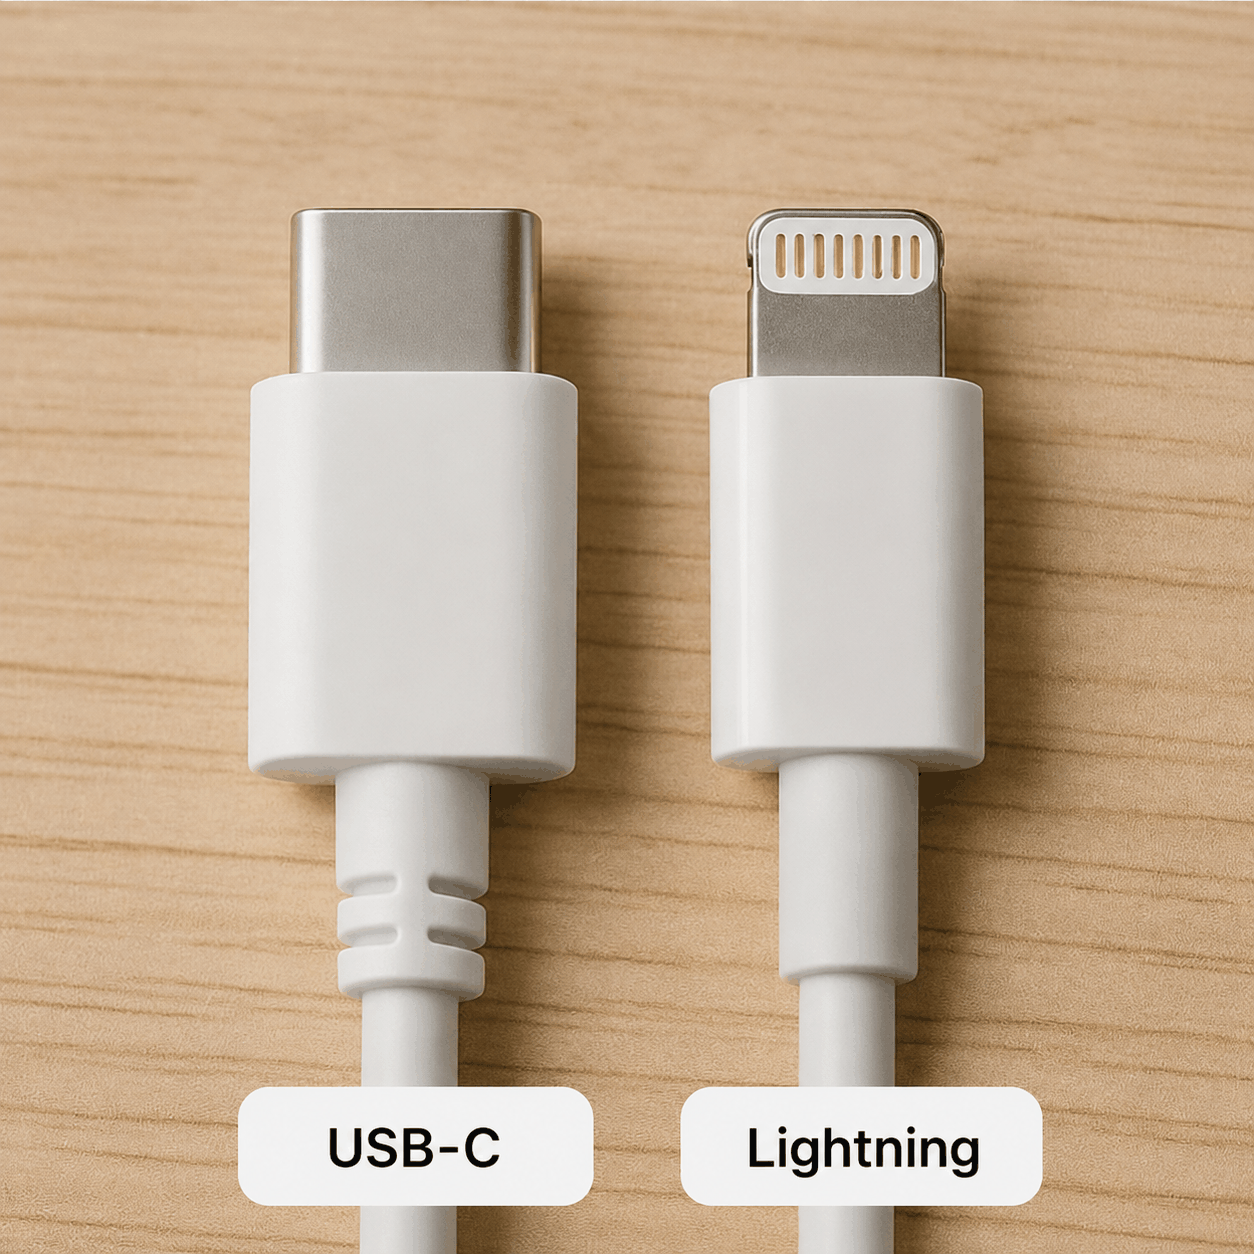
This is the simplest way to transfer photos from a smartphone to a computer. All you need is a USB cable of the appropriate type: Lightning for models before the iPhone 15, and USB-C for newer models.
After you connect the phone to the computer, it will display a message asking you to confirm access to photos and videos. You will also need to enter the device passcode.

With a current version of Windows, there is no need to install drivers to access iPhone photos and videos. The system will automatically detect the phone and display it in File Explorer.
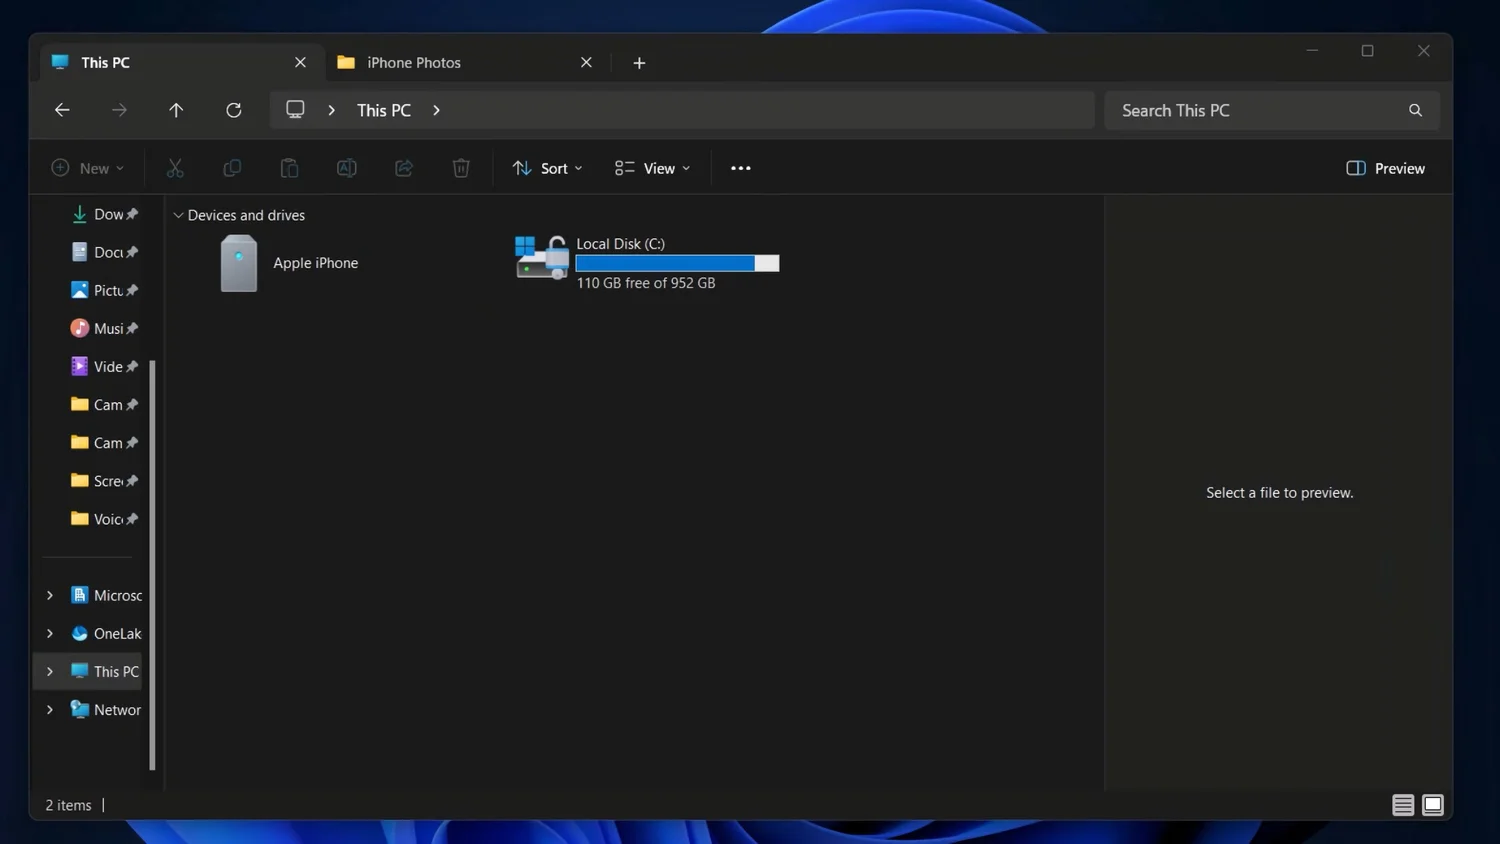
Because of the way iOS controls access to its file system, opening the device allows you to work only with photos and videos taken using the phone's camera. Media files saved from messaging apps and social networks remain unavailable. All accessible photos and videos are displayed in folders according to the year and month in which they were taken, so they can be copied and pasted directly to the computer.
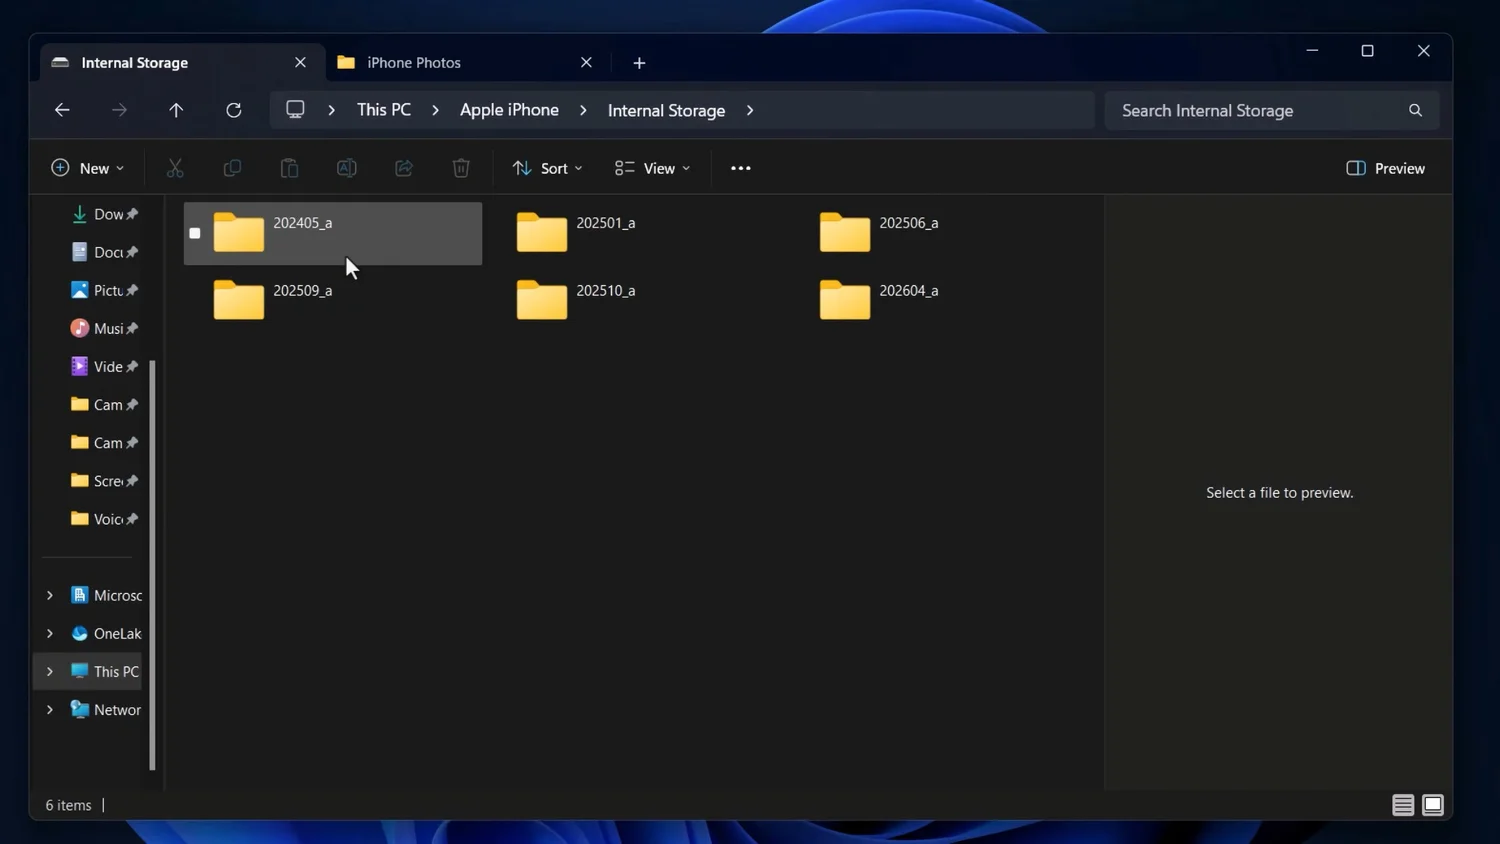
If you only need to transfer selected images rather than everything, simply open the folder for the relevant period.
Advantages of Transferring Photos from an iPhone via Windows File Explorer
- No additional software is required.
- Easy to use.
- High data-transfer speed.
- Full control over the files.
- Original files are preserved.
Disadvantages of Transferring Photos from an iPhone via Windows File Explorer
- No full synchronisation.
- Duplicates may be created.
- No automatic backup.
- Inconvenient for regular use.
Transferring Photos from an iPhone to Windows Using the Built-In Import Tool
Instead of transferring photos manually, you can use the import tool available from File Explorer's context menu.

This method is convenient because it not only copies the photos, but also provides basic organisation into folders based on the date taken and allows tags to be added.
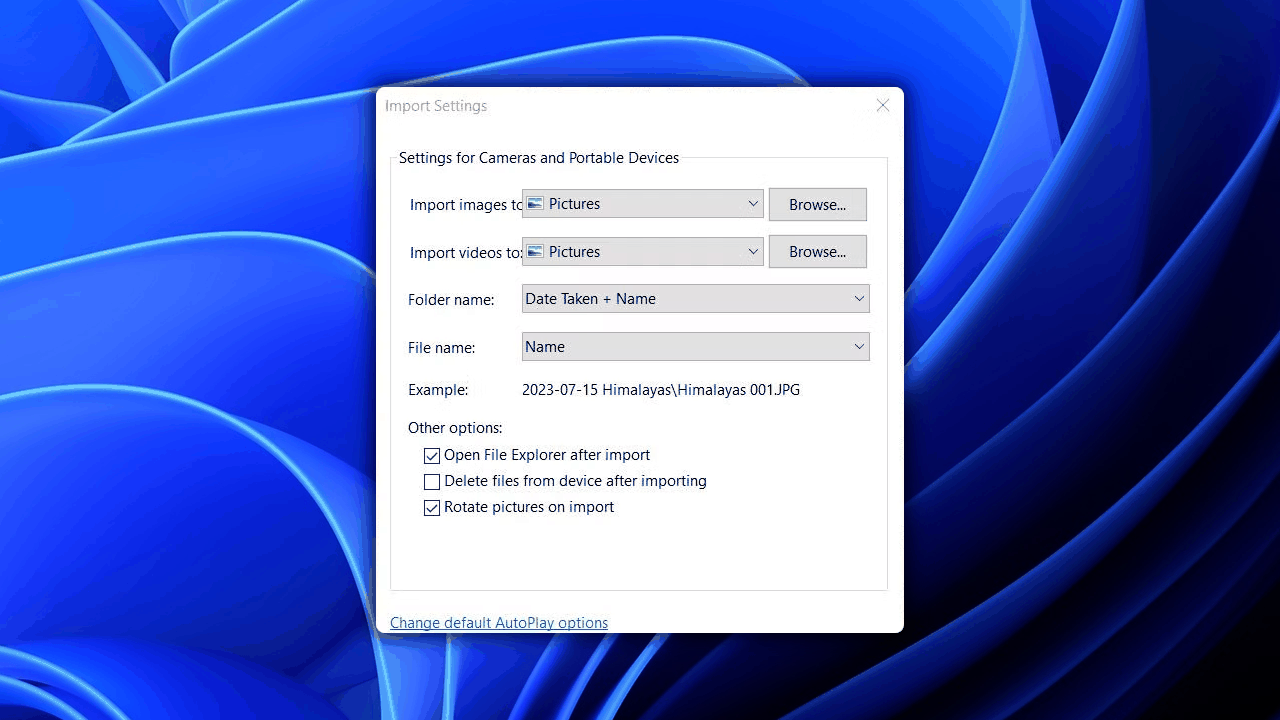
However, it is important to note that the utility cannot create folders by year. It only uses the year-month-day format, so the folders will need to be combined manually after the import.
Advantages of Using the Built-In Import Tool
- No additional software needs to be installed.
- Easy to use.
- Automatically detects new photos.
- Supports automatic sorting.
- Supports tags and grouping.
Disadvantages of Using the Built-In Import Tool
- Limited file-organisation options.
- No full media-library management.
- No automatic synchronisation.
- Duplicates may be created.
Importing Photos from an iPhone to a Computer Using Windows Photos
Although Microsoft positions Windows Photos as a photo manager, in practice its functionality does not go much beyond File Explorer. To begin with, the application does not detect an iPhone automatically, even when the phone is already connected to the computer and access to the photos has been granted.

Only after that can you choose one of the import options: all media files, new files only, or selected files.
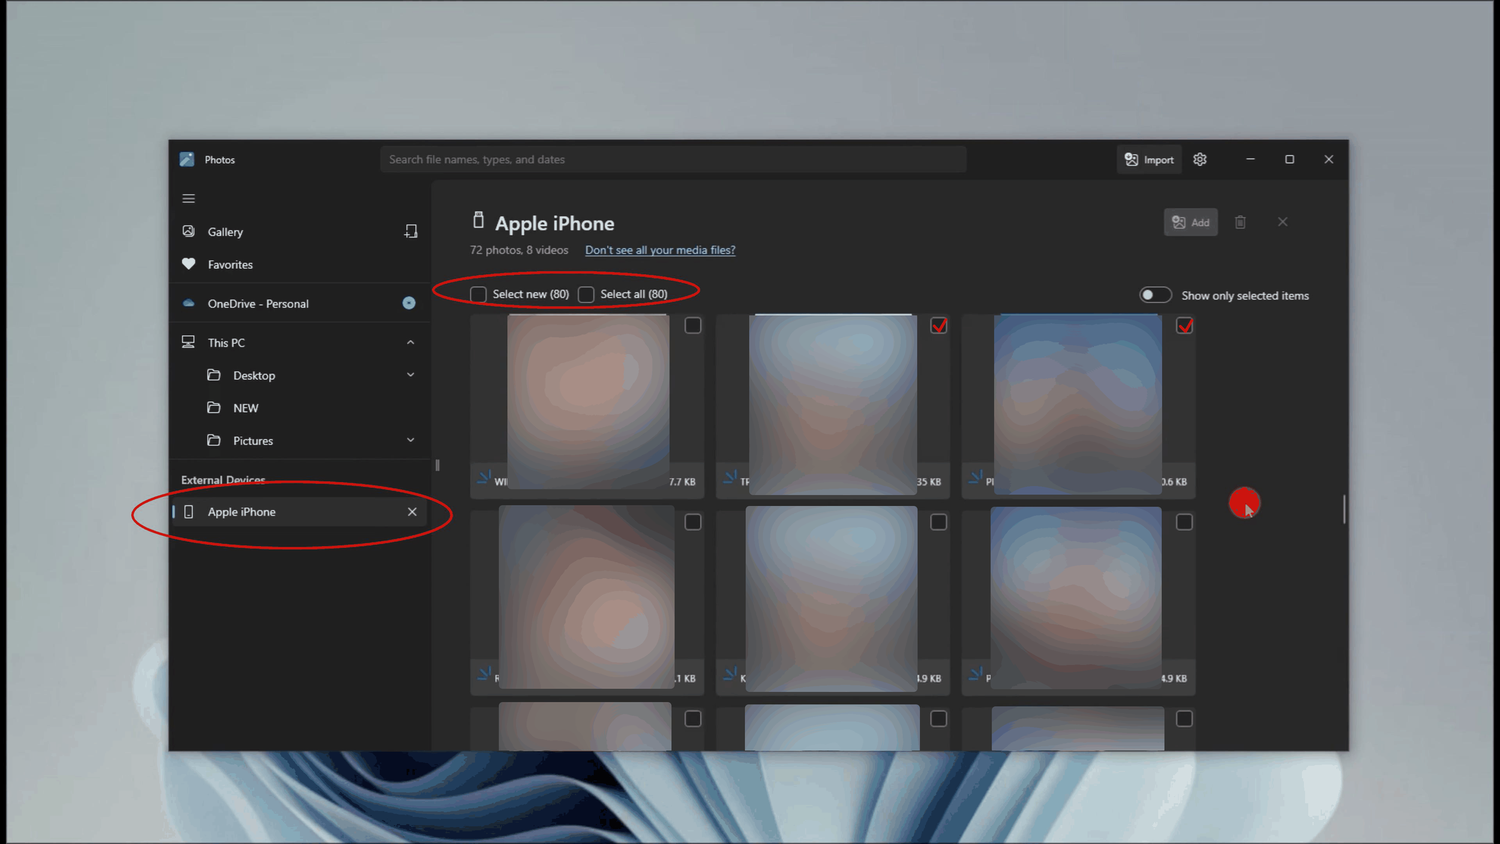
The final step is to specify where the media files should be stored on the computer. There is no automatic organisation into folders; the files are simply copied into the selected folder.
Advantages of Importing via Windows Photos
- You can choose exactly what to import.
- Photos and videos can be previewed.
- Integration with the Windows ecosystem.
Disadvantages of Importing via Windows Photos
- No automatic organisation of files into folders.
- No full synchronisation.
- Additional device configuration is required.
Transferring Photos from an iPhone to a Computer Using iTunes
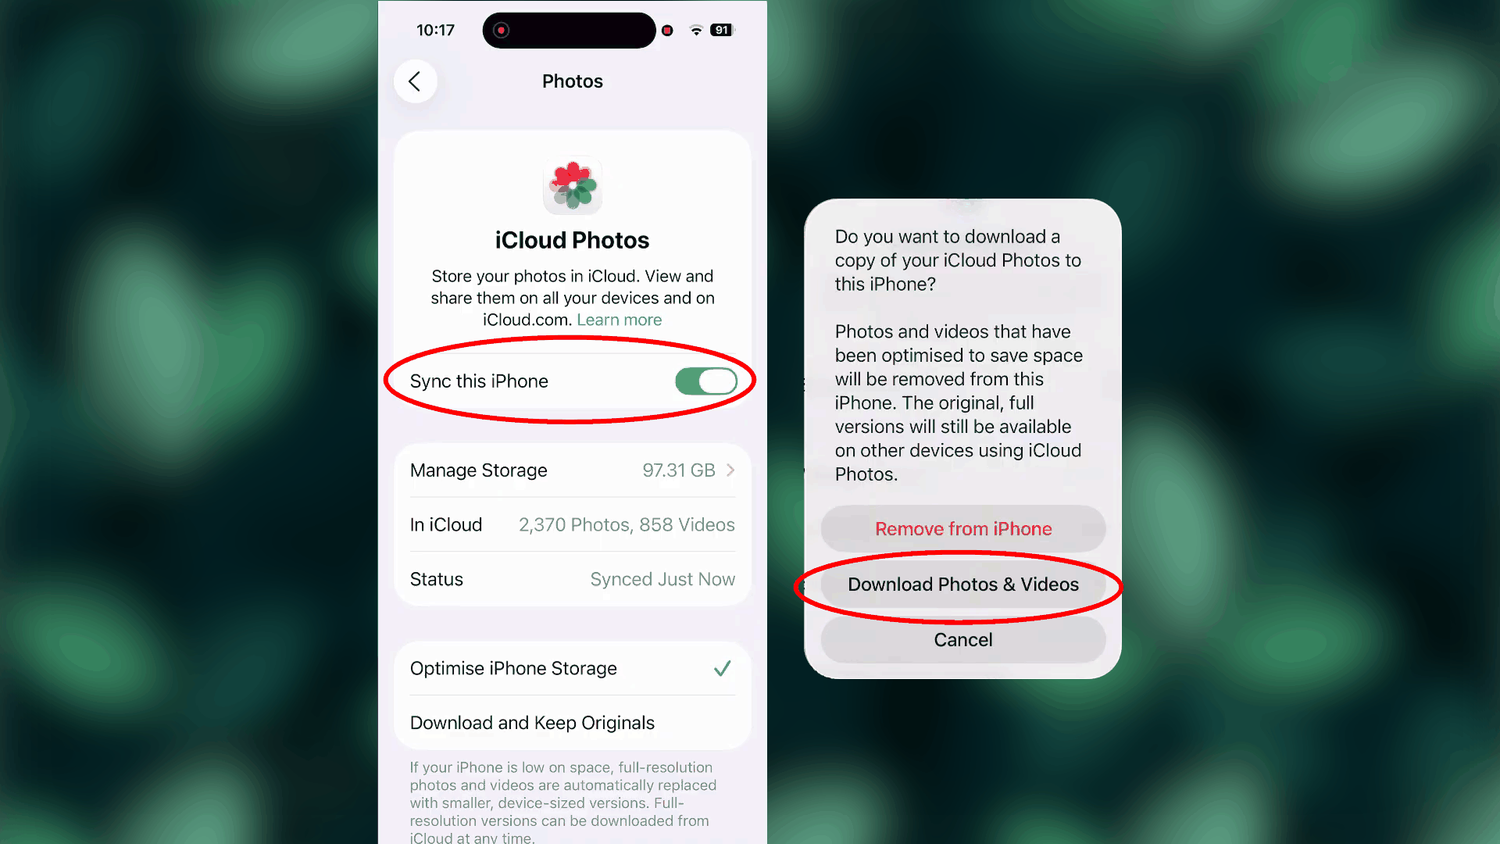
Using iTunes is the most radical method of transferring photos from an iPhone because it requires iCloud to be disabled and all content to be exported from the cloud to the phone's storage. Before starting, it is therefore important to make sure that the phone has enough free space.
To disable iCloud, open Settings and go to the user profile. Then open iCloud, select Photos and turn off synchronisation.
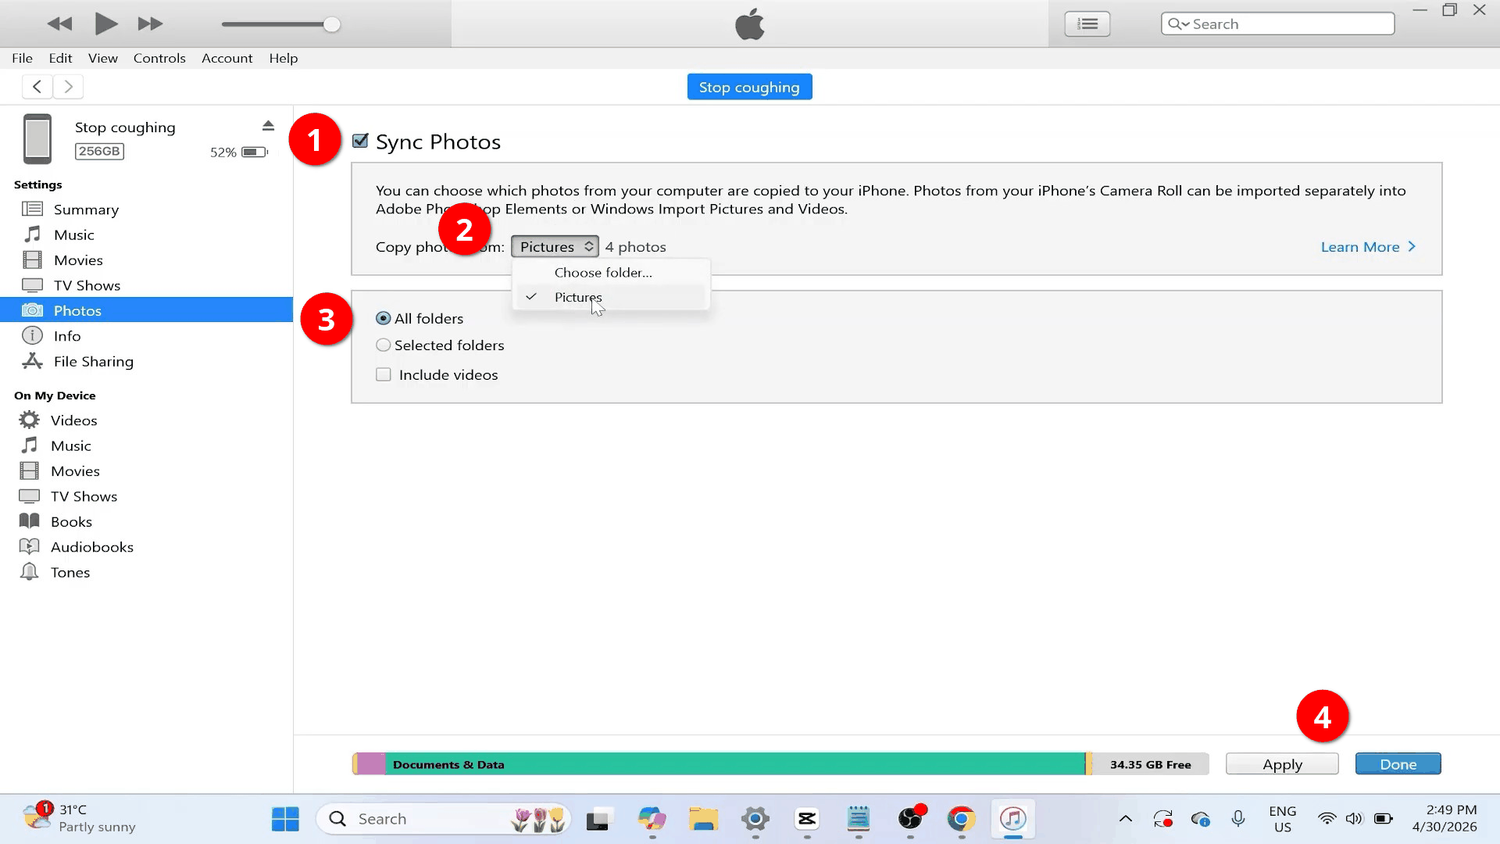
Once the export is complete, you can begin transferring photos from the iPhone to the computer after downloading and installing iTunes from Apple's official website or the Microsoft Store.
Next, open the program on the computer and sign in to your Apple ID account. Once these preparations are complete, you can connect the iPhone and transfer the photos.
Advantages of Using iTunes
- Creates a complete local copy of the photos.
- Allows the original file quality to be preserved.
- High data-transfer speed.
Disadvantages of Using iTunes
- A large amount of free storage is required on the iPhone.
- Downloading photos from the cloud can take a long time.
- Unnecessarily complicated for simply copying photos.
- Inconvenient for regular transfers.
- iTunes is not a specialised photo-export tool.
Transferring Photos from an iPhone to a Computer Wirelessly
Using a USB cable to transfer photos from a phone to a computer is a reliable method that provides the highest speed, but it is not always convenient, especially when you only want to add a few photos to a shared archive.
Fortunately, modern Wi-Fi standards provide enough reliability and transfer speed to move photos quickly from an iPhone to a PC.
However, connecting to Windows over Wi-Fi still requires some initial configuration or specialised software.
Transferring Photos Using Windows' Built-In Tools
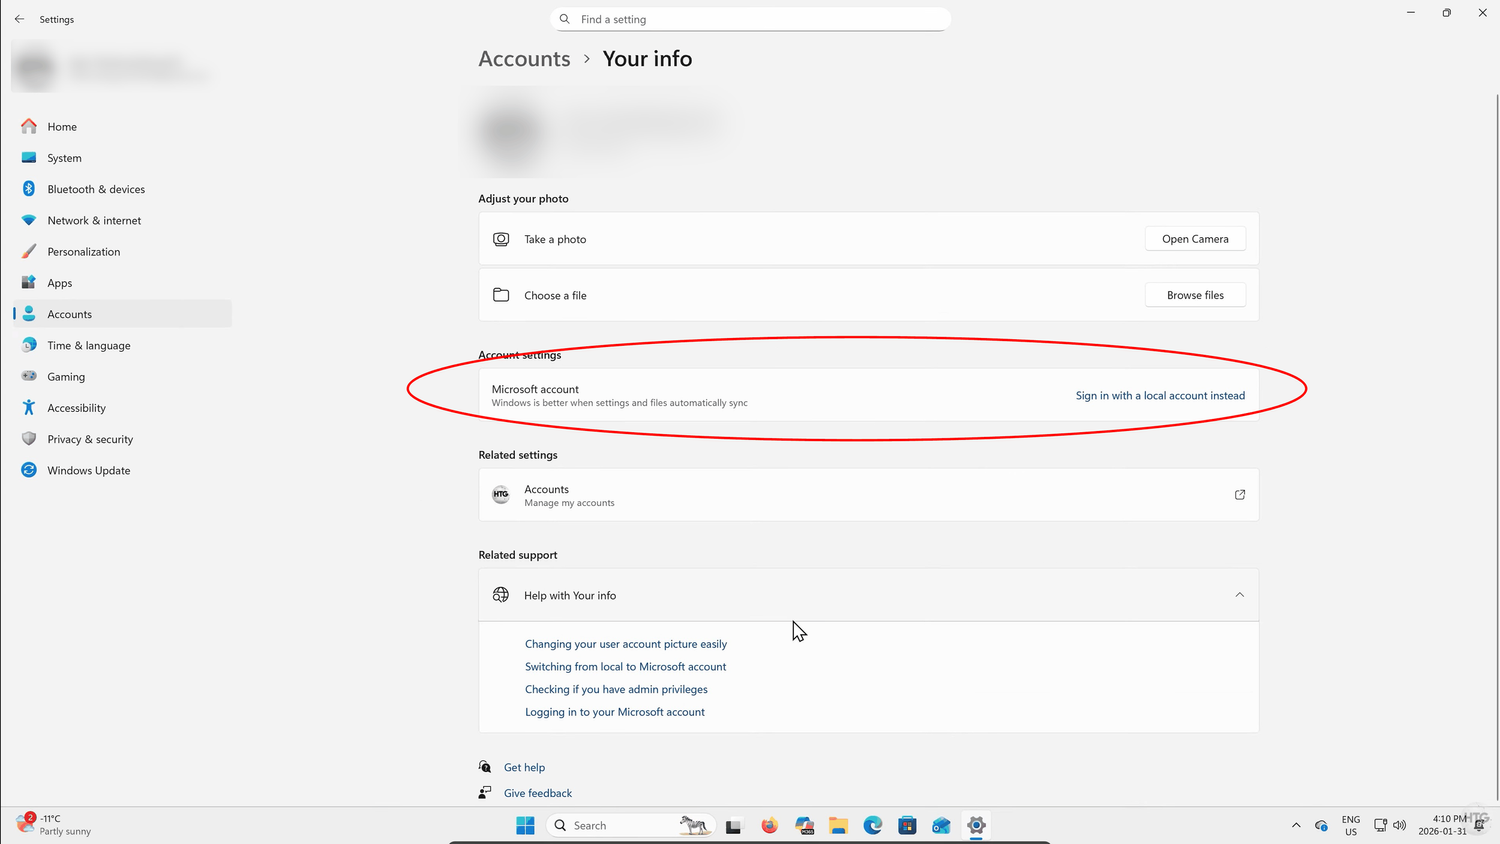
In this scenario, photos can be transferred to a folder on the computer that has been prepared in advance and made accessible over the local network. Before sharing it, however, you need to create a new local Windows user account or convert the current Microsoft account into a local account in the system settings.
This is required to make the shared Windows folder compatible with other operating systems, such as iOS on an iPhone.
Once the local account is ready and the computer has been restarted, you can create a shared folder. It is advisable to use a temporary folder because the photos are copied as they are, without sorting or organisation into directories.
Network access is configured in the relevant section of the folder properties, where you first set the advanced sharing options and then the general folder settings.
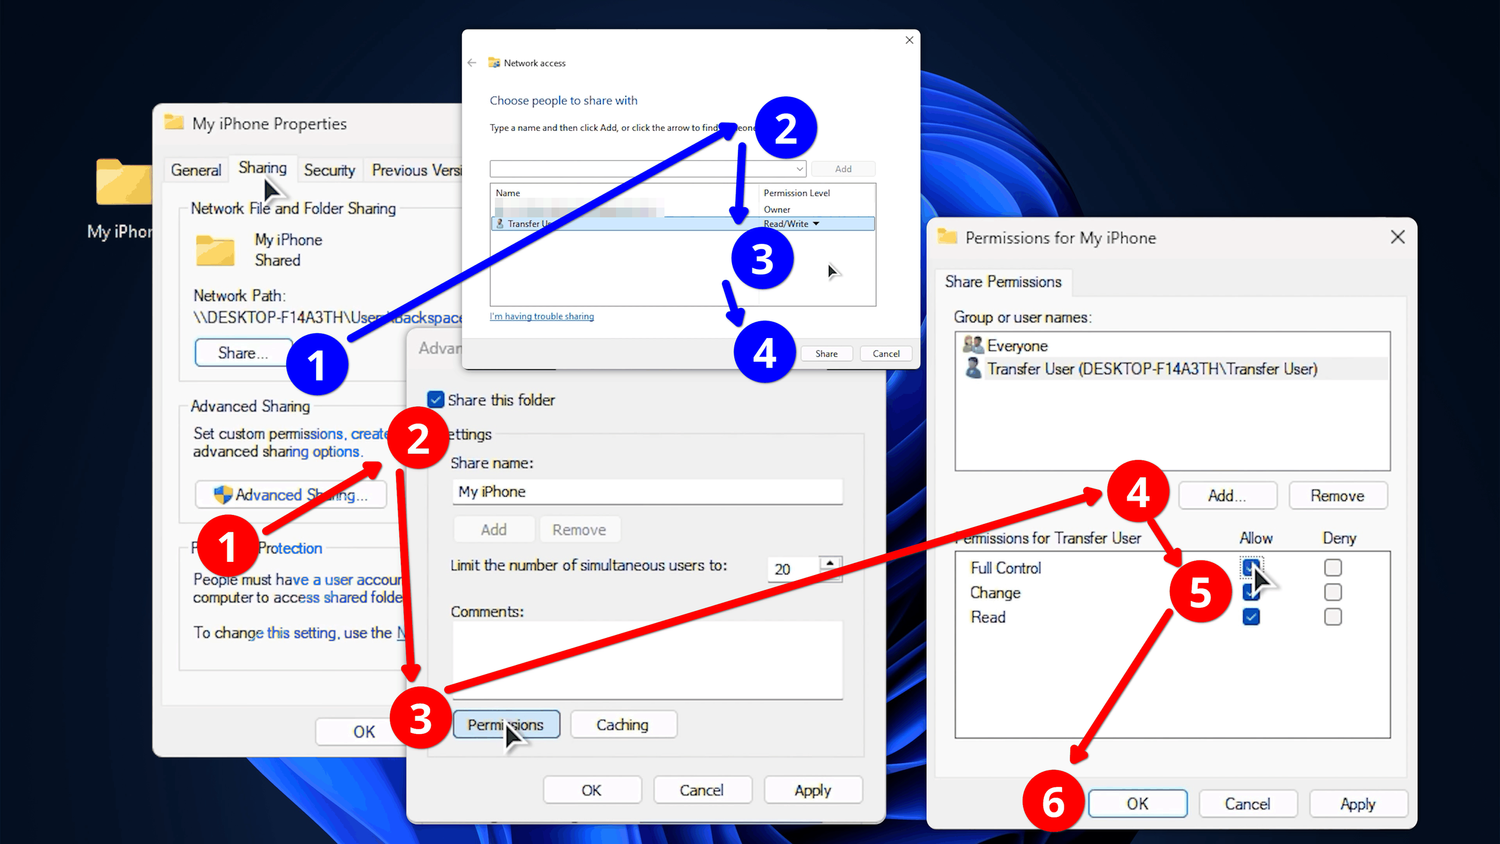
Restart the computer after completing all the settings.
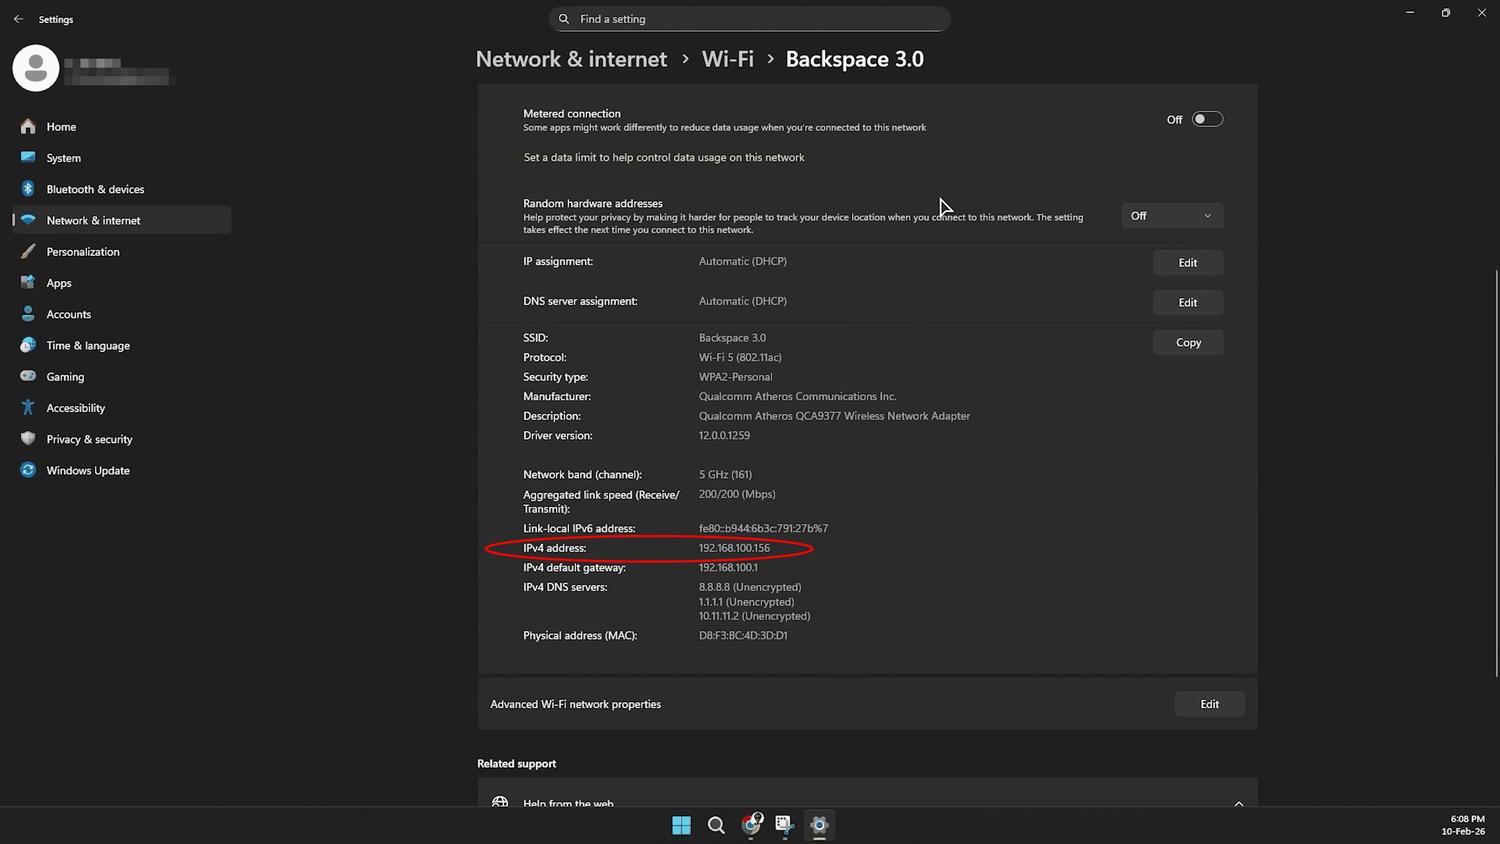
The only thing left is to find the computer's local IP address, which will be needed to connect the iPhone. It can be found in the system settings.
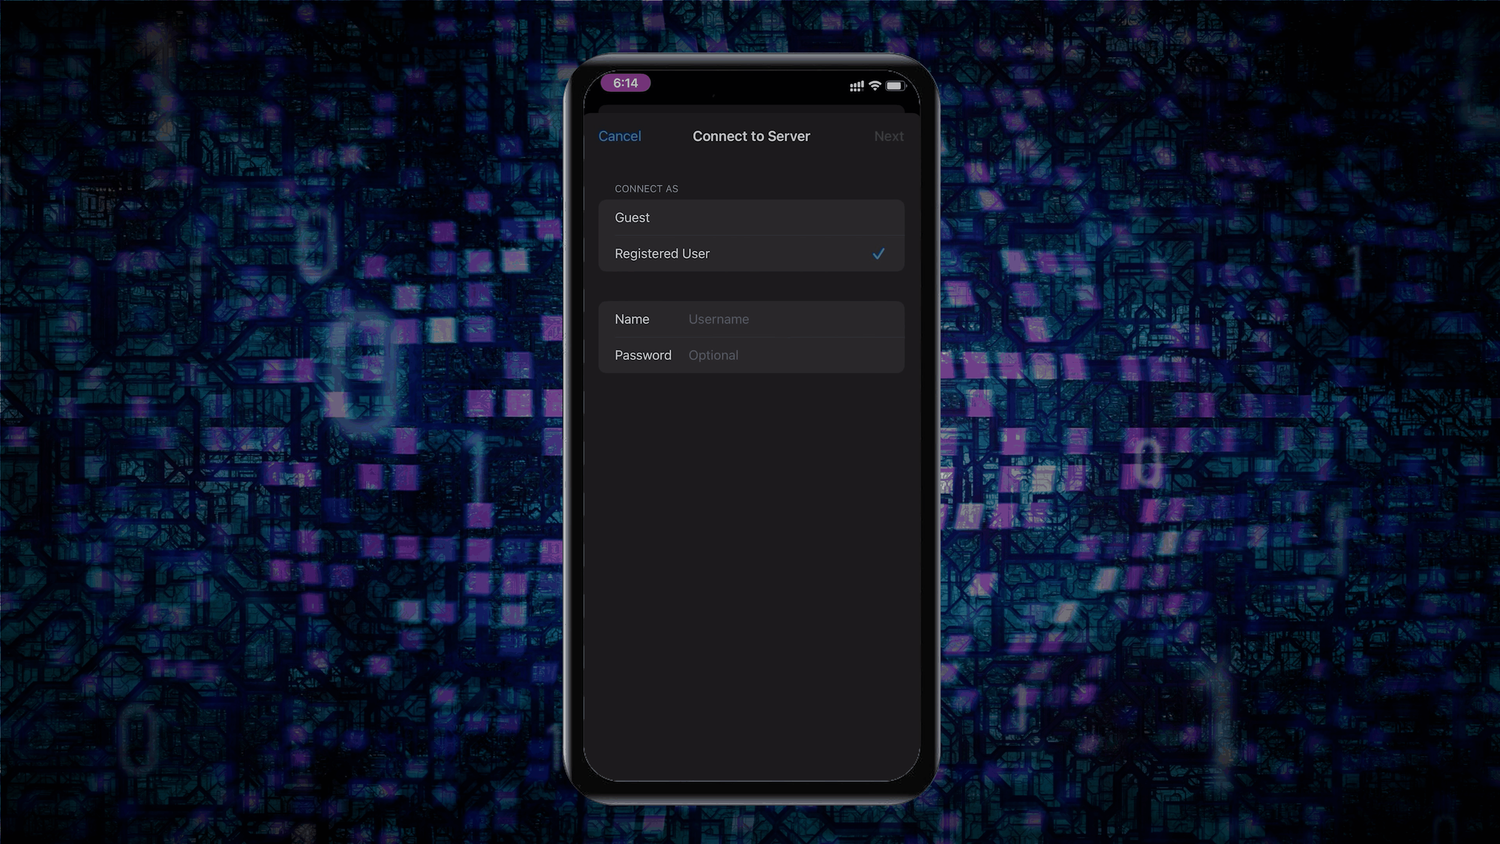
Now open the iPhone file manager and select the option to connect to a server from the additional menu.
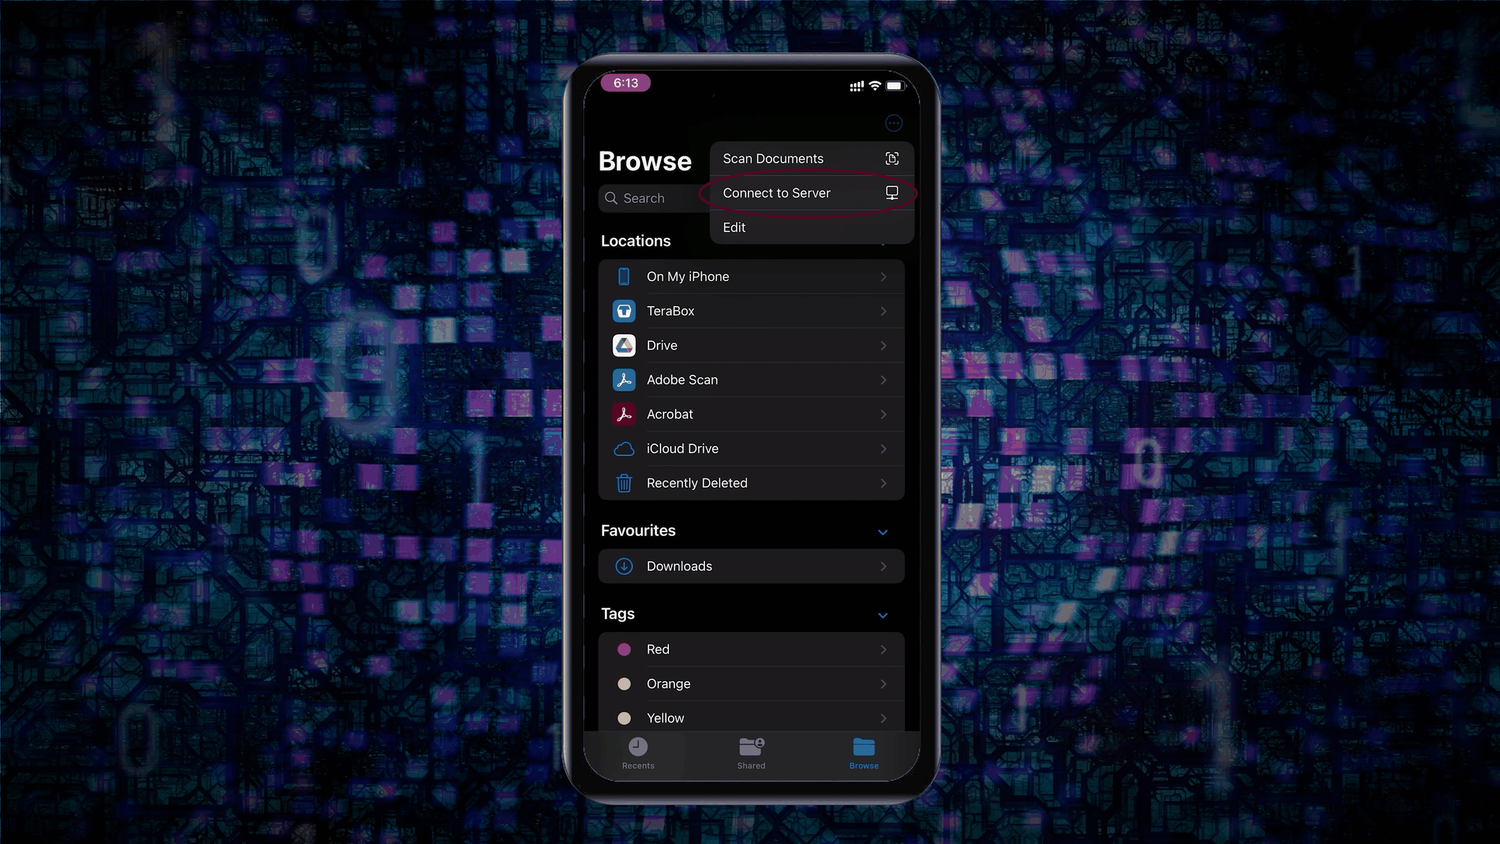
In the server address field, enter the IP address of the computer hosting the shared folder, together with the username and password for the local Windows account.
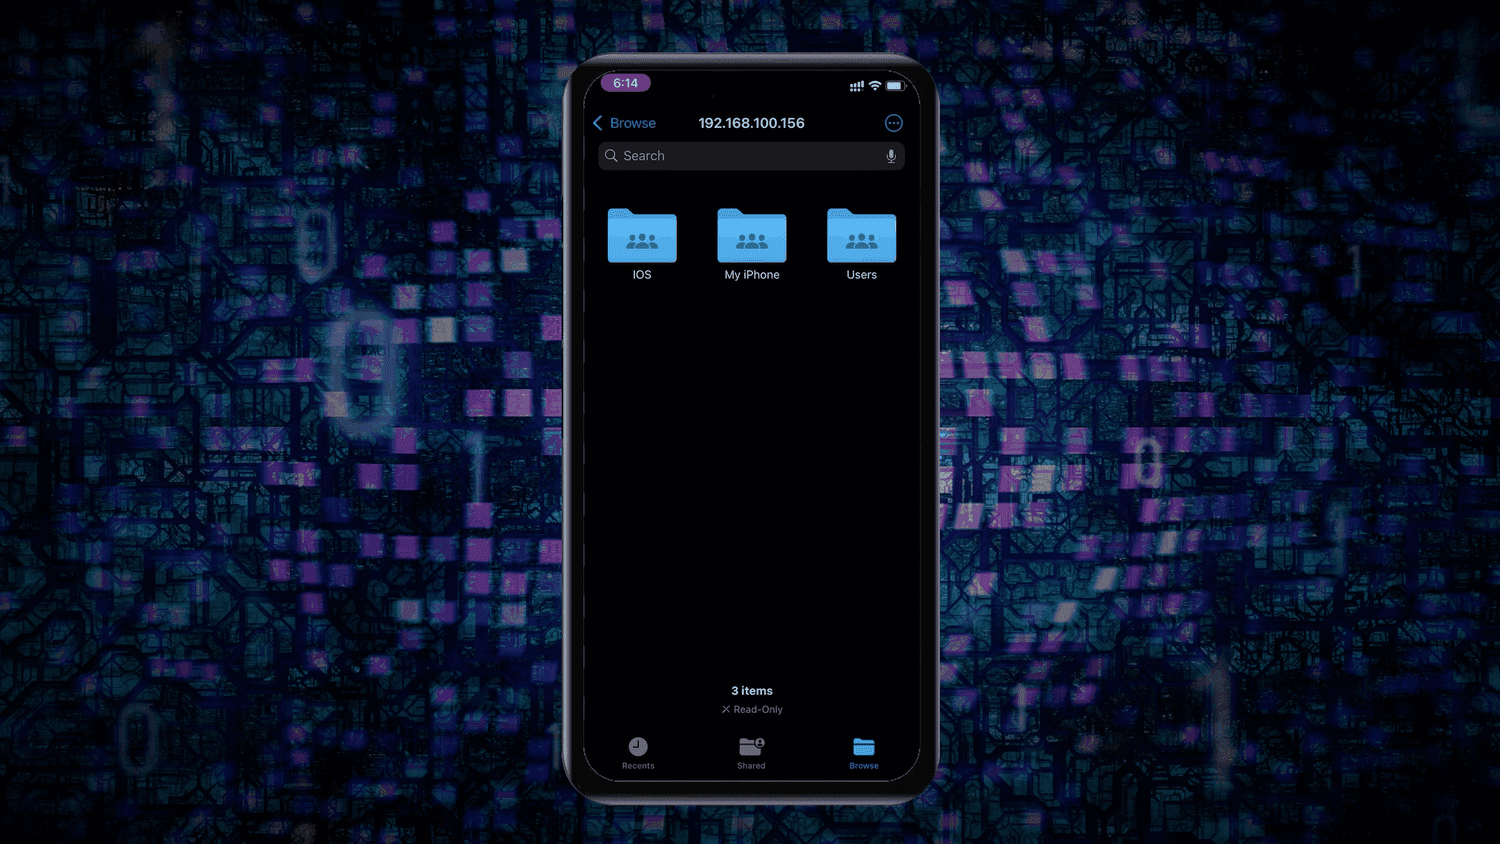
Once you have access to the folder on the computer, you can use it to transfer photos from the iPhone.
Advantages of Using Windows' Built-In Tools
- Completely wireless file transfer.
- High compatibility of the SMB network protocol.
- Files can be transferred without using cloud services.
- Independent of Apple services.
Disadvantages of Using Windows' Built-In Tools
- Complicated initial setup.
- Potential network-discovery problems.
- No automatic synchronisation.
- No built-in duplicate protection.
Transferring Photos from an iPhone to a Computer Using LocalSend
Using Windows' standard networking features is an overly complicated method. Fortunately, there are secure solutions that make wireless transfer genuinely simple. A good example is LocalSend, a free and open-source application for transferring files of any type over a local wired or Wi-Fi network.
All that is required is to install the application on both the iPhone and the Windows computer.
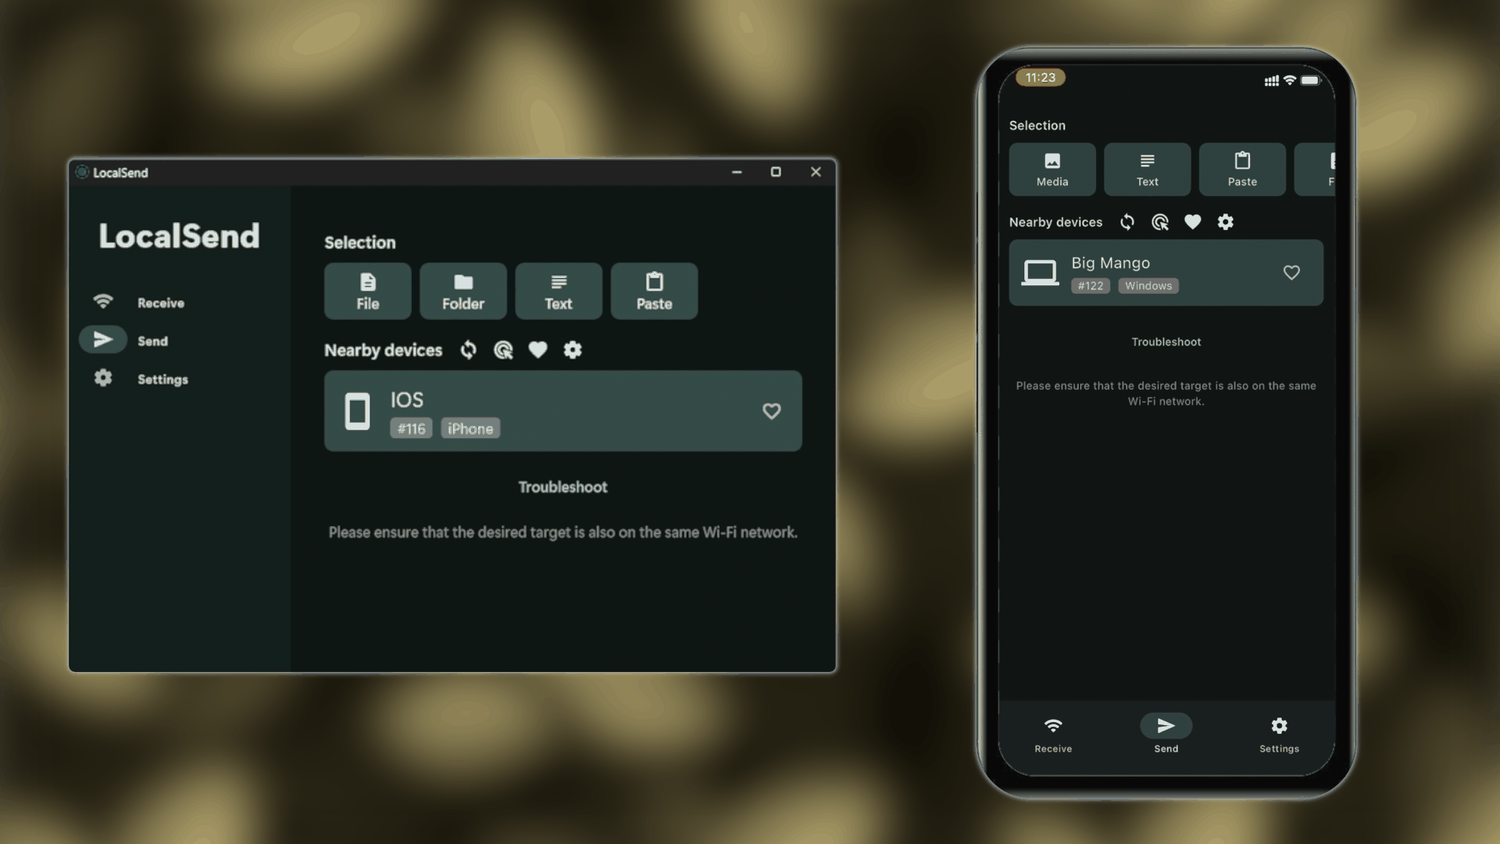
LocalSend can transfer files of any format and size. The only limitation is that they are transferred directly into the folder specified in the settings, without any organisation.
Advantages of Using LocalSend
- Easy to set up and use.
- High file-transfer speed.
- No file-size restrictions.
- Cross-platform support.
- No account is required.
Disadvantages of Using LocalSend
- No automatic photo organisation.
- No full synchronisation.
- No backup functionality.
Transferring Photos from an iPhone to a Computer Using Tonfotos
When it comes to professional photo organisation and subsequent processing, there are not many alternatives to Lightroom Classic. It is a genuinely powerful tool for photographers, allowing detailed colour correction and the preparation of images for printing. However, for personal and family photos, where the context of the captured moment matters more than artistic quality, Lightroom's functionality may be excessive.
In this situation, the number of editing tools is less important than convenient access to the archive. For example, you may want to find a photo of your grandmother taken five years ago within a few seconds, or recall an event by its date, location or the people in the picture. In such scenarios, the value of the system is determined not by the depth of its editing controls, but by how quickly it helps you reach the memory you are looking for.
Tonfotos is a photo manager designed specifically to automate the organisation of images from different sources into a single archive. The program does not include editing features, but it provides advanced sorting and cataloguing tools, together with built-in AI for searching for and recognising faces in photos.
Transferring Photos from an iPhone to a Computer in Tonfotos via USB
USB is the preferred option for the initial transfer of photos from an iPhone to a computer because it provides the highest data-transfer speed.
Before starting, prepare a folder that will form the basis of the future photo archive. To do this, after launching Tonfotos for the first time, clear the list of recommended folders and create a new catalogue. It does not have to be stored on the computer itself; you can use a network folder on a home NAS.

Without closing Tonfotos, connect the phone. A prompt will appear offering to import all media files from the device. After confirming the operation, all that remains is to configure the transfer process, including whether to skip duplicates, what should happen when the phone is connected again, and other settings.
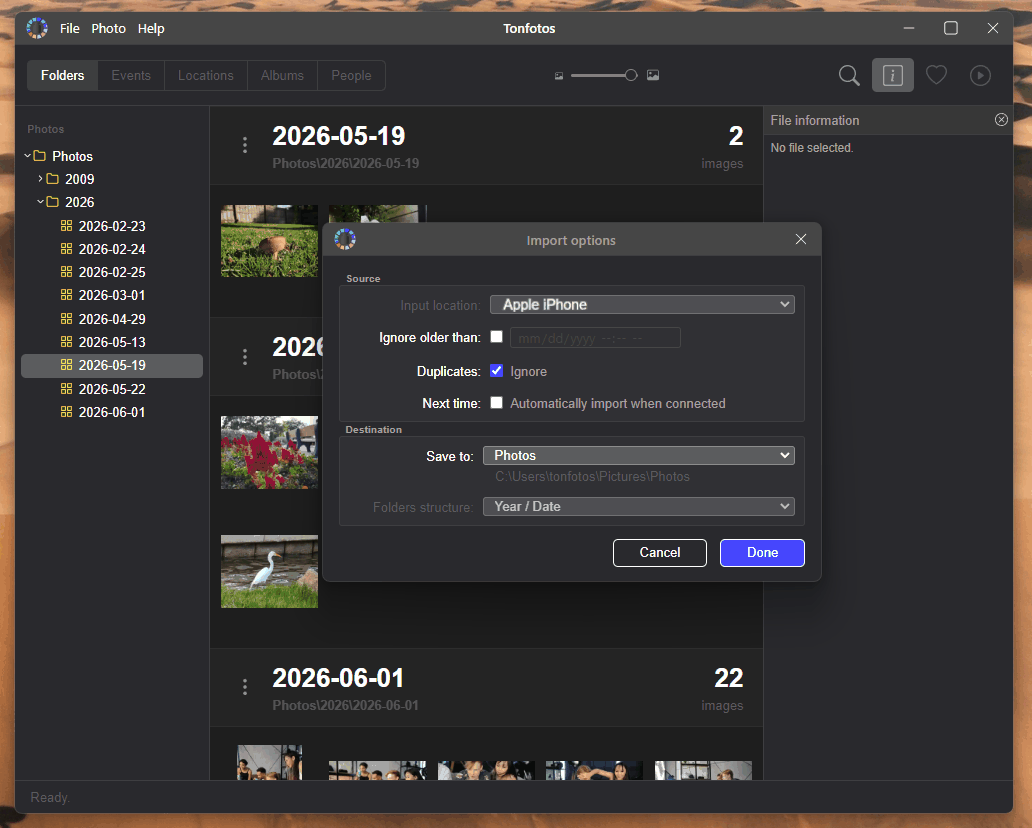
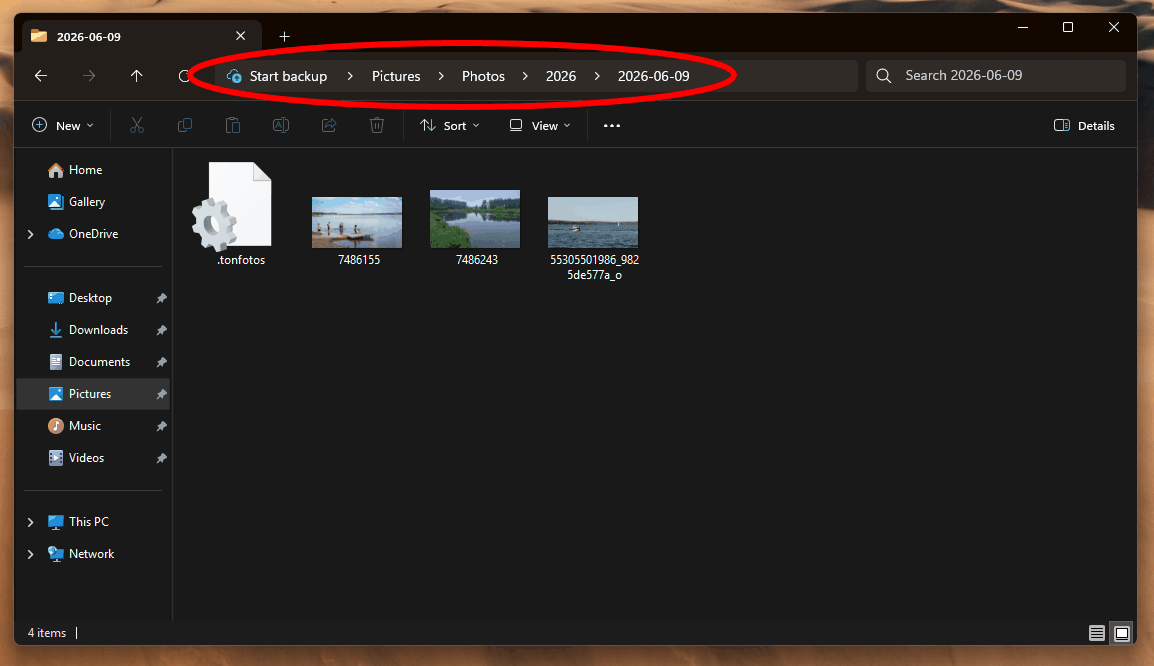
Notably, the program does more than simply copy photos and videos into the selected folder. It automatically organises them by the date taken. Files are arranged into folders using the following structure: first by year and then by specific date.
Transferring Photos from an iPhone to a Computer Wirelessly in Tonfotos
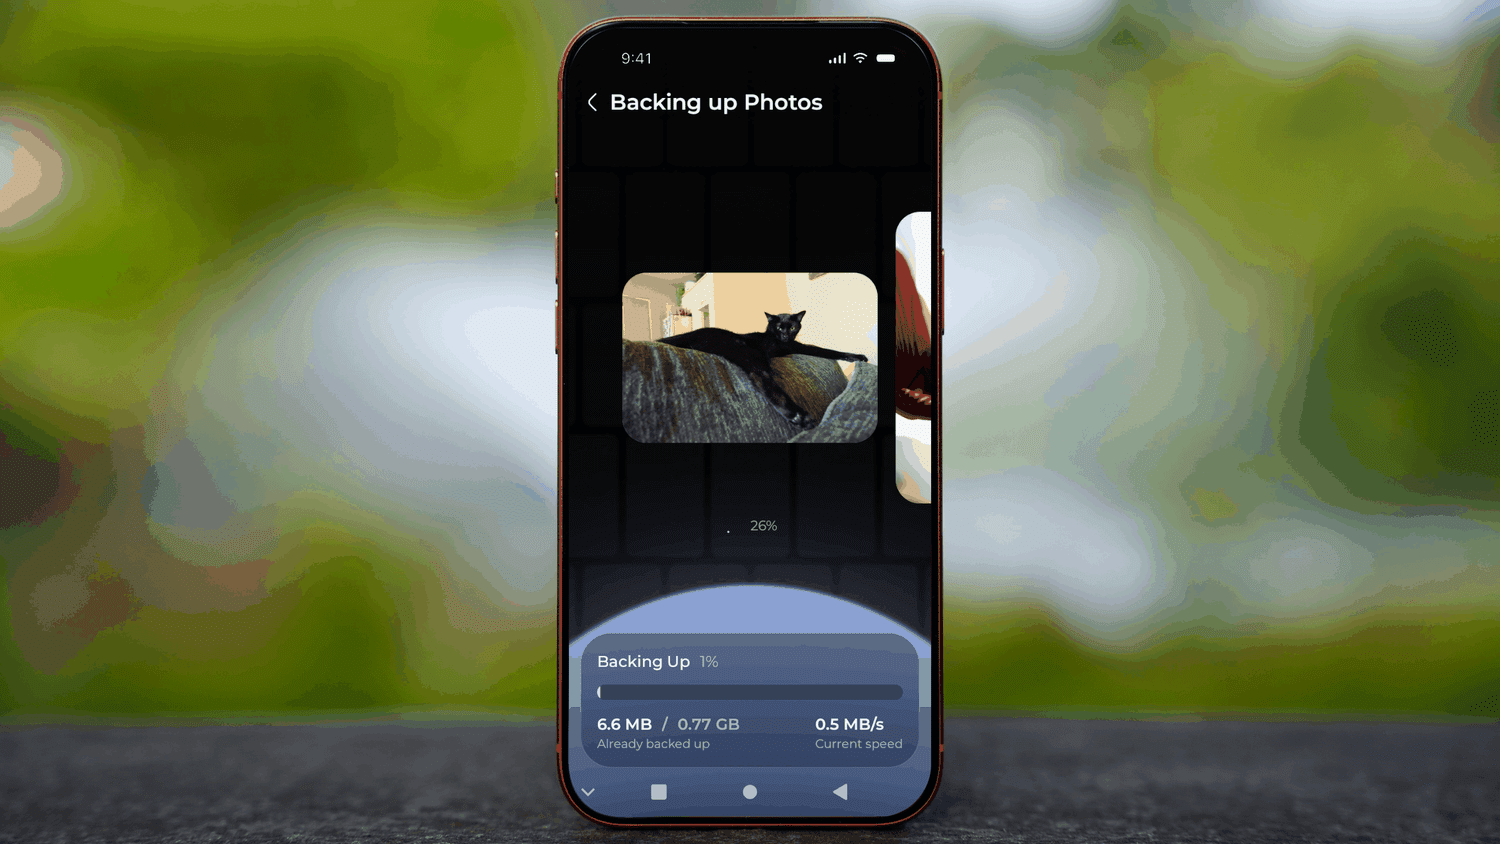
Transferring photos from an iPhone to a computer is not a one-off task but a regular process, and connecting the iPhone by USB every time is inconvenient. Fortunately, the developers of Tonfotos offer an effective solution to this problem: TonfotosSync. This mobile application automatically uploads new photos from the iPhone to the main photo archive when the phone and computer are on the same local network. The PC can be connected to the router by cable while the smartphone uses Wi-Fi.
The TonfotosSync mobile app is available on the App Store, and pairing it with the desktop version simply requires scanning a QR code.
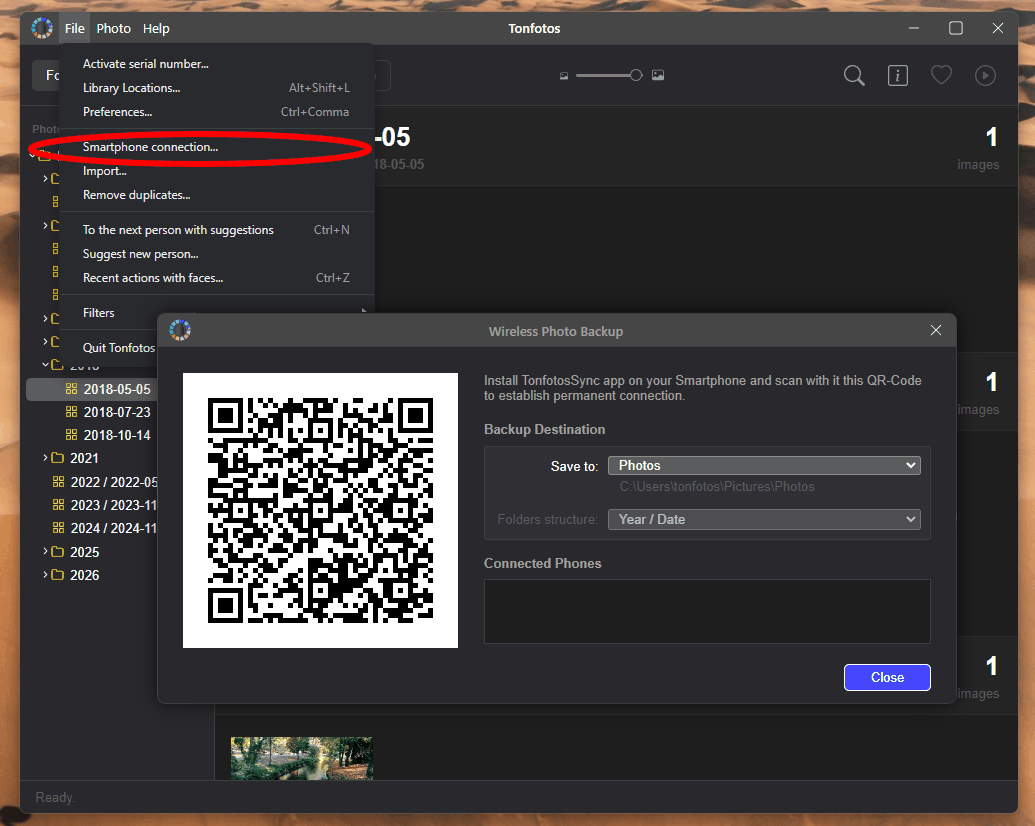
After synchronisation, only photos that are not already present in the main archive will be transferred.
Overview of the Tonfotos Interface
While the Tonfotos 'Folders' section mirrors the way photo files are stored in the computer's file system, the 'Events' section displays all of them in chronological order. This section also allows you to search by tags and keywords.

The 'Places' section is an interactive map displaying photos. It shows images whose metadata contains a geolocation tag recorded by the phone when the photo was taken.
If you travel frequently, this section will be especially useful. It allows you to find photos taken during a particular trip quickly, for example.

In 'Albums', you can quickly view all photos grouped under a particular keyword or collected in a virtual catalogue. This is also where albums available only within Tonfotos are displayed. They allow all photos imported from the iPhone to be organised according to different criteria.

'People' is the section of Tonfotos that is most interesting from the perspective of photo organisation. It is a catalogue of people created automatically using facial-recognition technology. Each card corresponds to a particular person who has been tagged or identified in the photos. The program gathers all related images and provides quick access to them without the need to search manually through folders and albums.

In addition, Tonfotos allows you to specify family relationships between people and add further information, including contact details, years of birth and death, education and employment information, and personal notes. This means the program can be used not only to store photos, but also for genealogical research. If necessary, the relationships created between relatives can be visualised easily as a family tree.

Conclusion
Whichever method you choose to transfer your photos, the most important thing is to do it regularly. It is much easier to add new images to your photo archive every few weeks than to sort through thousands of pictures on an overflowing phone later. If you also keep a copy of the archive on an external drive or NAS, your memories will be protected reliably against accidental loss.