
Landscape Photography Vision: The 30-50-10-10 Framework
Landscape Photography Vision: The 30-50-10-10 Framework
Table of Contents Show
"Reality is a decent reference, but a terrible master. The camera records what's there — the artist reveals what it felt like to be there."
— Alan Ranger
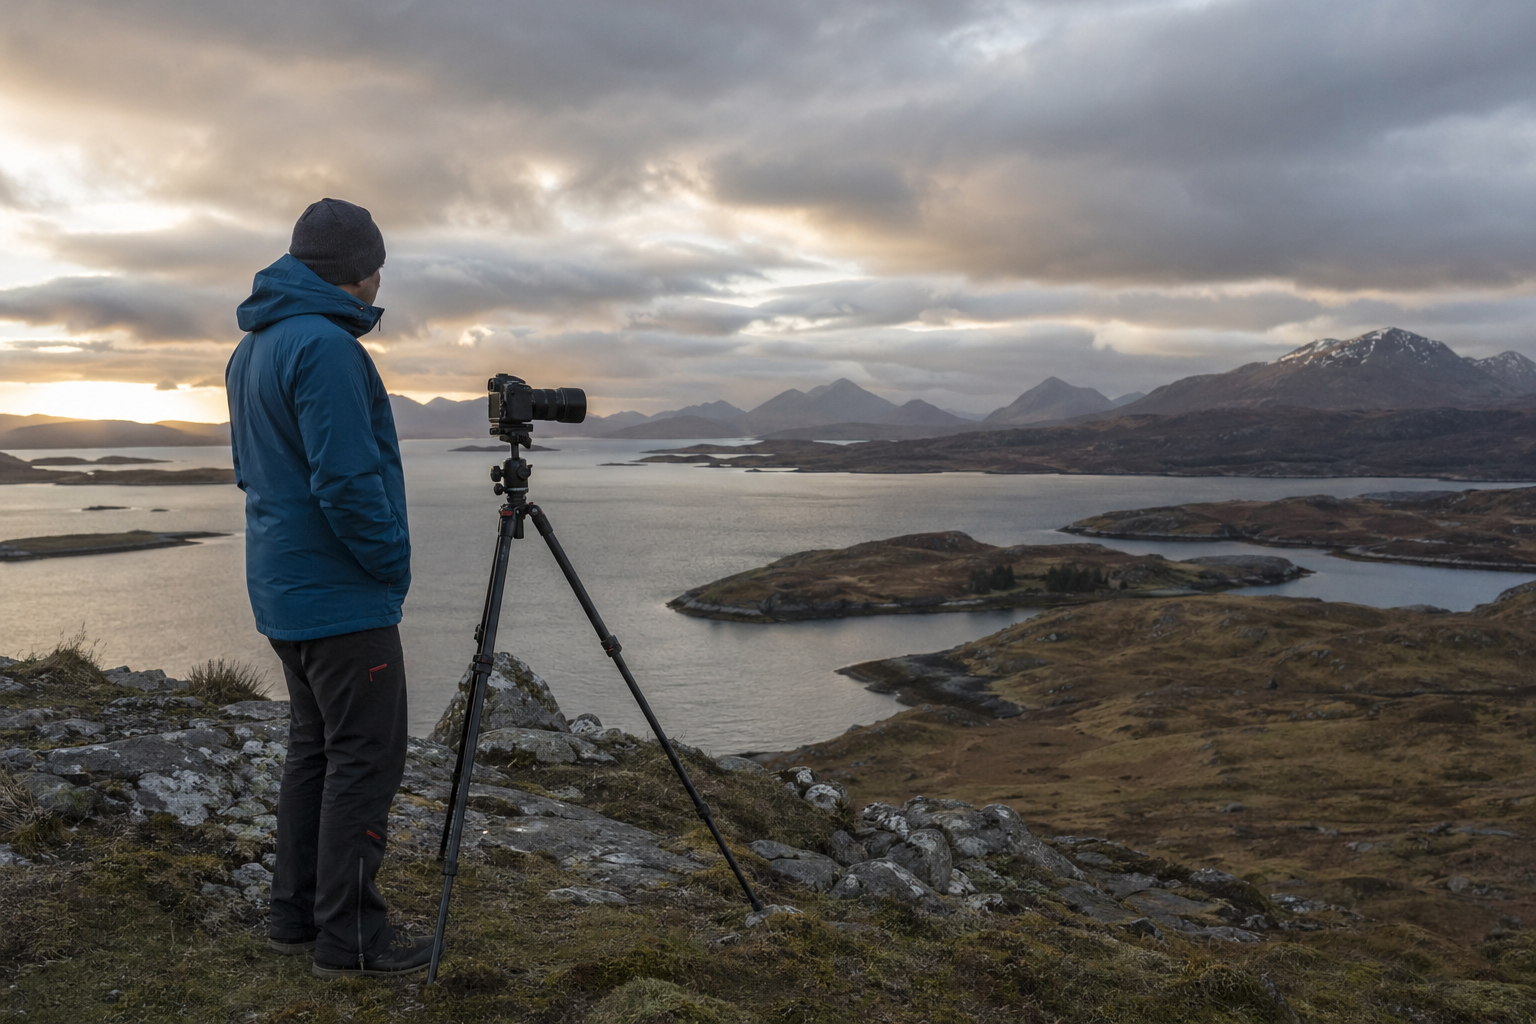
The shift from competent technical execution to making photographs that earn their place on a wall is rarely about better gear, longer exposures, or more elaborate filter stacks. It's about judgement — the field decisions you make before, during, and immediately after pressing the shutter. The photographers whose landscape work consistently lands aren't using better cameras than the photographers whose work doesn't; they're seeing differently, designing differently, and exposing intentionally rather than habitually. Vision is what separates the photograph that records a place from the photograph that reveals what it felt like to be there.
This guide is the intermediate decision layer for UK landscape photography — the companion to my master landscape photography guide (foundational principles) and my mastering landscape photography tips and techniques (intermediate craft). Read those for the technical and compositional grounding. This article is the layer that sits above both: the framework I use to make decisions in the field, the philosophy behind those decisions, and the four foundations that shape every strong landscape photograph I make.
Landscape photography is more than scenery
Recording a place is not the same as making a photograph. The two activities use the same camera, often happen in the same location, and can produce technically similar files — but the resulting images are fundamentally different objects. The recording answers "what was here." The photograph answers "what did it feel like to be here, and why did that matter."
The distinction comes down to five things, and none of them is gear:
It is not about photographing a nice place — it is about light, structure, mood, and timing.
It is about choices and exclusion at least as much as inclusion.
A strong image is designed, not merely recorded.
It is your personal interpretation, not a systematic application of rules and settings.
The frame begins long before the shutter releases — and continues into edit.
Most amateur landscape work fails not because the scene was wrong, the gear was wrong, or the settings were wrong. It fails because no decision was made beyond "point camera at view." The photographer turned up, recorded the place, and went home. Strong landscape photography is the opposite — every element in the final frame is there because of a deliberate decision, and every element that isn't in the frame is absent because of one too.
The five foundations of a strong landscape photograph
I keep coming back to five foundations when I'm in the field, when I'm editing, and when I'm critiquing other photographers' work. None of them is a rule. All of them are decisions you can either make consciously or fail to make at all.
The five foundations of a strong landscape photograph — not a checklist to tick off, but a set of related questions to ask in front of every scene.
The five foundations are not a checklist to tick off. They're a set of related questions to ask yourself in front of a scene: where is the light coming from and what is it doing; what is this photograph actually about; how are the elements arranged in the frame; what mood am I trying to convey; is now the right moment, or should I wait. Most strong landscape photographs I've made satisfy all five. Most weak landscape photographs I've made — and most weak landscape photographs I see from clients — fail one or more of them.
The 30-50-10-10 framework
How I spend my effort making an image in camera, broken into four phases. The percentages are deliberate and counter-intuitive: the largest investment is before the shutter releases, not after.
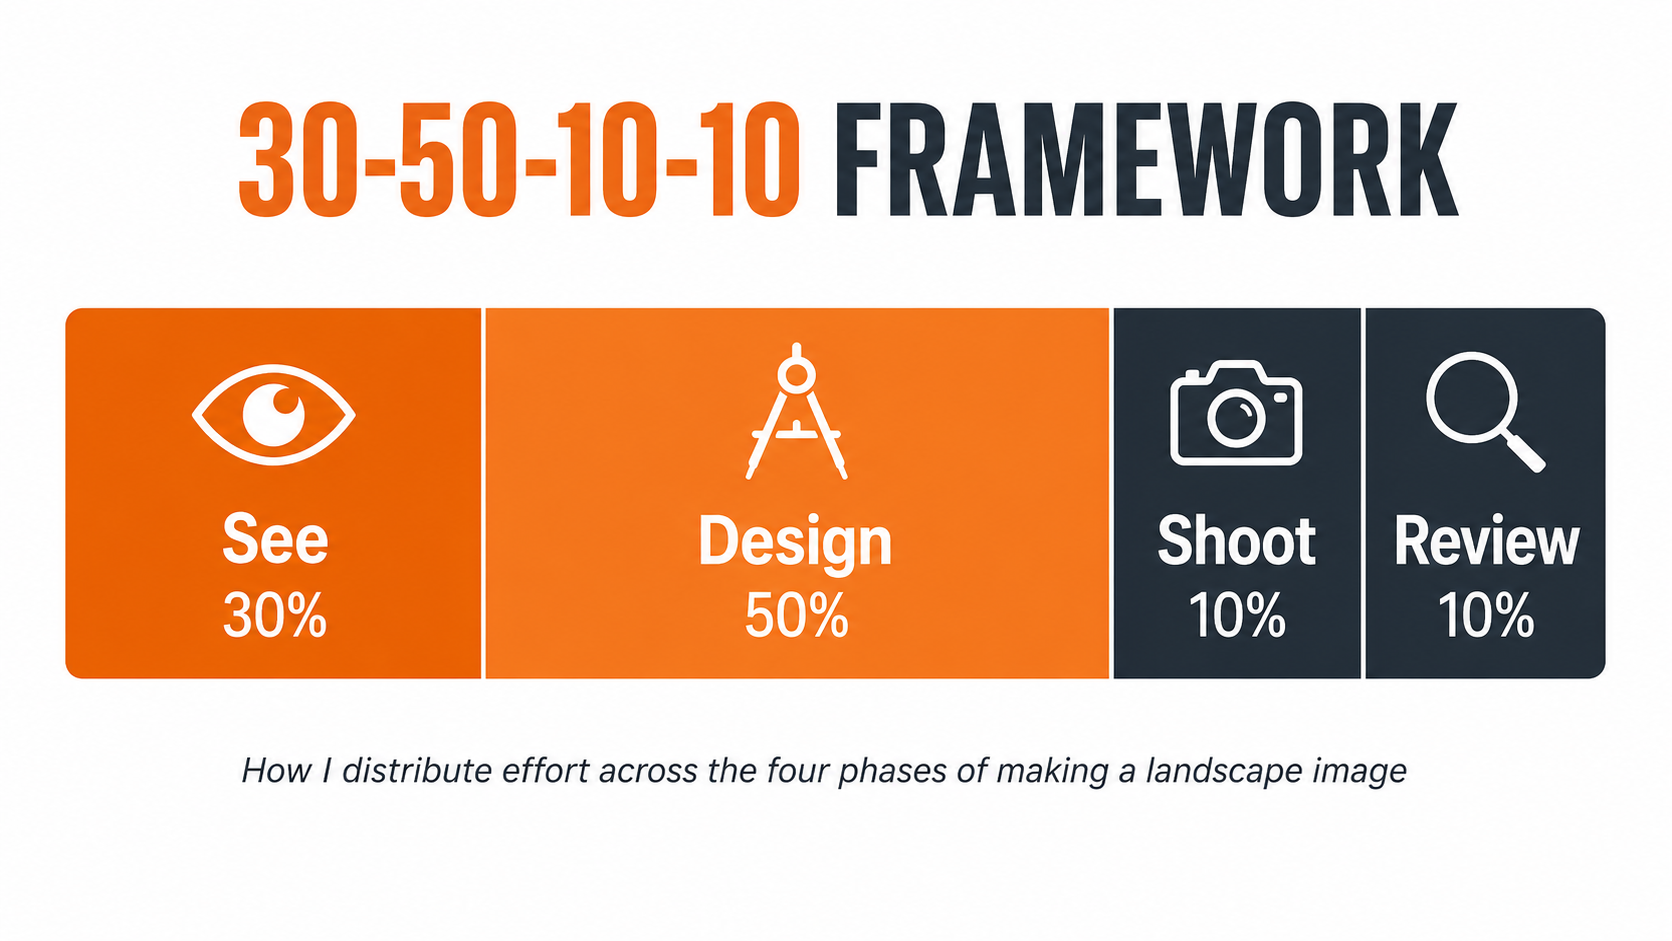
The 30-50-10-10 effort framework — how I distribute attention across the four phases of making a landscape image. The largest investment is upstream of the shutter press.
The biggest gains in landscape photography come before and around the shutter press, not after it. More observation and design upstream means fewer rescue jobs in post downstream. The photographer who spends thirty minutes seeing and ten minutes shooting consistently produces stronger work than the photographer who spends two minutes seeing and thirty minutes trying different settings.
This is why field discipline matters more than gear discipline. A camera you understand, a lens you know, and the mental space to actually look at the scene will outperform a camera you barely know paired with three lenses you've never used. Mastery of the See-Design-Shoot-Review loop is the skill that separates intermediate landscape work from beginner landscape work, and it's a skill you build through repetition rather than reading.
Step 1 — See (Observe 30%)
Your eyes, your emotions, your intention. Seeing is the biggest part of the process because it sets everything else up. This is where intention begins: what are you responding to, and why? Observation precedes composition; composition precedes exposure. Reverse the order and you're decorating an accidental subject rather than designing a deliberate one.
What "seeing" actually involves on location:
Observation and emotional connection come first — what is drawing you to this scene?
Think about your distance, viewpoint, and elevation relative to the subject — these are choices, not defaults.
Survey the scene from several positions before committing to one.
Notice the light, contrast, surroundings, and background — particularly the background.
Look for texture, shape, form, and directional flow.
Continue to observe the light and weather throughout — be patient. The conditions you arrived in are rarely the conditions you'll shoot in.
If you're not investing the most time in this phase, you're operating in the wrong order — and that's the single most common cause of mediocre landscape work I see in mentoring sessions and panel reviews.
Step 2 — Design (Compose 50%)
Your ability to distil and decipher. Composition is the largest investment in the framework because it's where most of the decisions actually happen — what's in, what's out, where it sits in the frame, how the elements relate to each other.
What "design" actually involves:
Build a clear framework of interest: subject, structure, and emphasis. The viewer should know what the photograph is about within seconds.
Try both vertical and horizontal options where useful — and change your physical position rather than just rotating the camera.
Watch the edges of the frame as carefully as the centre. Edge clutter is the most common composition failure I see in critique work.
Use movement, negative space, contrast, direction, and hierarchy intentionally — every visual decision should serve the image idea.
Do not feel obliged to show the whole area; simplify until every included element earns its place. Exclusion is a creative act.
Strong landscape composition is a process of subtraction more than addition. Most amateur frames fail because they include too much, not too little. The discipline is to keep removing elements — by zooming, by repositioning, by waiting for distractions to leave — until what remains is necessary and sufficient.
Step 3 — Shoot (Expose 10%)
Your ability to execute. Only ten percent of the effort, and intentionally so — because by this point you've already made the decisions that matter. Settings should serve the image idea you've already built, not generate it.
Set exposure deliberately rather than drifting into habit. Default settings are a sign you've stopped thinking.
Focus on the closest important element that needs to be sharp — not always the obvious subject.
Experiment where useful, but do not let settings distract from the image idea.
Consider how depth of field, shutter speed, and metering change emphasis. Each is a creative tool, not just a technical setting.
Use the camera to realise the design you have already built — the camera is a tool, not the source of the image.
Photographers who invert this percentage — fifty percent shooting, ten percent designing — produce technically clean files of poorly-composed scenes. Cameras have become so capable that "technically good" is now the floor, not the ceiling. The differentiator is judgement, and judgement happens upstream.
Step 4 — Review (10%)
Your ability to get it right and to keep improving. The smallest investment but a critical one — and one that needs to happen on location, not three days later when you're back at the laptop.
Examine the composition for any avoidable weakness — particularly the edges.
Check exposure, especially highlights and shadows.
Check focus, sharpness, and depth of field.
Delete obvious failures and refine while you are still on location — you can re-shoot.
Be prepared to loop back to earlier stages of the process if something isn't working.
The on-location review is what closes the feedback loop. Without it, you find out at the laptop two days later that the horizon was tilted, the focus was on the wrong element, or a distraction crept into the frame edge — and by that point it's too late to do anything about it.
My philosophy on composition and image-making
Five ideas that shape how I work in the field. Not rules, not formulas — habits of thinking that I keep coming back to over twenty years of teaching and shooting landscape work.
Working a location: patience, timing, and decisions
The first composition is rarely the best one. Most strong landscape photographs are the result of working a location rather than just photographing it. The photographer who arrives, takes three frames, and leaves is reliably outperformed by the photographer who arrives, walks the location, refines the frame across multiple visits to the same spot, and waits for the light to do something the photograph needs.
What "working a location" actually means in practice:
Move your position — laterally, forward, back, up, down. The composition you found first is rarely the best the location offers.
Refine the frame — small adjustments to focal length, tripod height, and angle often deliver more than the dramatic compositional reset.
Wait for the right light — the conditions you arrive in are rarely the conditions you'll shoot in. Patience is a creative tool.
Exclude distractions — actively look for what's failing the frame, not just what's working in it.
Keep asking: what is the picture really about? If you can't answer in one sentence, the photograph isn't ready.
Some of my strongest images came from sessions where I made five frames over thirty minutes. The first frame was rarely the keeper. The keeper was usually the result of fifteen to twenty minutes of just observing — watching the light shift, the cloud break, the shadow lengthen — and then committing when the conditions matched the image I'd been designing in my head while I waited.
The 30-50-10-10 framework in action
The video below — "Mastering Landscape Photography: Tips and Techniques" on the Alan Ranger Photography channel — walks through the framework on location with worked examples. About twelve minutes covering the same five foundations and four-step decision process this article has covered, but applied to specific landscape scenarios so you can see the framework operating rather than just reading about it.
Common landscape photography mistakes
The failures I see most often in mentoring sessions, in panel critique work, and in my own discarded files. None is a gear problem. All are decision problems.
Too much in the frame. No subject hierarchy — every element competes for attention. Fix: simplify until every element earns its place. Exclusion is creative work.
Weak or flat light. Shooting whatever was there rather than waiting for what was needed. Fix: patience. Return when the light supports the image you wanted to make.
No clear subject. Photographing the place rather than something specific in it. Fix: answer "what is this photograph about?" in one sentence before you shoot.
Shooting too early. Skipping the See phase — committing before observing. Fix: walk the location before raising the camera. Survey from several positions.
Relying on gear, not design. Believing better equipment will produce better photographs. Fix: master one camera and one lens; spend your budget on travel and time, not new bodies.
Over-processing. Trying to manufacture in post the drama that wasn't there at capture. Fix: restraint. Let the original scene's tonal structure carry the photograph.
The connecting thread across all six failures is judgement, not equipment. Most weak landscape images fail because of decision-making, not because of camera limitations or lens choices. The photographer who internalises the See-Design-Shoot-Review loop and the five foundations will outperform the photographer with double the gear budget but half the decision discipline.
Landscape photography vision FAQ
Key takeaways
Recording a place is not the same as making a photograph — strong landscape work is designed, not just recorded.
Five foundations — Light, Subject, Composition, Atmosphere, Timing. Most strong frames satisfy all five; most weak frames fail one or more.
The 30-50-10-10 framework — See (30%), Design (50%), Shoot (10%), Review (10%). The biggest gains come before the shutter releases.
Observe before you compose — pause first; let the scene reveal its potential before you start photographing it.
Think in balance, not rules — use compositional structure intentionally rather than treating formulas as fixed laws.
Tell a story, not just a scene — ask what the image is saying and why the viewer should care.
Style comes from repetition, not filters — consistent decisions about framing, light, and emphasis build a recognisable voice over time.
Forget gear, focus on vision — the camera is a tool; the photograph comes from your judgement and connection.
Slow down — the best compositions come when you give yourself time to notice, respond, and refine.
Continue learning
Conclusion and summary
Strong landscape photography is the product of judgement more than equipment. The technical floor — exposure, focus, sharpness, dynamic range — has been solved by modern cameras to a degree that makes "technically good" a baseline rather than a differentiator. What separates strong landscape work from competent landscape work is the field decisions that happen before, during, and immediately after pressing the shutter: what to include, what to exclude, when to commit, when to wait, what the photograph is actually about, and why the viewer should care. These decisions can be made consciously and trained over time, or they can be skipped — and the resulting photographs reflect which path was taken.
The framework to internalise: five foundations (Light, Subject, Composition, Atmosphere, Timing) and the 30-50-10-10 decision rhythm (See, Design, Shoot, Review). Observation precedes composition; composition precedes exposure; review closes the loop on location. Five habits of thinking carry the philosophy: observe before composing, think in balance not rules, tell a story not just a scene, build style through repetition, and focus on vision not gear. None of this requires a camera upgrade or a new lens. All of it requires the discipline to spend more time looking and less time fiddling with settings — and the patience to work a location rather than just photograph it.
If you'd like to develop this kind of decision-making under structured guidance, I run monthly online photography mentoring for photographers who already have technical competence and want to build vision and judgement. The mentoring uses assignment-based feedback with focused critique on the decisions in your work — what's working, what isn't, and why. It's the deliberate-practice version of the framework above, applied to your own photographs over time. Across more than twenty years of teaching, ten years as Photocrowd's expert judge, and three years lecturing at the Xposure international photography festival in the UAE, the photographers who improve fastest are the ones who shift their effort from settings to seeing — and who keep showing up to do that work month after month. The framework above is a starting point. The mentoring is what turns it into a practice.