
Airbnb Photography Guide For Holiday Let And Rental Hosts
Table of Contents Show
Airbnb Photography: A DIY Guide for Holiday and Let Hosts
Good Airbnb photography is the single biggest lever most UK hosts can pull to improve bookings — and the good news is you don't need to hire a professional every time. With a half-sensible camera, a tripod, and an understanding of what makes a listing image actually work, you can shoot a set of images that competes directly with the pro-shot listings at the top of the search results.
This guide covers what Airbnb photography actually needs to do, the kit that makes the job easy rather than painful, the seven shots every listing should have, the room-by-room technique, and the common mistakes that quietly cost hosts bookings every week.
Why Airbnb photography is different from regular interior photography
A good holiday let photograph isn't a styled magazine spread. It's a functional image that has to do three things at once: show the space truthfully, make a guest feel they can picture themselves staying there, and stand out in a grid of thumbnails against thirty other listings in the same postcode.
That's a different job from a Rightmove photograph (which sells the property), a hotel shot (which sells a brand), or a glossy interiors photo (which sells a lifestyle). Airbnb photography is about reassurance and aspiration in equal measure. Guests need to feel the space is real and usable, and that it's a nicer version of their normal life for a few days.
The practical implication is this: don't over-stage, don't over-edit, and don't lie with a wide angle. A guest who arrives expecting the photographed space and finds something smaller, darker or more cluttered will leave a three-star review — and three-star reviews cost more future bookings than a slightly less glamorous set of photographs ever would.
The kit you actually need
You can produce strong Airbnb photography with surprisingly little kit. The one thing you genuinely cannot do without is a tripod — everything else is a question of budget versus polish.
Airbnb photography kit tiers — the three practical setups, from phone-only to full-frame. Pick the level that matches the investment you want to make.
| Tier | What you need | Rough cost | Output quality | Best for |
|---|---|---|---|---|
| Phone only | Modern smartphone (iPhone 12+ or equivalent), phone tripod, Bluetooth remote shutter | £30–£80 (tripod + remote) | Good enough for 80% of listings | First listing |
| Budget camera | APS-C body (Fuji, Sony, Canon), 10–18mm or 10–24mm wide zoom, stable tripod, bubble level | £500–£900 used | Properly professional | Regular hosts |
| Pro setup | Full-frame body, 16–35mm wide zoom, sturdy tripod, geared head, off-camera flash optional | £1,800–£3,500 used | Magazine-grade output | Multi-property owners |
The two biggest upgrades, in order, are: (1) a tripod, and (2) a wide-angle lens or wide-angle zoom. Most smartphone cameras have a wide-angle mode built in, which is fine for a first pass. If you're shooting a dedicated camera, a 16–35mm zoom on full frame (or 10–18mm on APS-C) is the range you want. Go wider than that and you'll distort the space in a way that looks misleading.
Flash is optional. Most Airbnb photography is shot with natural light alone, supplemented by the room's existing lamps. That's partly a quality choice — natural light reads as genuine — and partly a practical one, because off-camera flash is a significant learning curve for a host shooting their own listing.
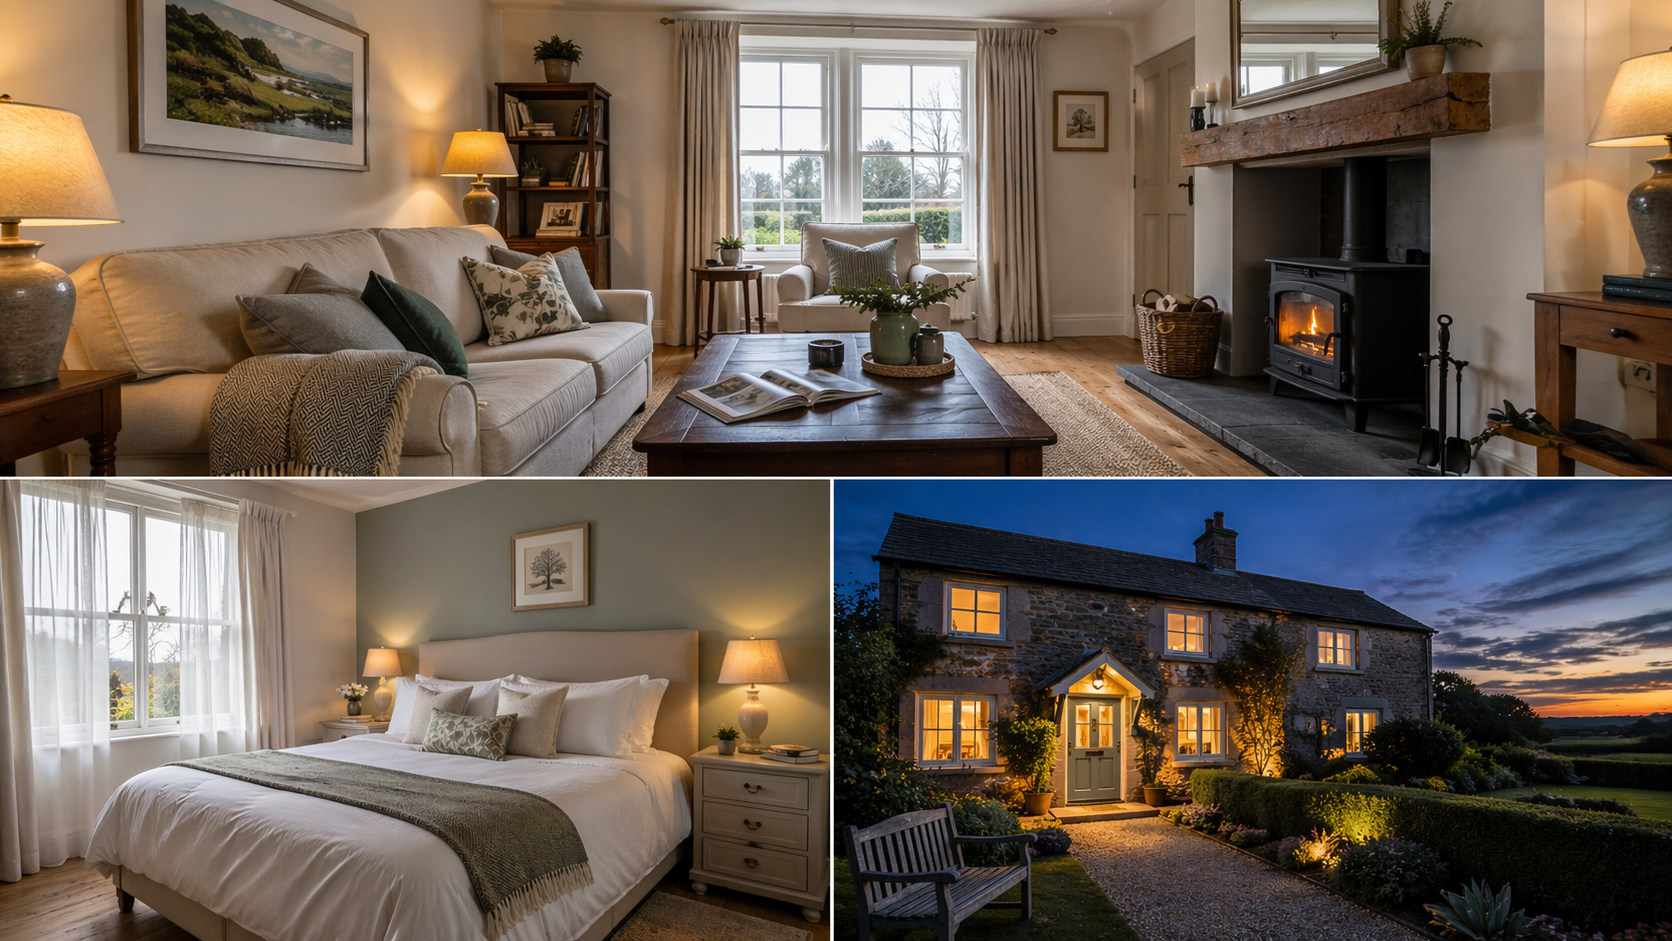
The seven shots every listing needs
Airbnb rewards completeness. A listing with 30 thoughtful photos books better than one with 10 beautiful ones. You're aiming to answer every question a guest might ask before they book, without them having to ask it.
The seven shots every Airbnb listing needs — in order of importance. The first three carry most of the click-through weight.
| Shot | Angle & framing | What it answers | Priority |
|---|---|---|---|
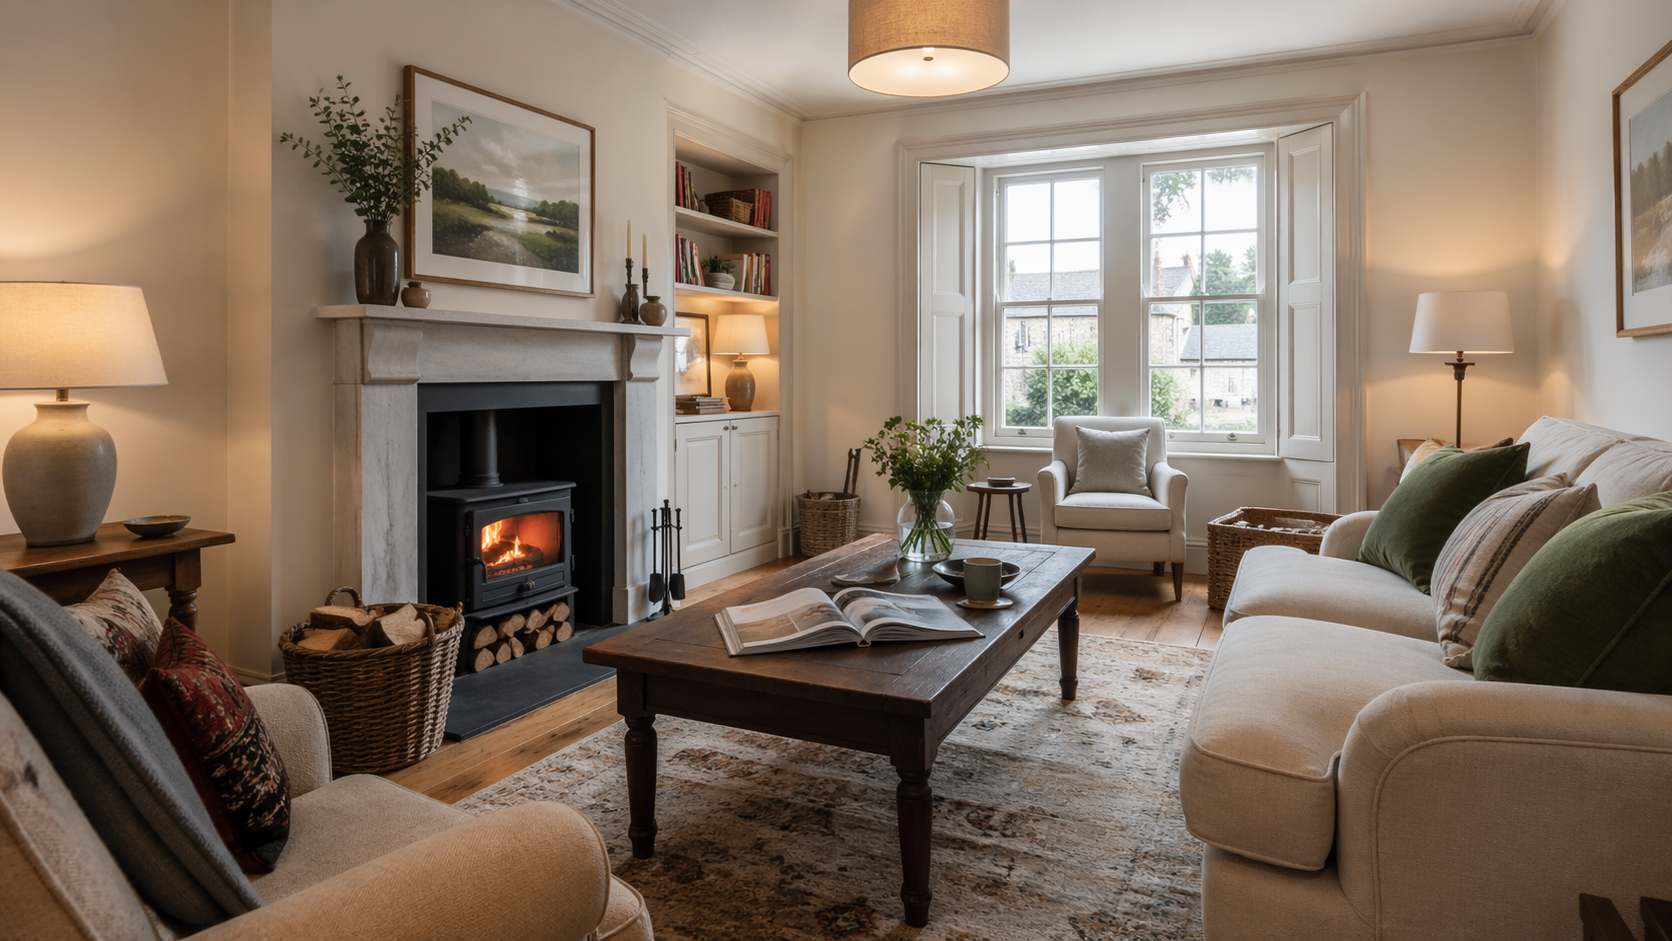
| Hero image | Widest, brightest, cleanest room — usually living room or kitchen, corner-to-corner composition | Would I want to stay here? | Critical |
| Second interior | The next strongest room, shot wide and flattering, reinforcing the hero's feel | Is the whole place nice, not just one room? | Critical |
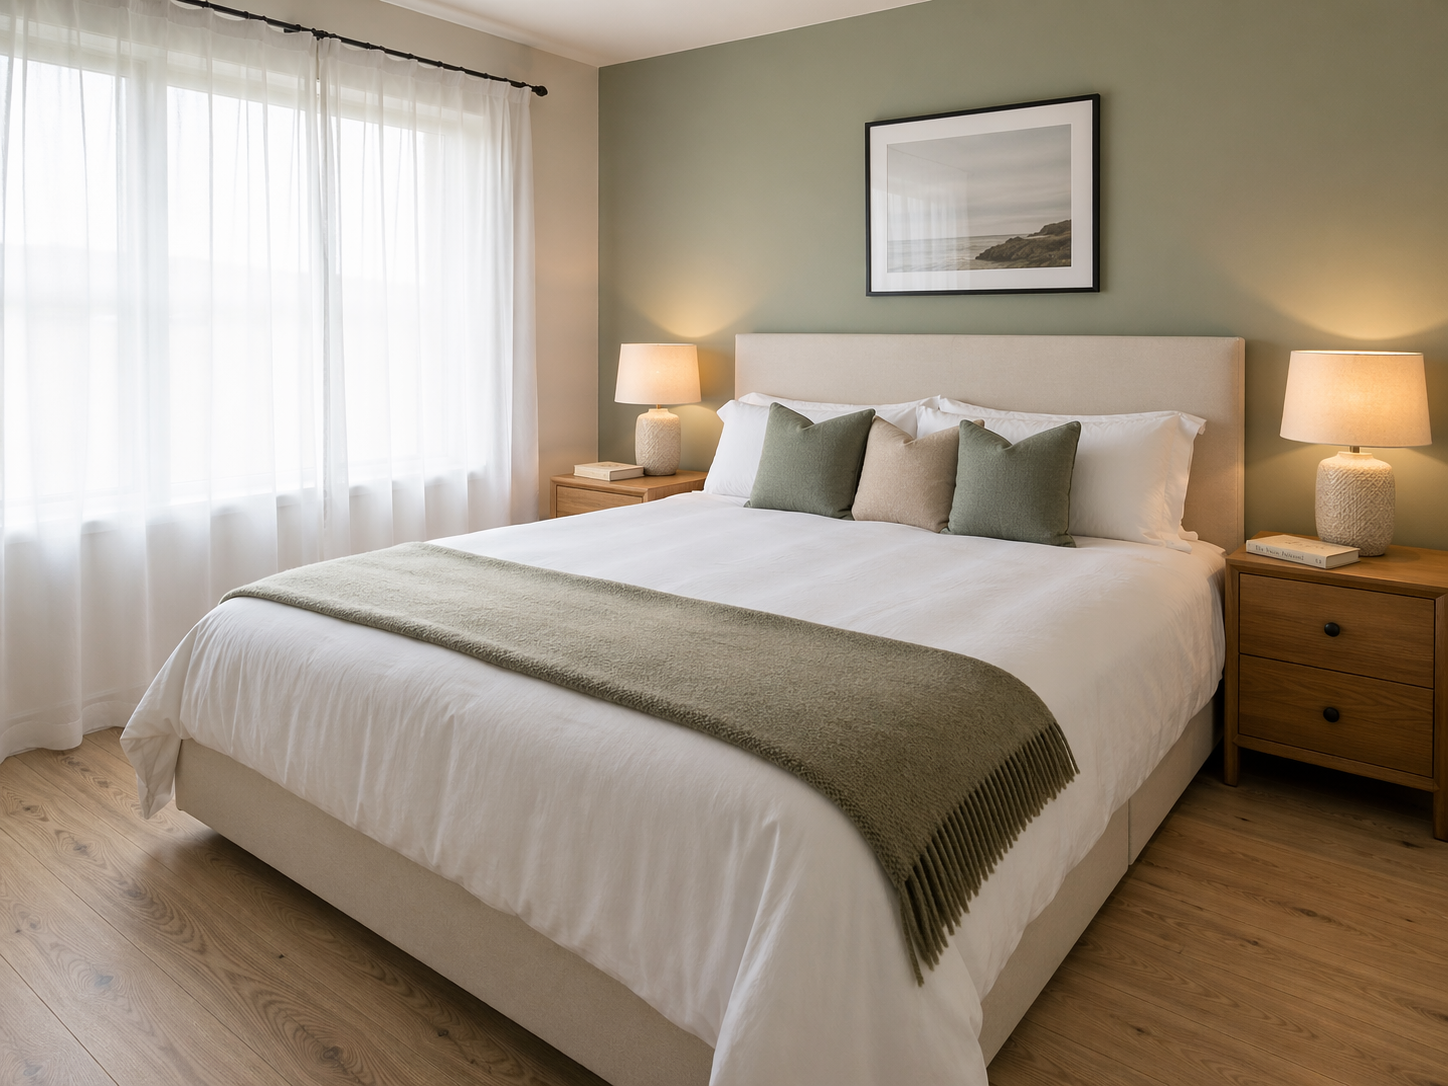
| Primary bedroom | From the foot corner with the bed as the subject, wide enough to show storage and light | Will I sleep well? | Critical |
| Kitchen | Down the length of the room, worktops cleared, hob and sink both visible | Can I cook here? | High |
| Bathroom | From doorway, towels stacked, shower visible, mirror angled away from camera | Is this clean and usable? | High |
| Outdoor space | Garden, patio or balcony, shot in end-of-golden-hour light | Is there somewhere to sit outside? | High |
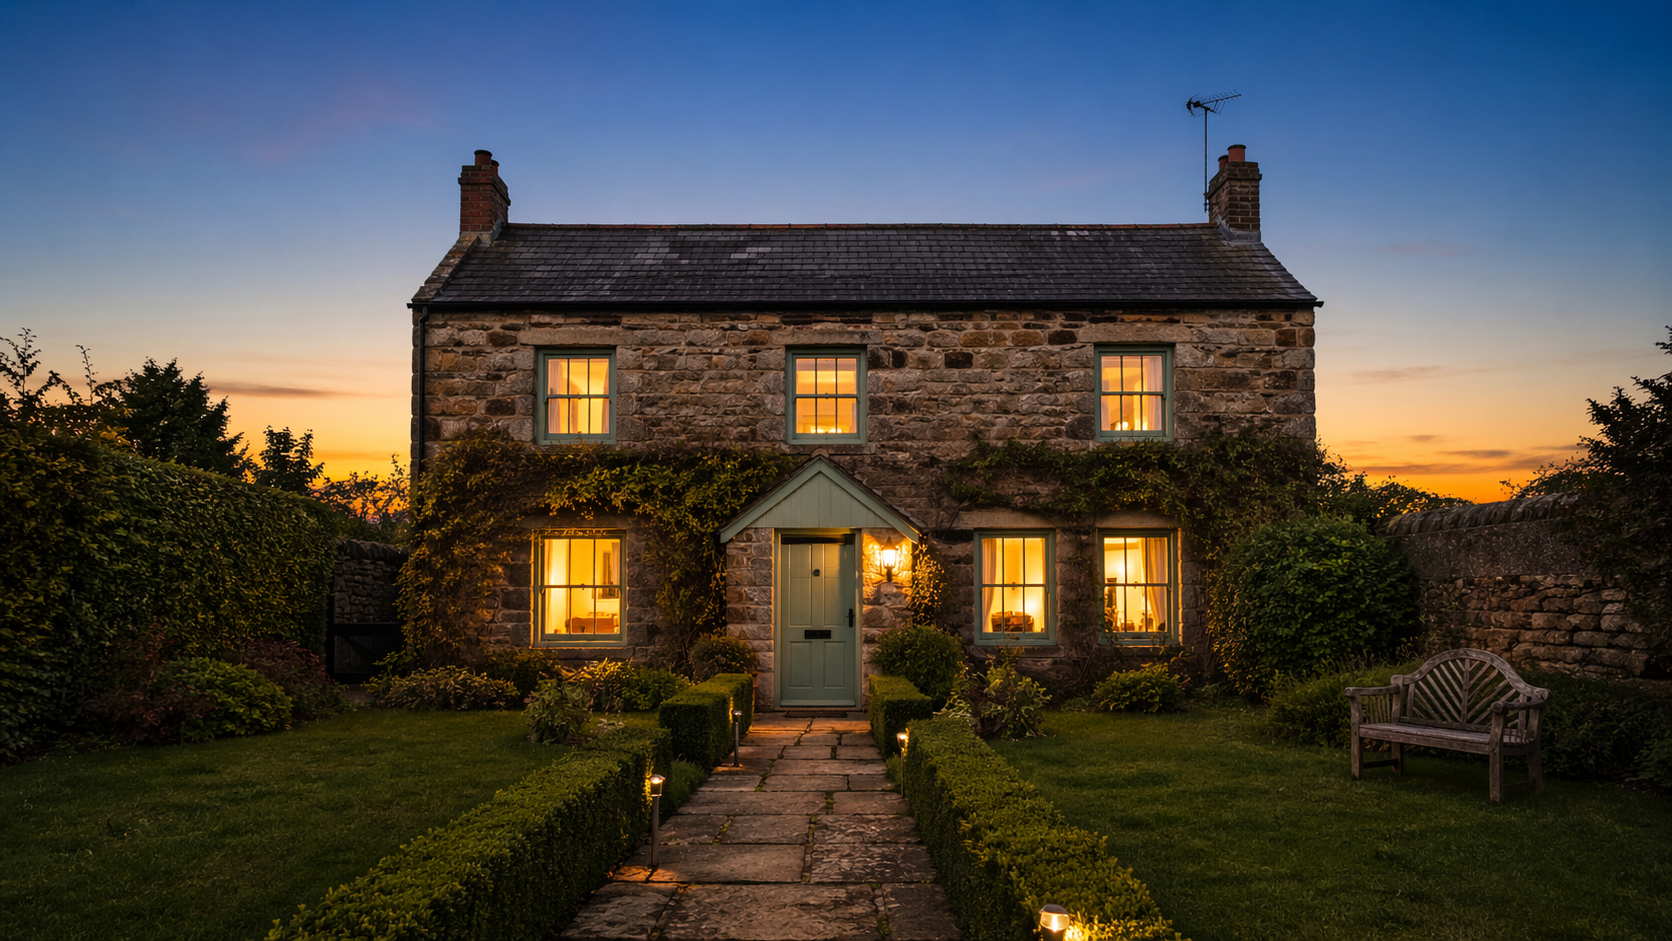
| Twilight exterior | Whole property from the street, 15 minutes after sunset, every interior light on | Is this a place I'd come home to? | Bonus |
The hero shot is the single most important image in your set — it's the one that appears in search results and social shares, and it carries almost all of the click-through weight. Spend disproportionate time getting it right. A strong hero is usually the living room or the kitchen, shot wide, at the brightest, cleanest time of day, with the eye drawn into the frame through a natural line (a sofa pointing toward a window, a kitchen island leading to a view).
Room-by-room technique
The technique is the same for every room, but the priorities change. Here's the workflow that repeatedly produces listing-ready images without drama.
Living room. Shoot from the corner diagonally opposite the main feature (usually the window or the fireplace). Camera at roughly 1.3m high — chair height, not eye height. Lens wide but not silly-wide. Turn every lamp on. Open every blind. If the natural light is flat, shoot around 11am on a bright-overcast day; if it's harsh, wait for late afternoon shade.
Kitchen. Clear the worktops of everything except one small considered item (a fruit bowl, a coffee machine). Shoot straight down the length of the room or diagonally across the island. Aim the camera so the hob and the sink are both visible — guests want to know they can cook.
Bedroom. Bed perfectly made, no creases, pillows plumped. Shoot from the foot corner with the bed as the main subject. Nightstands styled minimally (one lamp, one book, one water glass). Bathroom door ajar if adjacent — it suggests the layout without needing an explanation.
Bathroom. The hardest room because they're often small and always reflective. Shoot from just inside the doorway. Towel stack, no loose bottles, mirror angled so it doesn't catch the camera or the photographer. Turn the overhead light on and the shaver light on for a double-source look.
Outdoor space. Garden, patio, balcony, view — any of these is a booking multiplier. Shoot at the end of golden hour, when the light is warm but the shadows aren't too long. If you have a view, include the view; don't just hint at it.
Lighting: timing beats technique
The quickest win in Airbnb photography isn't a better camera — it's shooting at the right time of day. For most UK properties:
East-facing rooms: shoot mid-morning, when the sun is off the glass but the room is bright.
West-facing rooms: shoot late morning or very early afternoon, before direct sun hits the window.
North-facing rooms: shoot any time during daylight — the light is soft and consistent.
South-facing rooms: shoot on a bright-overcast day rather than in direct sun, which blows out the window and plunges the room into contrast.
Turn on every internal lamp regardless of time of day. The warm pools of lamp light in a daytime shot are what signals "cosy" to a browsing guest — and "cosy" converts.
Composition fundamentals
Three rules cover 90% of what makes a listing photograph work.
Keep verticals vertical. Doorframes, window frames, and corners of walls should be perfectly vertical in the frame, not splayed outward or tilted. A tripod with a bubble level (or your phone's level screen) solves this in about ten seconds. A slightly wonky room reads as unprofessional before a guest even works out why.
Shoot from chair height, not eye height. Around 1.2 to 1.4 metres off the floor. Eye-height shots look down into the room and make ceilings feel lower. Chair-height shots feel balanced and show both floor and ceiling generously.
Lead the eye through the frame. Every shot should have a natural path for the eye — a sofa pointing toward a window, a bed pointing toward a door, a dining table leading to a kitchen. If the image feels flat, move one step sideways until it doesn't.
Exterior and twilight shots
One exterior shot taken 15 minutes after sunset, with every internal light on, will do more for your listing than three more interior photographs. Twilight exteriors are the single most shared, most screenshotted, most saved images in UK holiday let photography — and they're not difficult.
Set up on a tripod before sunset. Compose with the property filling the frame comfortably. Turn on every light inside. Wait until the sky is a deep blue — around 20 minutes after official sunset in summer, closer to 10 minutes in winter. Shoot at the base ISO of your camera, aperture around f/8, shutter whatever is needed to expose the sky to a rich blue. The warm interior light against the cool exterior sky is the whole point.
How to shoot a room for your Airbnb listing
A six-step workflow that works for any room in any property.
1Prepare the room before the camera comes out
2Set up the tripod at chair height
3Turn on every internal light
4Compose from a corner diagonally opposite the main feature
5Set exposure for the window, not the room
6Take three frames, slightly different angles
Common mistakes that quietly lose you bookings
Five mistakes show up in roughly half the UK holiday let listings I see.
1. Too wide. An ultra-wide lens (10mm on full frame, 7mm on APS-C) makes small rooms look generous but creates a visible warp guests will spot. Stay at 16–24mm on full frame, 10–16mm on APS-C.
2. Phone portrait orientation. Airbnb's listing grid is horizontal. Vertical phone photos get letterboxed with ugly grey bars either side. Shoot landscape, always.
3. Lights off in daytime shots. Cold. Clinical. Empty-feeling. Lights on — even in daylight — is the single cheapest atmosphere upgrade available.
4. Clutter creep. Dishcloths by the sink, remote controls on the sofa, toothbrushes by the basin, charging cables on nightstands. A twenty-minute tidy before shooting is the highest-paid work you'll do that week.
5. Over-editing. HDR-heavy, saturation-heavy, contrast-heavy edits signal "estate agent photo" to guests and read as inauthentic. Keep edits subtle: a little lift to shadows, a gentle white balance correction, nothing that would make the space unrecognisable in person.
Editing workflow
A clean edit takes five minutes per image and makes a genuine difference. The essentials, in order:
Correct the white balance first. Mixed daylight and lamp light usually needs warming slightly, not cooling.
Lift the shadows a touch so dark corners have some detail without going flat.
Pull back the highlights gently so windows aren't completely blown out.
Straighten verticals if the tripod-and-level step wasn't perfect in camera.
Very light crop to clean up the frame edges. Don't re-compose heavily in post.
Lightroom or Lightroom Mobile does all of the above comfortably. If you're on a phone-only workflow, Adobe Lightroom Mobile (free tier) or Snapseed are both perfectly capable.
Airbnb photography: frequently asked questions
Practical answers to the questions hosts ask most often.
Can I shoot my Airbnb listing on a phone?
What's the best time of day to photograph my holiday let?
How many photos should I put in my Airbnb listing?
Should I use HDR for Airbnb photography?
Do I need a wide-angle lens?
How high should the camera be when shooting an Airbnb listing?
Can I photograph my Airbnb with guests staying there?
When is it worth hiring a professional instead?
Ready to go further
Shooting your own Airbnb photography is a genuinely useful skill with a direct return. If you want to level up further — either to shoot more confidently, to learn to shoot for other hosts as a side line, or to bring in a professional for the difficult shots — here are a few useful next steps.
Continue learning
Related reading and a practical next step.
- Related article Headshots at Home: A DIY Guide The portrait equivalent of this guide — what to do with the kit you already own.
- Related article Learn Landscape Photography Techniques The composition principles that apply to interior photography too.
- Related article Corporate Photography Training, Coventry If you want to take this skill further or train your team.
- Hire Alan Commercial & Property Photography When you need a professional shoot rather than a DIY pass.