
Sports and Action Photography Guide - Master the techniques
Table of Contents Show
The hit-rate problem
The first thing most parents and hobbyist sports photographers tell me is that they "shoot loads but only keep a few." Cards full of frames; folders of near-misses; the occasional one that works. The instinct, when this happens, is that the equipment is the problem — that a longer lens, or a faster body, or one of those expensive 70-200s would lift the hit rate.
The equipment is almost never the actual problem. The problem is usually one of three things: position, anticipation, or settings discipline. A parent with a mid-range body and a second-hand 70-300mm zoom can produce sharper, better-composed images of their child's match than a wealthier hobbyist with full-pro kit who hasn't thought about where to stand or what shutter speed they actually need. Sports photography rewards thought before it rewards spending.
This guide pulls together the principles I teach photographers who come to me wanting to shoot their kids' weekend matches, their local club games, or — at the more ambitious end — semi-pro fixtures and athletics meets. It covers settings, technique, and equipment, but it leads with the things that change your hit rate first: where you stand, what you anticipate, and how you discipline your settings before the action starts. The settings table covers all the major UK sports as a quick reference, but if you only take one thing from this article, take the anticipation principle in section three.
What sports photography actually rewards
Four traits separate photographers whose galleries are full of keepers from photographers whose galleries are full of out-takes.
Anticipation. Knowing where the action is going to be a half-second before it gets there. The viewfinder is too narrow and your reaction time is too slow to react to action — by the time you've seen it, it's gone. The good sports photographers are reading the game, not chasing the ball.
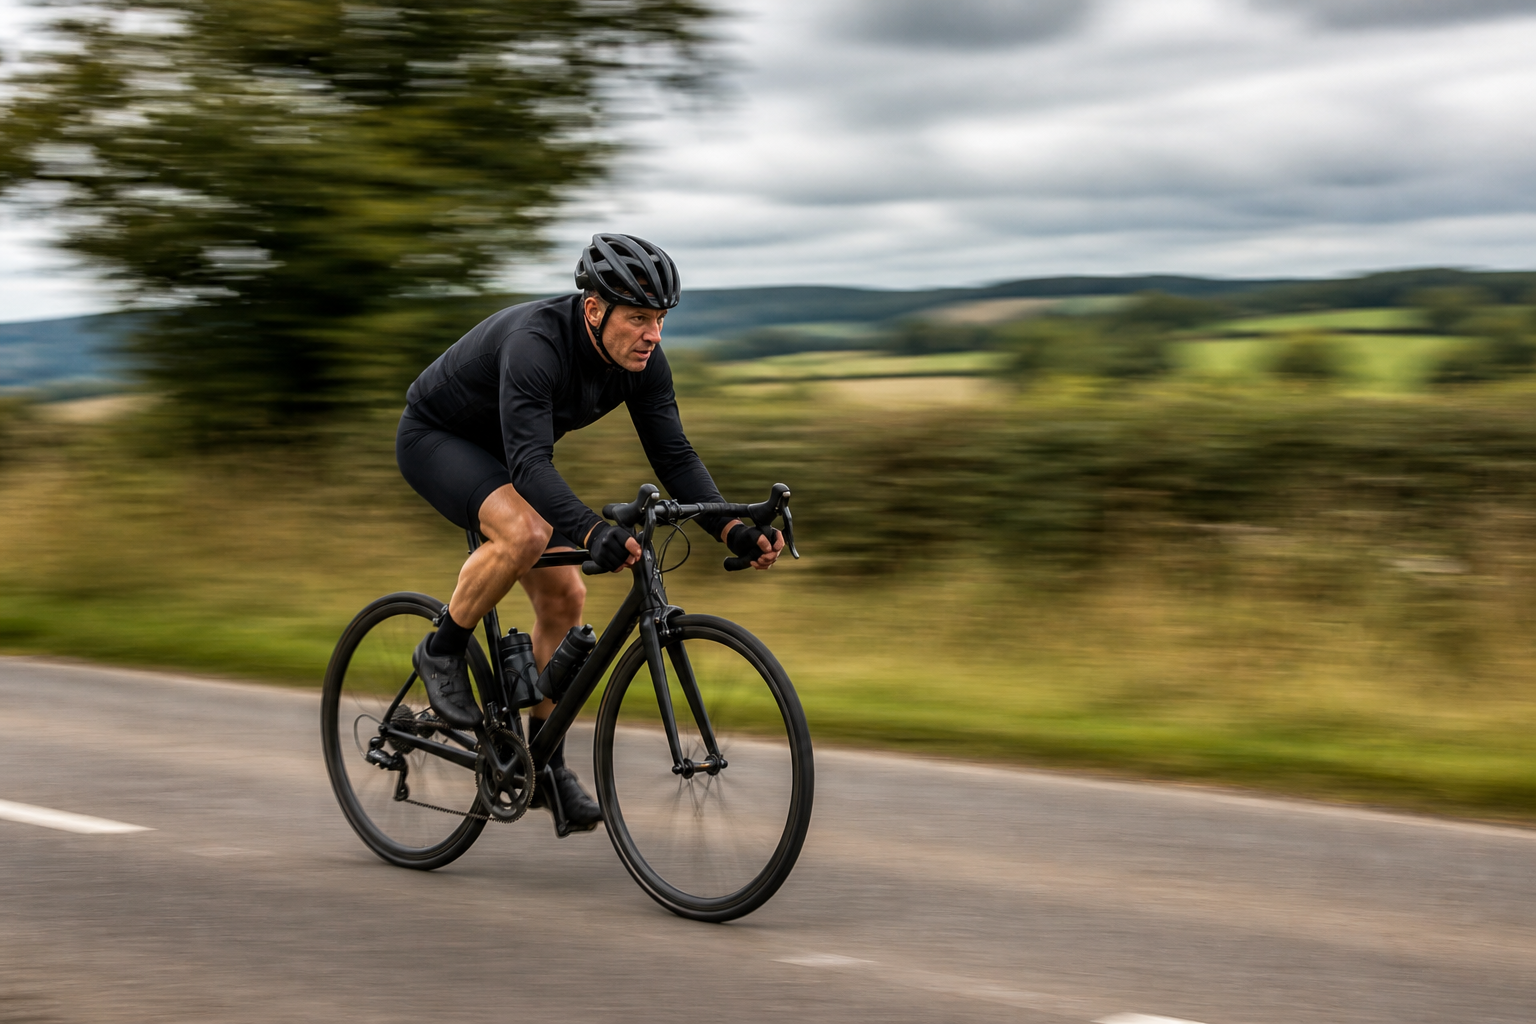
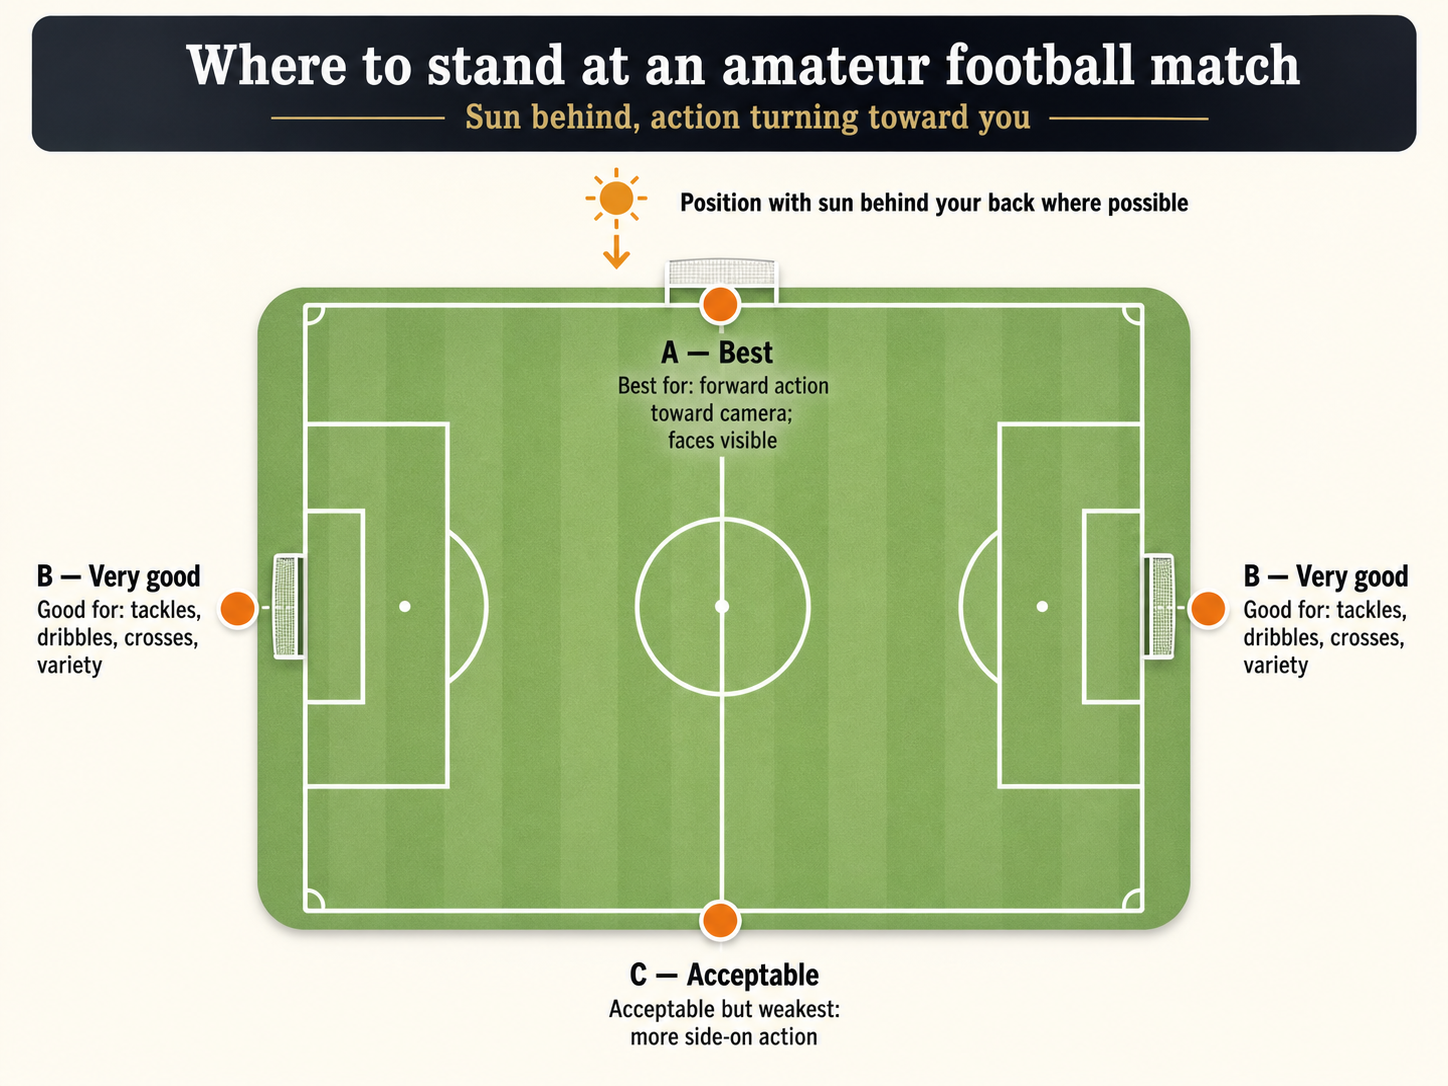
Position. Where you stand changes everything. Get low, put the sun behind you when you can, choose the side of the pitch where the action will turn toward you. Most amateur sports photographers stand wherever's most comfortable. The keepers come from photographers who walked around the venue first and chose their spot deliberately.
Light. Sport doesn't always happen in good light, but you can make better choices within the light you have. Floodlit football grounds, dappled park pitches, dusk kick-offs, indoor sports halls — each one calls for different settings and different shot choices. The photographer who keeps shooting the same way regardless of conditions wonders why some sessions produce nothing.
Settings discipline. Decide your settings before the action starts and adjust deliberately as conditions change. Don't drift through the game on whatever the camera fancied at the start. The biggest single source of soft sports photographs is a shutter speed that was fine ten minutes ago and is wrong now.
The rest of this guide is about how to develop each of those four.
The anticipation principle
Watch the game without the camera first.
If you have time before kick-off — even five minutes — put the camera down and just watch. Where do the players gather? Where does the ball spend most of its time? In football, where are the corners played from and where do they land? In rugby, where do the lineouts and scrums happen? In cricket, where does the bowler run from and where does the batsman face? You're building a mental map of the geography of the action so that when it starts, you already know where to point.
Then watch the patterns. Sport is more predictable than it looks. A good winger has favoured moves. A particular striker likes to cut inside onto their stronger foot. A bowler has a stock ball before they vary it. By the second or third instance of a pattern, you can shoot it.
Talru Film & Photo, a UK sports photographer who's spent over a decade pitch-side at professional football, calls this "knowing the storyline" — knowing what's likely to happen at this fixture before kick-off. If a player is returning from injury and likely to want to celebrate, you know to watch for it. If a manager is making their home debut and will probably wave to the crowd at the final whistle, you know where to be at full time. The same applies at every level: the under-12s' best player will probably get the ball more, and a regular at the local parkrun will probably push hard at the finish line. Plan for what you can predict.
The practical version of this for in-the-moment shooting: watch the play with both eyes, with the camera at chest height, and only bring it to your eye when you know where the next action is about to be. The camera always slightly narrows your awareness — peripheral vision, sound, atmosphere — so spending unnecessary time at the eyepiece costs you anticipation. Up for the moment, down between moments. You'll feel less rushed and you'll catch more.
Position and access
Position is the photographer's biggest free upgrade. It costs nothing and changes results more than most equipment decisions. Three principles apply across nearly every sport.
Get low. Knee height, sometimes lower. Players spend a lot of time looking down at the pitch, the ball, or the puck — if you're shooting at standing height, you'll get a lot of shots of the tops of heads. Drop down and you get faces, eye lines, and a more dramatic perspective. A photographer kneeling on the touchline of a football match will produce stronger images than the same photographer standing.
Sun behind you when you can. Light direction matters more in sport than people realise. With the sun behind your back, your subjects are front-lit and well exposed. With the sun in front of you, your subjects are silhouetted unless you're deliberately going for that look. At amateur grounds you can usually choose your touchline; at ticketed events you can't always. Shoot what's possible from where you're allowed.
Choose the side where action turns toward you. If you're shooting football and the home team usually attacks the right-hand goal in the first half, station yourself behind the goal they're attacking. The action will be coming toward you, faces will be visible, momentum will be in your direction. Static side-on shots from the halfway line are usually the weakest position you can pick.
Access varies by venue. Local park pitches and recreation grounds are public, and a parent watching their child's match can stand wherever they like. Club venues at amateur level usually welcome a parent or supporter with a camera, but it's good practice to ask. Ticketed events at semi-pro and professional level have accreditation systems — without a press pass, you're a spectator and you're shooting from your seat. The line between supportive parent-photographer and intrusive photographer is sometimes about position too: stand where you don't block other parents' views, don't crowd the dugout, don't talk to players during play.
Light and weather
UK sport happens across the worst possible range of light conditions. Bright midday sun on a dry July athletics meet. Floodlit November football kick-offs. Drizzle and overcast skies for half the cricket season. Indoor sports halls with horrible mixed fluorescent and tungsten lighting. The settings strategy has to flex.
Bright outdoor light is the easy case. Shutter speed up, aperture moderate, ISO low. Standard sport settings work well and you have headroom for fast shutter speeds and shallow apertures simultaneously.
Floodlit grounds are the next hardest case. Most floodlights produce uneven coverage — some areas of the pitch are noticeably darker than others, and the light can have a strong colour cast. The temptation is to set up for the brightest area and accept underexposure elsewhere; the better approach is to set up for the area where the action will be most concentrated and adjust your ISO upward when play moves into the dim corners.
Indoor sports halls are the hardest case most parents face. Basketball, netball, gymnastics, indoor cricket and futsal all share the same problem: artificial overhead lighting, often quite low light levels, often mixed colour temperatures. You will need a fast lens (f/2.8 or faster) and a high ISO (1600–6400 is normal) and you will accept some grain. The alternative is motion blur, which is worse. Modern sensors handle ISO 3200 well; ISO 6400 is usable on most current bodies.
Bad weather is a feature of UK sport. Rain on a long lens needs a rain cover or a friend with an umbrella. Cold mornings drain batteries faster than you expect. Shooting through a fence at amateur grounds is sometimes unavoidable — a wide aperture and the lens close to the wire can make the fence dissolve in the foreground.
Technique — settings principles
Sports settings live in three decisions, taken in order: shutter speed for the action speed, aperture for the depth of field you need, then ISO to balance the exposure.
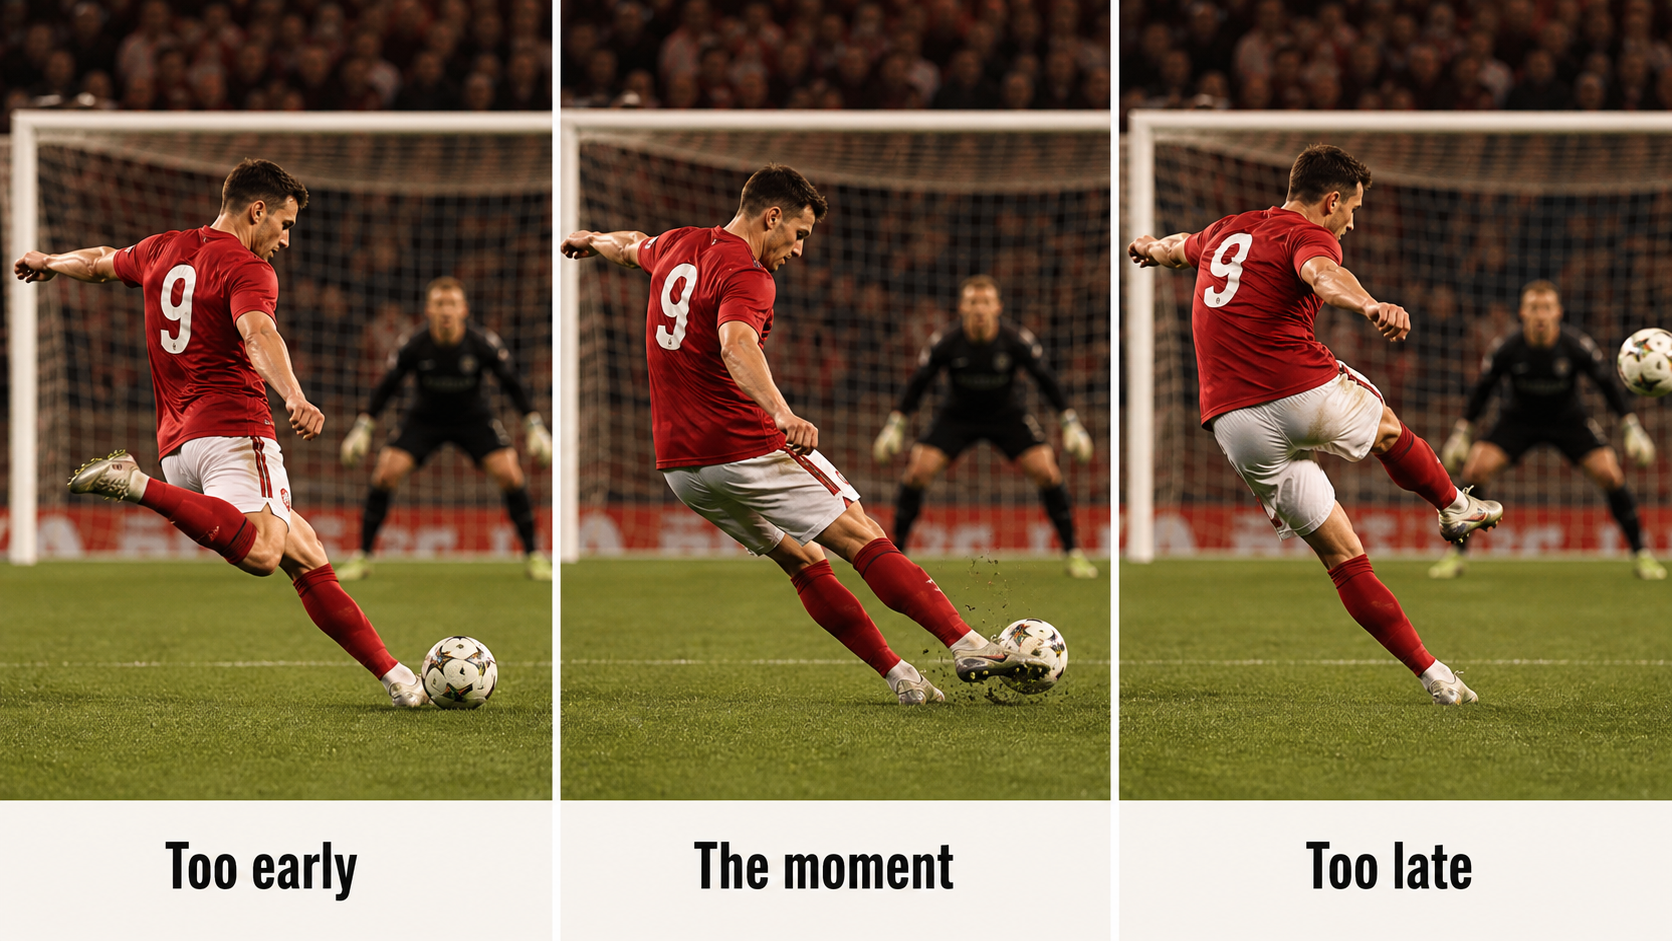
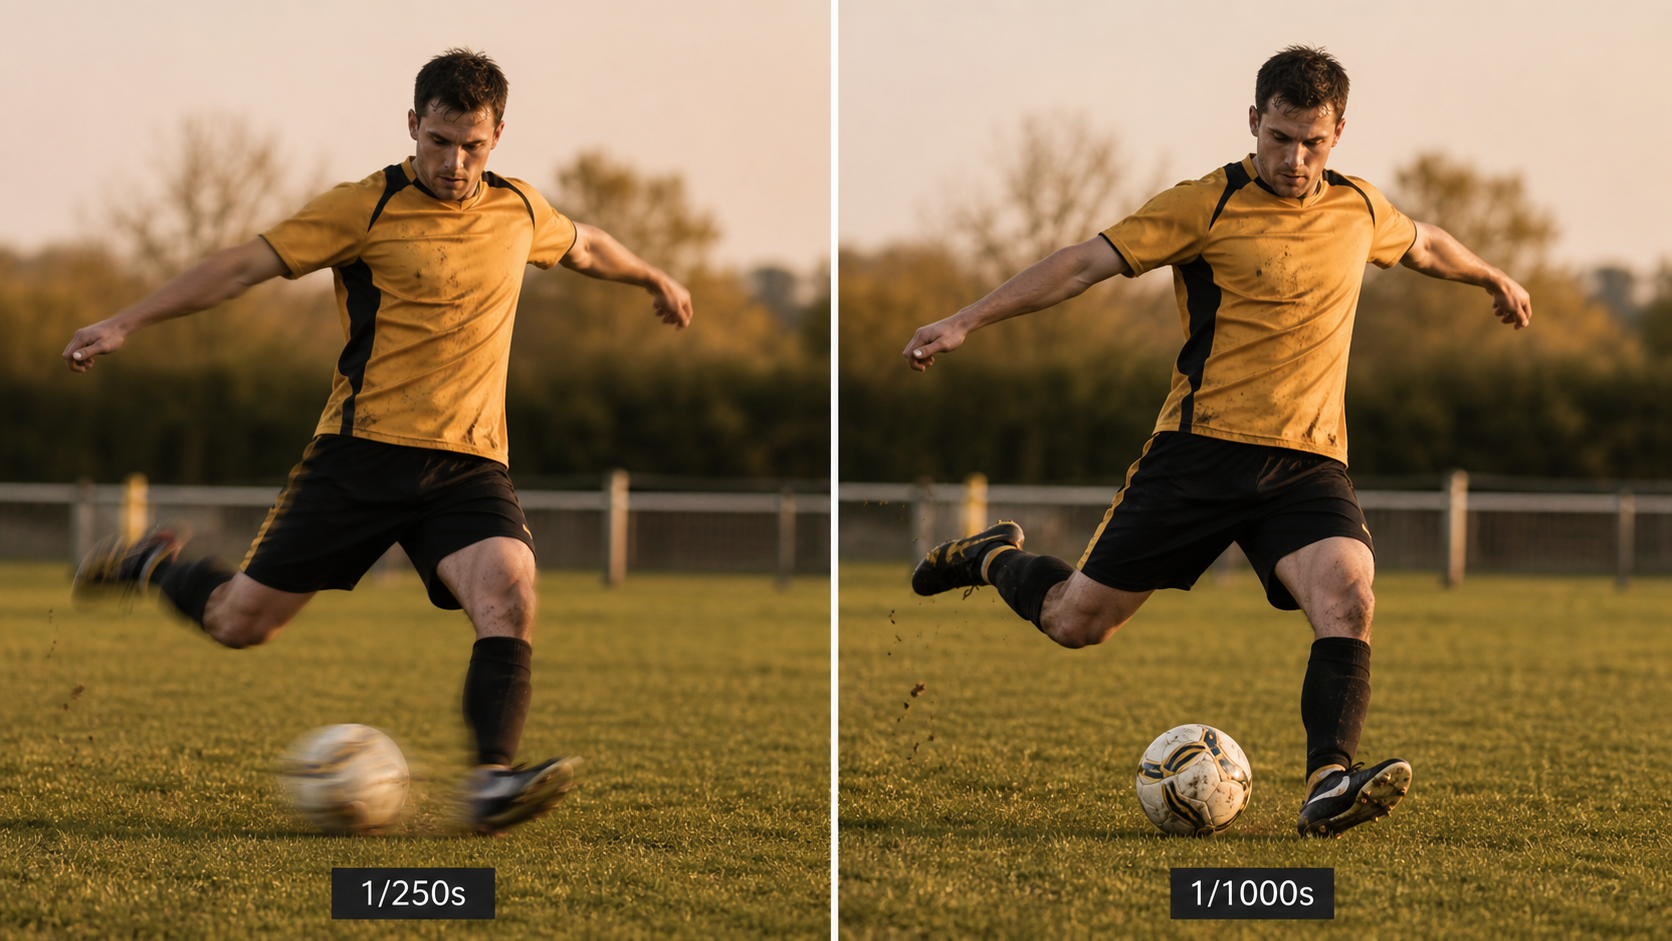
Shutter speed first. This is the decision that decides whether your photographs are sharp or blurred. The general rule is faster than you think — for most action sports, 1/1000s is a sensible starting point and many sports want faster. The full breakdown by action speed is in Table 2 below, but the principle is: pick a shutter speed that freezes the slowest body part of the fastest motion in your frame. A footballer's foot at the moment of a kick is moving much faster than their torso. A swimmer's hand exiting the water is faster than the rest of their body. Shoot for the fastest part. If you want a deeper foundation on this, my guide to what shutter speed is in photography covers the underlying mechanics.
Aperture second. Wider apertures let in more light (which helps ISO stay low) and produce shallower depth of field (which separates your subject from the background). Most sports photography lives at f/2.8 to f/4. Tighter than f/4 starts costing you ISO performance you can't easily afford. Wider than f/2.8 starts producing depth of field so shallow that you'll miss focus on running subjects. f/2.8 is the sport sweet spot if your lens can do it.
ISO third. ISO is the balancing setting. Pick your shutter speed and aperture for the action and the look, then raise ISO as much as needed to expose correctly. Modern bodies handle high ISO far better than five years ago — don't be afraid of ISO 3200 outdoors at dusk or ISO 6400 indoors. Grain is fixable in editing; motion blur is not.
Exposure mode. Either manual or shutter priority. Auto and "sports mode" auto don't give you enough control. Shutter priority is the friendliest start: you set the shutter speed, the camera works out the aperture and ISO. Once you're confident, manual gives you more control — especially when light is changing as players move between sun and shadow. Most professional sports photographers shoot manual; most parents starting out are better off in shutter priority for their first few sessions.
Autofocus mode. Continuous autofocus (Canon: AI Servo or AF-C; Nikon: AF-C; Sony: AF-C) is essential. The camera continuously refocuses while you half-press the shutter, tracking the subject as they move. Single-shot AF locks focus when you half-press and doesn't update — useless for moving subjects. Make sure you're in continuous mode before kick-off. My guide to focus modes and tracking covers the practice mechanics.
AF point selection. A single centre point is the most reliable choice for sport. You place that point on your subject (typically the chest — easier than the face, which moves more) and let continuous AF do the work. Modern cameras have impressive zone and tracking AF, including subject-recognition for athletes and faces, and on the latest bodies these are excellent. On older bodies, a single point is more reliable than zone modes that hunt for the right subject.
Burst mode. Set continuous high. Fire short bursts of 3–6 frames at the moment of action, not long sprays of 20+. The hit rate per moment is higher with deliberate short bursts than with held-down spraying, and you'll spend much less time culling.
Settings reference table by sport
The table below is a starting-point reference for the major sports a UK photographer is likely to shoot. Use it as a default and adjust to the specific conditions you find on the day.
Settings reference by sport
A starting-point reference for the major sports a UK photographer is likely to shoot. Adjust to the actual conditions on the day.
| Sport | Shutter speed | Aperture | ISO (daylight) | Focal length | AF mode | Key tip |
|---|---|---|---|---|---|---|
| Football | 1/1000s+ | f/2.8–f/4 | 200–800 | 200–400mm | AF-C, single point | Get low, behind goal team is attacking, sun behind |
| Rugby | 1/1000s+ | f/2.8–f/4 | 200–800 | 200–400mm | AF-C, zone | Anticipate breakdowns; watch the gainline |
| Cricket | 1/1000–1/1600s | f/4–f/5.6 | 200–400 | 300–600mm | AF-C, single point | Bowling stride and batting moments matter most |
| Athletics / parkrun | 1/1000s+ | f/4 | 200–400 | 70–300mm | AF-C, single point | Finish line and corners for emotion + effort |
| Cycling (road) | 1/1000–1/2000s freeze OR 1/60–1/125s panned |
f/2.8–f/5.6 | 200–800 | 70–200mm | AF-C, single point | Pick freeze OR pan — not both at once |
| Equestrian | 1/800–1/1600s | f/4 | 200–400 | 200–400mm | AF-C, focus on horse's eye | Jumps and dressage finishes carry the moment |
| Motorsport | 1/1000s+ freeze OR 1/125–1/250s panned |
f/4–f/5.6 | 100–400 | 200–600mm | AF-C, tracking | Pan at corners (reads "fast"); freeze on straights reads static |
| Swimming | 1/1000s+ | f/2.8–f/4 | 800–3200 (indoor) | 70–200mm | AF-C, single point | Indoor lighting is brutal — fast lens essential |
| Tennis | 1/1000s+ | f/2.8–f/4 | 200–800 | 200–300mm | AF-C, single point | Net level for serves; baseline level for rallies |
| Indoor sports (basketball, netball, gymnastics) |
1/640–1/1000s | f/2.8 | 1600–6400 | 70–200mm f/2.8 | AF-C, single point | Hardest light most parents face — fast glass non-negotiable |
| Watersports (sailing, rowing) |
1/1000s+ | f/4–f/5.6 | 100–400 | 200–600mm | AF-C, tracking | Light reflects off water — meter for the boat, not the highlights |
The shutter-speed-by-action-speed table is the same data viewed differently — by what's moving, rather than by which sport. Useful as a quick mental check when you arrive at an event you haven't shot before.
Shutter speed by action speed
A quick mental-check reference when you arrive at an event you haven't shot before. Pick the shutter speed for the fastest moving body part in your frame.
| Action speed | Minimum shutter speed | Examples |
|---|---|---|
| Slow walking / static | 1/250s | Warm-up, team line-ups, post-match handshakes, dressage at walk |
| Brisk movement | 1/500s | Jogging, easy trotting, slow-paced training drills |
| Running / general action | 1/1000s | Football open play, rugby running, athletics, parkrun, equestrian canter |
| Fast limb movement | 1/1600s | Footballer striking ball, cricketer's bowling action, swimmer's hand at catch, tennis serve |
| High-speed sport | 1/2000s | Road cycling, club motorsport (freeze), sprint athletics finish |
| Very fast machinery | 1/4000s+ | Rally cars, track motorsport, professional cycling sprints (freeze) |
| Panning (creative) | 1/60–1/250s | Cyclist passing, runner on bend, horse galloping, motorsport at corner |
| Long pan (advanced) | 1/30–1/60s | Confident-hands panning for dramatic motion blur — high miss rate, high reward |
When in doubt, faster. Modern cameras handle high ISO better than they used to; grain is fixable in editing, motion blur is not.
Equipment — what actually matters
Equipment matters in sport more than in some other genres, because the demands are real: long reach, fast autofocus, high frame rate, the ability to shoot at high ISO without falling apart. But the priorities are different from what camera-buying guides usually suggest.
Body — autofocus performance over megapixels. A 24-megapixel body with class-leading autofocus and a 10fps burst is much more useful for sport than a 45-megapixel body with average AF and 5fps. Recent mirrorless bodies have leapfrogged DSLRs for sport because their AI subject-detection is genuinely excellent. If you're upgrading specifically for sport, prioritise AF speed, AF coverage, burst rate, and high-ISO performance. Resolution comes last on the list.
Lens — reach is what you usually need. The single most common upgrade question I hear is "do I need a longer lens?" — and for parents shooting amateur sport, the honest answer is usually yes. A 70-200mm zoom is fine for tightly contained action like swimming or basketball, but for football, rugby, or cricket on full-size pitches, you'll want 300mm or 400mm at the long end. A 100-400mm zoom is the sweet spot for amateur sport — long enough for football from the touchline, versatile enough to back off for celebration and team shots.
Fast glass vs slow glass with high ISO. An f/2.8 zoom at ISO 800 produces the same image brightness as an f/5.6 zoom at ISO 3200. The fast glass costs significantly more and is heavier. The slow glass needs better high-ISO performance from your body. For outdoor daylight sport, slow glass and a modern body work fine. For indoor sport and floodlit night football, fast glass earns its weight and price.
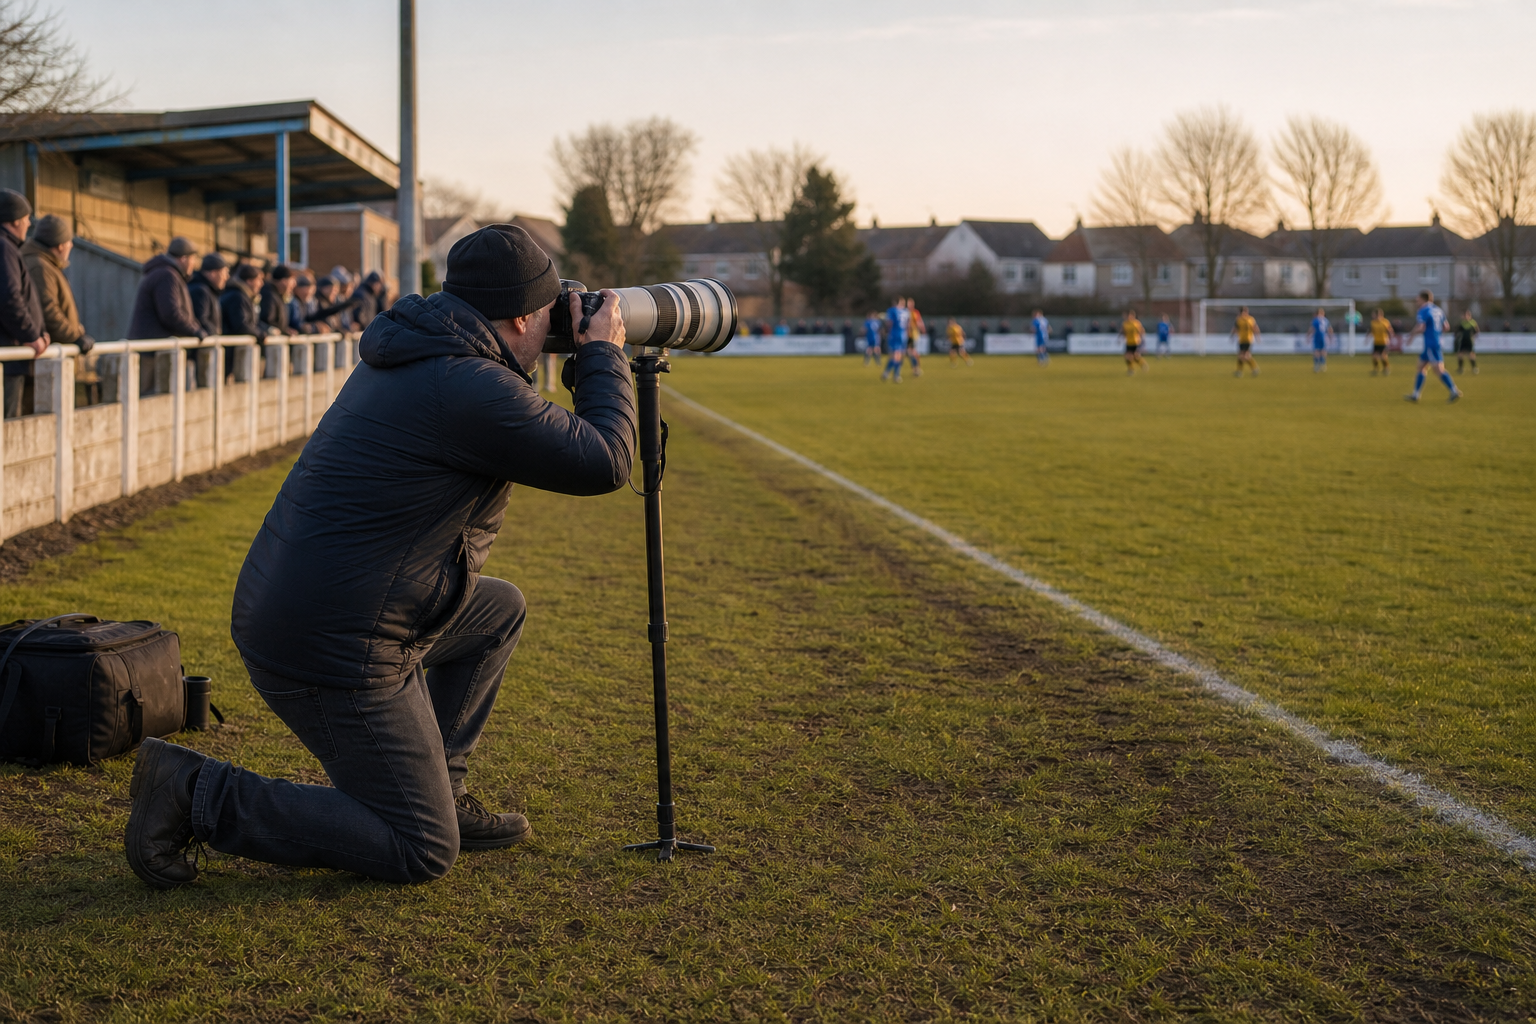
Place here, mid-equipment section. Filename: monopod-long-lens-action.jpg. A photographer kneeling at the touchline of a UK sports match, long telephoto lens supported on a monopod, shooting toward the action. Reinforces both the "get low" position principle and the equipment-in-real-use point. Caption suggestion: "A long lens on a monopod and a low position — most of the kit story for amateur sport."
Zoom vs prime. Zooms win for amateur sport. The flexibility to recompose without moving (because at amateur grounds you usually can move, but you'll often miss action while you do) is more valuable than the marginal sharpness and stop of aperture you get from a prime. Pros sometimes carry a 400mm f/2.8 prime and a second body with a wider zoom; for most readers of this article, one fast zoom is the right answer.
Used market and budget options. Used sports glass is plentiful and well-priced. A second-hand Canon 70-200mm f/2.8 IS II or Nikon 70-200mm f/2.8 VR II is a fraction of the new price and produces images that are indistinguishable from what comes off the latest version. The used market is healthy through dealers like MPB, WEX Used, and Park Cameras Used.
Teleconverters. A 1.4x teleconverter on a 70-200mm gives you 100-280mm at the cost of a stop of light. A 2x teleconverter takes you to 140-400mm at the cost of two stops. Cheaper than a longer lens, lighter to carry, often a better option for a parent who wants more reach occasionally rather than constantly.
Monopods. A long lens at f/2.8 is heavy, and your shutter speeds aren't always fast enough to absorb hand-held shake when you're tired in the second half. A monopod takes most of the weight, is allowed at most amateur venues (tripods often aren't), and lets you shoot for longer sessions without arm fatigue.
Freezing motion vs conveying motion
Sport gives you two valid creative choices: freeze the moment so every detail is sharp, or convey motion so the image feels alive with movement. Both work. Both belong in a strong sport portfolio. Mixing them deliberately is what separates a gallery of identical sharp moments from a gallery that tells a richer story.
Freezing motion. This is the default for sport. Shutter speeds of 1/1000s and above, fast enough to render the fastest moving body part as sharp. The image looks like a clean stop in time — the ball at the moment of contact, the runner in mid-stride, the swimmer at the catch. For practice and structured assignments to build this skill, my shutter speed and motion practice assignment walks through the process.
Conveying motion through panning. Slower shutter speeds — typically 1/60s to 1/250s — combined with the camera moving in time with the subject. The subject stays sharp; the background blurs into streaks of motion. The image reads as fast in a way that a frozen shot doesn't. Cycling, motorsport, and athletics are particularly suited to panning. Football and rugby panning works for set-piece moments more than for general open play.
Panning is harder than freezing because you are deliberately accepting some softness in exchange for the sense of speed. Start at 1/250s for an easy pan; drop to 1/125s as your technique improves; 1/60s is for confident hands and is where the genuinely dramatic results come from. The technique: pick a focus point, follow the subject smoothly through the frame, fire the shutter while still moving. Stopping the camera before the exposure ends produces a sharp subject on a sharp background — the opposite of what you want. My movement and intentional blur practice assignment covers the panning side in more depth.
When to mix. A typical session might be 80% frozen action and 20% panned motion. The panned shots earn their place in your gallery because they feel different — they convey the speed of the sport in a way that frozen shots can't. Try a panned shot at every moment when the subject is moving across your frame predictably (a cyclist passing, a runner on the bend, a horse on the gallop). Some will work, most won't, and the keepers are often the most powerful image of the session.
Composition for action
Sport composition has its own conventions. Some carry over from general photography; some don't.
Leave room in the direction of travel. A footballer running left should have empty frame space to the left, not to the right. The eye reads the photograph as the player about to move into space — visually satisfying. Crop with no space ahead of the subject and the photograph reads as cramped or as the player about to run out of frame. The compositional principles in my finding your compositional balance article apply directly here, applied to dynamic subjects rather than static scenes.
Get the ball — or whatever the equivalent is — in the frame. A football photograph without the ball is usually weaker than one with it. A cricket photograph at the moment of bowling reads better with the ball mid-flight. A tennis photograph wants the ball or the racquet at the contact moment. There are exceptions — celebration shots, emotional after-the-event moments — but for action shots, the implement matters.
Crop tight in-camera where you can. Empty space around your subject usually doesn't help. The exception is the direction-of-travel space mentioned above; otherwise, fill the frame with the subject. Cropping in post is less effective than cropping in-camera because you're throwing away resolution. The principles in my what is framing in photography guide cover this in more depth.
Background awareness. The bin behind their head. The parked car in the corner. The fence post that grows out of their shoulder. At amateur venues backgrounds are often messy. Your two main tools are aperture (f/2.8 throws the background out of focus enough to suppress most distractions) and angle (a small move left or right can move a distracting object out of frame). Spend a few seconds before kick-off looking at what's behind your usual shooting position and decide what you'll do about it.
Ethical considerations
Sport photography crosses some ethical territory that landscape and even street photography don't. The clearest case is photographing under-18s. The principles below apply at every level from local kids' football to school sports days, and ignoring them creates real risks for you, for the children, and for the clubs that host the sport.
Ethical principles when photographing under-18s
Sport photography crosses ethical territory that other genres don't. These principles apply at every level from local kids' football to school sports days.
The disability sport question deserves separate emphasis. Photograph the sport, not the disability. A wheelchair basketball player is a basketball player. A para-athlete is an athlete. Frame the athletic effort as the subject; the equipment and the impairment are present in the frame because they're present in the sport, but they're not what the photograph is about. Disability sport photographs that frame the impairment as the subject objectify the athlete; photographs that frame the athleticism as the subject treat them as an athlete first.
For ticketed events at semi-pro level and above, accreditation rules apply. Without a press pass, you're a spectator and you shoot from your seat with whatever lens you brought — long lenses are restricted at many venues for security reasons. With a press pass, you stand in marked photographer zones, you don't cross into restricted areas, and you behave professionally toward players, officials and other photographers. Local clubs are usually happy to give a regular supportive parent a written permission to shoot from a more useful position than the spectator seats; ask the club secretary in writing, offer to share images with the club for their website or social media, and behave well enough that the permission gets renewed.
Common mistakes
The mistakes I see most in clients' early sport sessions are remarkably consistent.
Shutter speed too slow. The single biggest cause of soft sport images. 1/250s is fine for a portrait of a footballer at warm-up; it's nowhere near fast enough for the same footballer in action. When in doubt, faster.
Single-shot AF instead of continuous. A surprising number of new sport photographers leave their camera in single-shot AF (One Shot on Canon, AF-S on Nikon). The camera locks focus when you half-press and doesn't update; by the time the subject has moved a metre, the focus point is in the wrong place. Continuous AF (AI Servo, AF-C) tracks the subject as they move. Set this before kick-off.
Wrong AF point. Default centre-point AF is usually fine. AI subject-detection on modern bodies is usually fine. What goes wrong is either using all 45 (or 153, or 759) AF points indiscriminately — which lets the camera focus on whatever's nearest, often the fence or the grass — or fighting against subject-detection by using a manual point that the camera keeps overriding. Decide which mode you're in and commit.
Standing too high. The most common compositional weakness in amateur sport photography. Drop down to knee height. The photographs immediately look more dramatic.
Background blindness. The bin, the parked car, the fence post growing out of someone's head. The fix is to look at the background before kick-off and decide your strategy — wider aperture, different angle, accept it and crop later.
Burst-spraying. Holding down the shutter for 30-frame bursts in the hope that one will work. Buffers fill, write times slow you down, and culling becomes painful. Short bursts of 3–6 frames at the moment of action work better.
Key takeaways
Anticipation beats reaction. Read the game; don't chase the ball.
Position is your biggest free upgrade. Get low, sun behind you, action turning toward you.
Shutter speed first, aperture second, ISO third. Modern bodies handle high ISO well — protect your shutter speed.
Continuous AF, single point. The reliable default for nearly every sport.
Freeze and pan both belong in your gallery. Mix the two for a stronger session.
Ethics first when shooting children. Permission, no identifying social media without consent, photograph the sport not the impairment.
Equipment matters but it's third on the list. Anticipation and position come first.
How to shoot a sports event from preparation to delivery
A 7-step workflow you can run for any UK sports fixture, from kids' weekend matches to club-level events.
1 Research and plan before you arrive
Know the storyline. Who are the key players? Is anyone returning from injury or playing a milestone match? What kit colours will both teams wear? Where will the sun be at kick-off? Check the venue's photographer policy and confirm you have permission. If shooting children, confirm the consent arrangements with the club or school in writing.
2 Arrive early, watch the venue, choose your position
Aim to be at the venue 30 minutes before kick-off. Walk around. Identify where the action is likely to concentrate, where the sun will be, where the cleanest backgrounds are. Decide your primary shooting position and a backup. If access is restricted, find out where you're allowed to stand and what the sight lines are like.
3 Set up your camera before play starts
Continuous AF on (AI Servo / AF-C). Single AF point, centre, unless you're confident with subject-detection on a recent body. Burst mode set to continuous high. Shutter speed at the table value for your sport. Aperture wide (f/2.8 to f/4 typically). Auto ISO with a sensible upper limit, or manual ISO if light is constant. Test on the warm-up — fire a few frames at moving warm-up players and check sharpness on the back of the camera.
4 Watch the play, anticipate the moments
Camera at chest height, both eyes on the play. Bring the camera up only when you know where the next action is going. Read the patterns: which players favour which sides, which moves repeat, where the action concentrates. Anticipation comes from awareness, not from looking through the viewfinder constantly.
5 Capture in short deliberate bursts
Fire 3–6 frame bursts at moments of action. Don't hold the shutter down for 30-frame sprays — you'll fill the buffer, slow the camera down with write times, and make culling painful. Mix freezes (1/1000s+) with the occasional pan (1/60–1/250s) when subjects move predictably across your frame. Recompose every few minutes if the action shifts.
6 Adjust as conditions change
Light shifts during a match — sun behind clouds, late-afternoon shadows lengthening, floodlights coming on at half-time. Don't drift on the settings you set at kick-off. Check exposure on the back of the camera every 10–15 minutes and adjust shutter, aperture, or ISO as needed. If the action moves into a darker area of the pitch, raise ISO immediately rather than letting shutter speed drop.
7 Cull and edit with discipline
Apply the same workflow to sport that you would to any other genre. Import, rate using a star ladder, cull aggressively before editing. Delete the soft frames immediately — they're not worth saving. Edit only the keepers. For sport, the cull is brutal: you may keep 5–10% of frames from a session, and that's normal. Output sized for the destination — full-size for prints, web-size for social and parents' WhatsApp groups.
Frequently asked questions about sports photography
The questions parents and amateur club photographers most often ask in private lessons.
? What's the minimum camera I need for amateur sport?
Any modern body with continuous autofocus and a burst rate of at least 6 frames per second will get you started. The autofocus tracking and high-ISO performance of bodies released in the last five years make sport much more accessible than it used to be. A used Canon R10, Nikon Z50 II, or Sony α6400 paired with a 70-300mm zoom will handle most amateur sport perfectly well. Save your upgrade money for the lens before the body — reach matters more than resolution.
? Do I need a monster telephoto lens?
For full-size football, rugby, or cricket pitches, you'll want at least 300mm at the long end. A 100-400mm zoom is the sport sweet spot for amateur work — versatile, reasonably affordable second-hand, and long enough for most amateur grounds. For tightly contained sports — swimming, basketball, gymnastics, indoor cricket — a 70-200mm is plenty. Do not buy a 600mm lens for shooting your child's under-12s match; you'll be too far away to read body language and you won't be able to get out of the way fast enough when play moves.
? What ISO is too high?
Modern bodies handle ISO 3200 well and ISO 6400 usably. The honest answer is: take whatever ISO you need to keep your shutter speed up. Grain is fixable in editing — modern noise-reduction is excellent. Motion blur is not fixable. If the choice is between ISO 6400 with a sharp subject and ISO 800 with a soft subject, choose ISO 6400 every time. The exception is older bodies — pre-2018 cameras struggle above ISO 1600. Know your specific body's threshold by testing it on a static subject before you need it on a moving one.
? Should I shoot in shutter priority or full manual?
Both work. Shutter priority is the easier start: set your shutter speed, the camera handles the rest. This is what most parents starting out should use for their first few sessions. Full manual gives you more control, particularly when light is changing as players move between sun and shadow — it's what most professional sports photographers use. Once you're comfortable with shutter priority and you understand how the camera is making its aperture and ISO choices, switching to manual is a natural progression. There's no shame in shutter priority; some of the best sport photographers in the world use it.
? Can I photograph my child's school sports day?
Photographing your own child is fine; what to do with the photographs afterwards is the question. Most schools allow personal photography at sports day on the understanding that images aren't shared on social media without the consent of every other parent whose child appears in them. Group shots of races inevitably contain other children — if you're posting publicly, either crop to your own child only, blur other faces, or ask the school for guidance. Most schools have a written photography policy that covers this; check before you publish.
? How do I photograph indoor sports without a flash?
Indoor sport at amateur level usually doesn't allow flash, and at higher levels flash is almost always prohibited. The answer is fast glass plus high ISO. A 70-200mm f/2.8 lens at ISO 3200 or 6400 will get you sharp images of basketball, netball, gymnastics, indoor cricket and similar. There's no shortcut — slow zooms (variable aperture or f/4+) cannot keep up with the shutter speeds indoor sport demands. If indoor sport is what you'll be shooting most, the f/2.8 zoom is the most useful single piece of kit you can buy.
? Should I edit sport photos differently from other genres?
The workflow is the same: import, cull, set intent, global adjustments, tonal refinement, local adjustments, output. Sport-specific considerations: cull more aggressively than landscape (5–10% keeper rate is normal), keep edits relatively clean and natural rather than heavily stylised (sport audiences want to see the action clearly, not a moody interpretation), and crop in-post to tighten composition when the in-camera framing was loose. The 7-stage workflow guide on this site applies in full — sport doesn't need a separate framework.
? Is panning worth the miss rate?
Yes, with caveats. A panned shot at 1/60–1/125s has a high miss rate — perhaps 1 in 20 frames sharp on the subject. But the 1 frame that works often communicates the speed of sport better than any frozen frame can. The trick is treating panning as a deliberate creative choice for specific moments — a cyclist passing, a runner on a bend, motorsport at a corner — rather than as a default approach. Mix freezes for the action and pans for the speed; the gallery is stronger for the contrast. As your panning technique improves, the miss rate drops.
Continue learning
Where to go next — face-to-face tuition for hands-on practice, plus the technique foundations that underpin sport photography.
Conclusion and summary
Sport photography rewards practice. There is no real shortcut. The principles in this guide will lift your hit rate immediately — anticipate, position, set your shutter speed properly, choose continuous AF — but the polished work comes from doing it repeatedly. Each match teaches you something about the rhythms of the sport and about your own camera's behaviour. After ten sessions you will be sharply better than after one. After fifty you'll see what works for you specifically, which sports you most enjoy shooting, which conditions suit your style.
The same workflow scales from your child's under-12s match to a Conference South cup tie. The settings change, the access changes, the ethical considerations change, but the underlying principle — anticipation plus discipline plus ethical conduct — is the same.
If you would like to learn this with hands-on guidance, my face-to-face private photography lessons in Coventry work particularly well for sport because we can go to a local match together and work through positioning, settings and anticipation in real time. For readers outside the Midlands, the same content runs as online 1-2-1 lessons via Zoom, where we can review your sport photographs together and work on technique with your own files. For ongoing critique on the photographs you produce session after session, my monthly online mentoring takes you through structured assignments with personal feedback.
Once you have a session of strong sport images, the next step is editing them — and the workflow for that is the same as for any other genre. My companion guide to UK photography editing workflow walks through the seven-stage process I use for everything from landscape to sport, with the rating-and-cull discipline that makes a session of three hundred frames manageable.
The single most important sentence in this whole guide is this one: watch the game without the camera first. If you only change one thing about your sport photography this season, change that. Everything else follows.