CLASSES

Beginners Photography Course
Weekly Classes - Coventry

Lightroom Photo Editing Course
Weekly Classes - Coventry

RPS Accreditation
Online Mentoring for RPS

Photography Mentoring
Monthly Assignments


To Shoot Your Products or Services
Professional photos for your product, property, services and company


Table of Contents Show
Ready to turn your digital images into stunning prints? Understanding photo print sizes and resolutions is crucial for ensuring your images look their best on paper. This guide provides essential insights into calculating optimal print sizes and maintaining quality.
1. Ensure image resolutions meet minimum requirements.
2. Upload full-resolution images to your print lab.
3. Confirm correct aspect ratios for your prints.
4. Select a suitable paper type for your photos.
Get it right first time. Download the UK Print Size & DPI Cheat-Sheet (free PDF).
Utilise our Photo Print Size Calculator to determine the ideal dimensions for your prints. Input your photo's pixel dimensions, select an aspect ratio, and specify your desired print quality. The calculator will deliver results that include required megapixels and minimum viewing distances, helping you to create prints that impress.
Need a second pair of eyes? Book a 30-min Print-Prep Session (£29).
Calculate optimal print sizes, required megapixels and viewing distances from your image pixels, aspect ratio and target quality.
Enter image pixels and (optionally) choose a standard aspect ratio to preview cropping.
| Print Size | Dimensions (in) | Aspect | Required MP | Viewing Distance | Quality |
|---|
Enter image pixel dimensions and choose a resolution (DPI/PPI).
Enter the target physical size and resolution to get exact pixel dimensions.
Check effective DPI and expected quality for a chosen print size.
Uncompressed estimate; actual sizes vary by format and compression.
The Photo and Print Size Calculator is a user-friendly tool designed to help photographers and print enthusiasts determine the optimal print sizes for their digital images.
To use it, simply input your photo's width and height in pixels, select your desired aspect ratio (or keep the original), and choose your preferred print quality.
The calculator will then display the maximum print size for your image and provide a detailed table of common print sizes, along with information on required megapixels, minimum viewing distances, and whether your image is suitable for each size.
This tool is invaluable for ensuring your prints maintain the best possible quality and for understanding how different aspect ratios might affect your image. You can easily calculate, reset, and even print the results for future reference.
Book a 30-minute Print-Prep Session (£29)
Nowadays, few people choose to print images as it’s so much easier to share electronically through social media and photo websites. As such, many photographers don’t have the knowledge and understanding of print resolution, aspect ratios, mounting, paper choice and the plethora of challenges that come with making the print. In fairness, even as professional from the digital age, I must work things out each time I go to print, too, though I have done enough exhibitions and other print-related tasks to have a reasonable understanding.
“The negative is comparable to the composer's score and the print to its performance. Each performance differs in subtle ways.” Ansel Adams
Given that I have many clients, on various courses, and other events wishing to create prints, I felt a guide to the considerations and technicalities would be helpful.
So, what about aspect ratios? In its simplest form, a print aspect ratio is a measurement of the width compared to the height, expressed as a ratio. For example, a full-frame image taken from an SLR camera, without any cropping, is in the ratio of 3:2. Alternatively, this can be expressed as the width of the image being 1.5 times the height of the image.
How do aspect ratios relate to cropping? The image below is a full-frame 3:2 image. If we printed this as a 6×4” print, it would not need cropping, but what if we wanted this image in another standard print format – a 10×8”?
This would, unfortunately, mean cropping part of the image –possibly a vital part of the composition. The reason is that although the 10×8” print is significantly larger than a 6×4”, its aspect ratio is 5:4. In other words, the larger 10×8” print’s aspect ratio is squarer.
Image Aspect Ratio
What about other common small print formats – the 7×5? It’s are more elongated than the 10×8” but squarer than the 6×4”. If this seems more confusing, think of in terms of the width as a multiple of the height (or just refer to this table below!).
Remember the aspect ratio has nothing to do with the quality and size of the photo it is just the shape of the rectangle – viewing area.
Image Size Ratio
We are all familiar with standard paper sizes when it comes to office and home printers. However, the camera doesn’t naturally conform to those standard dimensions when we are printing a photo (uncropped) from a digital SLR camera.
The camera photo dimensions (aspect ratio) are based on the sensor or film size, so do not fit the page size easily or equally (the same amount of white space around the photo)
Therefore, we have to convert image size to fit standard paper sizes to fill as much of the paper area without cropping the image. Here you can see that the paper aspect ratios do not align perfectly to image aspect ratios. Nearly all the paper sizes in the table below have an aspect ratio of 1.41 which is the closet match to 7 x 5 image aspect ratio (1.4)
Paper sizes and ratio
If the calculation of paper size and image sizes was not already complicated enough, we also need to consider image resolution. Meaning acceptably sharp at “normal viewing distances”.
Acceptably sharp is determined by the viewing distance and medium the image is presented on. Assuming you are printing images for viewing rather than seeing on as a projected image (or Mobile device and computer), then a viewing distance of 1-3 feet (within arm’s length) is considered the normal range for determining sharpness and details of the print.
How do you calculate minimum viewing distance?
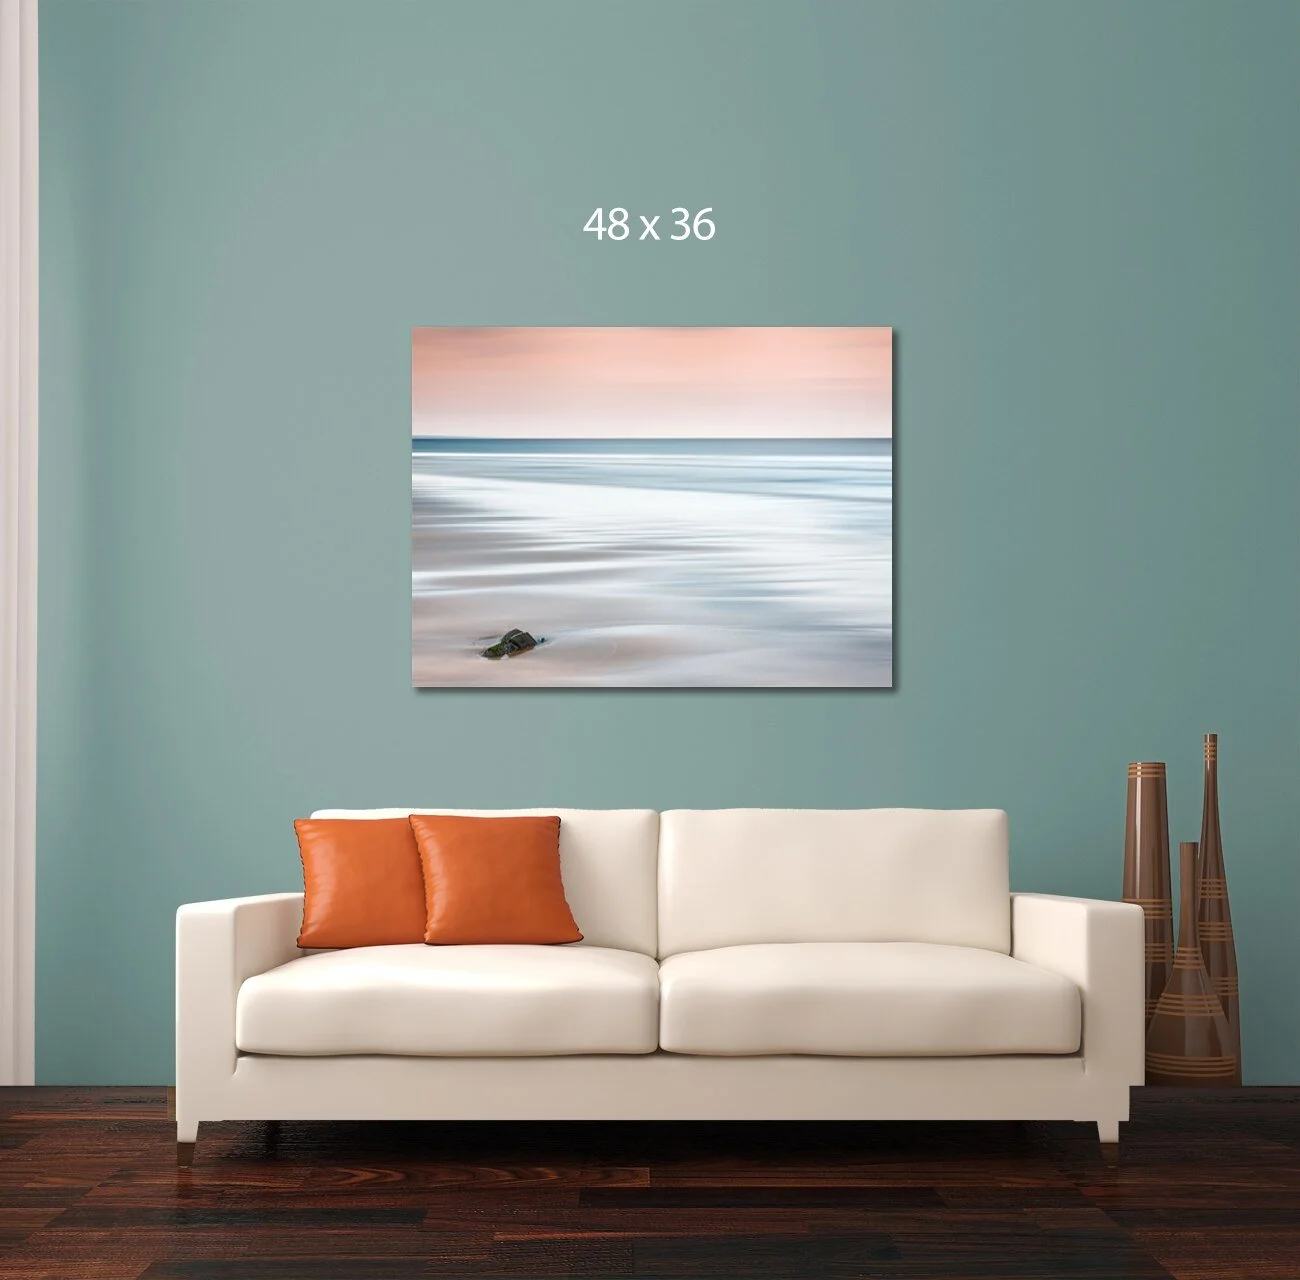
A generally accepted rule of thumb is that an appropriate minimum print viewing distance is simply the diagonal length of an image multiplied by 1.5
For example, a 36" x 54" image would have a diagonal length of about 64.9". Multiplying 64.9" by 1.5 results in a viewing distance of about 97.3" or 8.1 feet
Viewing distance for photographs
Viewing Distances
In addition to this the PPI needs to be sufficient to render the image sharp at that viewing distance and size of image
PPI stands for “pixels per inch.” The more pixels per inch, the higher the image resolution. You can see from the chart, below, that PPI, or resolution, is inversely related to the output size and viewing distance. The larger your output AND greater your viewing distance, the fewer pixels per inch that are needed in order to ensure sharp appearance.
Therefore, the image resolution must be sufficient in megapixels to ensure you can produce a high-quality print at 200 PPI for minimal, and 300 PPI for high quality as close viewing distance and less than 200 PPI when viewing from greater distances.
Pixels per inch (PPI) is a measure of the number of pixels in a digital image, which affects the quality of a printed image. A higher PPI generally results in a higher quality print.
300 PPI: A good choice for high-quality prints, such as photos for magazines or brochures
180–240 PPI: A common choice for non-commercial use or smaller designs
How PPI affects print quality
A higher PPI means more pixels per inch, so each pixel can be printed at a higher resolution
This results in sharper images and smoother gradients
For small format prints, such as brochures or booklets, 300 PPI is recommended
For large format prints, such as line images, 200 PPI is recommended
For photographic images on canvas, 100 PPI is recommended
Higher PPI also means more detailed and crisp images on a display. Modern smartphones and high-end monitors often have very high PPI ratings
Formula:
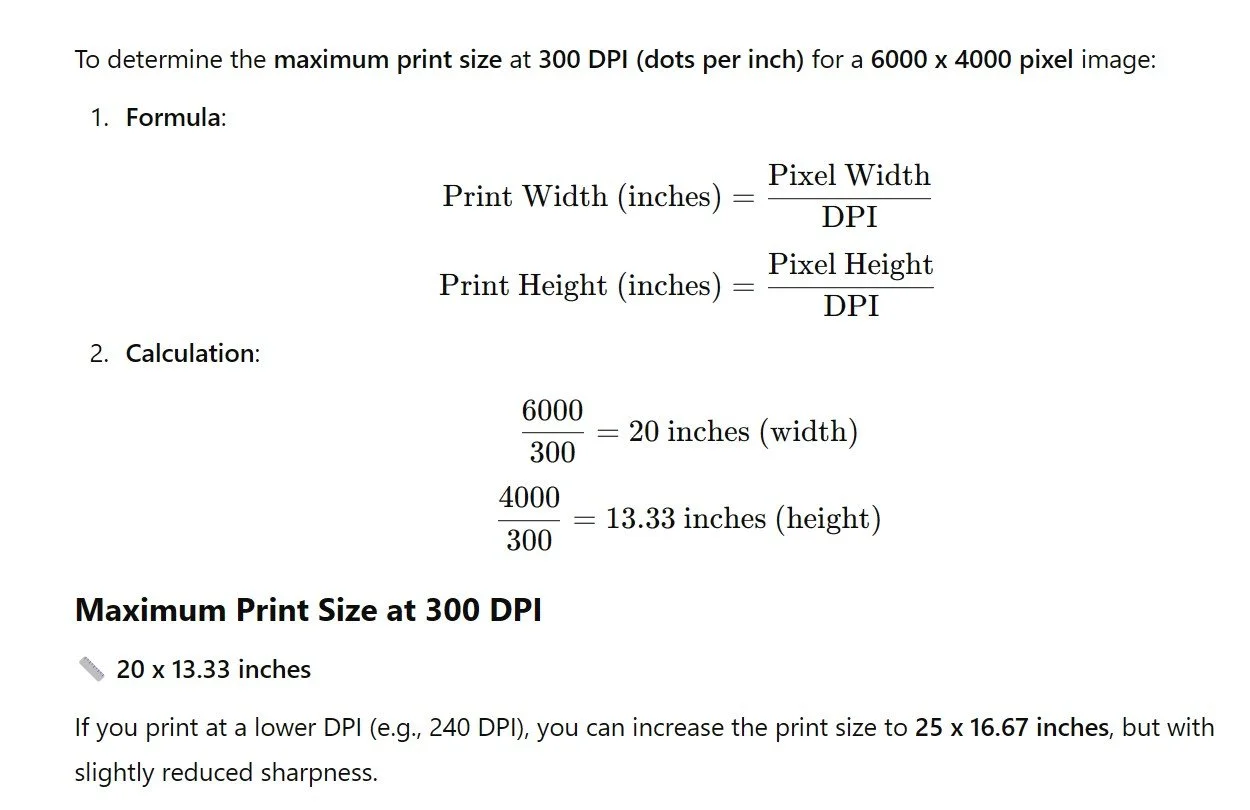
Print resolution and PPI
The maths involved to come up with that size print is to first divide the number of pixels in the width of the file by the 200 DPI. (2,000/200=10).
Next, divide the number of pixels in the height of the file by 200. (1600/200=8). So, there you have it. A file size of 2,000 pixels X 1600 pixels can be printed to make a good quality 10 X 8 photo when printed at 200 DPI.
If you decide to make a print at 300DPI from the same image file, you will have a print with better resolution. However, the maximum size for a quality print will be smaller.
The maths would be.... 2,000/300=6.8. Next, 1,600/300=5.3. So, if you round the numbers out, the maximum standard size for that print will be about 7 X 5.
The key connection to viewing distance here is that due to the optics of the human eye, a print that is 3x farther away requires exactly 3x less resolution to maintain the same visible quality!
So, in the case of the 36" x 54" image, having 1/3 of the resolution at 100 PPI is equally compensated for by the 3x longer viewing distance.
Though printing a fine art photograph at 100 PPI is considered completely unacceptable to some, if a photographer intends for a large print to only be viewed from 8 feet away or more, this is reasonable.
Viewing distance and resolution of photograph
Takeaway - 300 PPI for a 10" x 14" is the largest print size generally felt as comfortably sharp when viewing at arm's length, at which point 300 PPI is just beyond the capabilities of the human eye. Smaller than this then 300 PPI is ideally required, larger than this then 200 PPI or less is acceptable at the appropriate viewing distance.
The table below shows the ideal resolution of the image required at 300 PPI to be printed at a size of approximately A4 (8.3 x 11.7 in). This is the expected minimum size for RPS panels.
The mount sizes shown is 16 x 12 in. Approx. A3 size
Picture A3 paper with an A4 Cut-out/Window centred on the A3 to get an idea of image space and mount space.
A3 Mount with A4 Cut-out/Window
To calculate the size of the image space for any given aspect ratio, (thus avoiding any cropping) and leave 4 inches between the image border and mount border,
1. specify the target longest edge size of the image
2. divided by the aspect ratio longest side
3. to give you a scaling factor of nn
4. then multiple the smaller sides aspect ratio by nn to calculate the short dimension.
Example when wanting a print size of around 12 inches on the longest side with an image in 2:3 aspect ratio
1. 12 inches
2. Divided by 3 (longest edge aspect ratio) = 4
3. 4 is the scaling factor (nn)
4. 2 x 4 (2 is the shortest side aspect ratio, 4 is nn factor) = 8
Result is 8 x 12 inches
To calculate the image resolution and megapixels for the image dimensions.
1. Longest edge multiplied by 300 (300 being PPI)
2. Shortest edge multiplied by 300
Result: Pixel Dimensions
Next multiple the x & y dimensions to calculate the Megapixels needed for 300 PPI.
Example:
2:3 aspect ratio printed at 8 x 12 inches.
1. 12 x 300 = 3,600
2. 8 x 300 = 2,400
Result pixel dimensions 2,400 x 3,600
Megapixels = 2,400 x 3,600 = 8.64 million
I recommend a 16 x 12 inches mount (Approx. A3) with Max photo width of 12 inches (Approx. A4 image size) as below:
Image size calculation for mount size
There is a large choice of papers when it comes to fine art prints. The choice of paper is largely a personal one and it does depend on what paper suits a particular image.
For example, portraits print well on Permajet Matt Plus and landscapes print well on Hahnemuhle – Bamboo. Just my opinion but it is worth getting some test prints on various papers before committing to a final choice. Remember if you are putting a body of work/panel together its strongly advised to stick to one paper for all the images in that panel/exhibition/body of work to keep the coherence.
One Vision Imaging Print Lab Paper Choices for fine art prints
Common lab sizes are 6×4" (15×10cm), 7×5" (18×13cm), 8×6" (20×15cm), 10×8" (25×20cm) and 12×8" (30×20cm). These follow camera aspect ratios (mainly 3:2 or 4:3). If your image doesn’t match the print ratio, expect either a crop or white borders unless you resize first.
Photo sizes use camera ratios (3:2 or 4:3). A-sizes use the ISO paper ratio 1:√2 (e.g., A4 = 210×297mm, A3 = 297×420mm). Printing a 3:2 image on A-paper will crop or leave borders unless you resize to the A-ratio before export.
Aim for 300 DPI for small prints and albums, 240 DPI for general wall prints, and 180–200 DPI for large, wall-mounted pieces viewed from farther away. Higher DPI gives finer detail, but viewing distance matters—don’t over-upscale; resize to a sensible pixel size for the chosen print.
At 300 DPI: 6×4" → 1800×1200px ≈ 2.2 MP, 8×10" → 2400×3000px ≈ 7.2 MP, A4 (8.27×11.69") → 2481×3507px ≈ 8.7 MP. At 240 DPI, requirements drop ~20%. More megapixels help with cropping, but good technique and processing matter just as much.
Yes if the image ratio doesn’t match the paper size. To avoid surprises: choose a print size that matches your camera’s ratio, crop to the target ratio before export, or accept borders (fit-to-paper). Always preview the crop in your editor to protect key subjects and horizons.
Gloss: higher contrast and vibrancy, deep blacks; can show glare and fingerprints. Matte: no glare, subtle tones and texture; blacks look softer. Lustre/semi-gloss is a great middle-ground for portraits and general work. Match finish to viewing conditions (lighting, framing, handling).
In Develop, press R and set the Crop Aspect to the print ratio (e.g., 3:2, 4:3, 5:4, or custom for A-sizes). Compose and Apply. Then Export: tick Resize to Fit (Width & Height or Long Edge), enter the required pixels (DPI × inches), set Resolution 300 ppi, choose Sharpen for Matte/Glossy, and export.
I would really welcome your comments, questions, debates or any engagement on this post on my Photo Sizing Guide, so please feel more than welcome to send me a message
Remember to visit my photography blog page for free tips, information, advice and the latest offers.
What is ISO in photography? Plain-English definition, examples and pro tips. Set ISO for clean results and fewer mistakes—see when to raise or keep it low....
Master composition in photography with five expert tips. The Camera Isn’t the Artist – You Are. Learn to see, balance, tell stories and create with intention
Master exposure with this free Outdoor Photography Exposure Calculator - Perfect for beginners learning aperture, shutter speed, ISO and the exposure triangle.
Deep Dive into Photography Styles: Trends and Tips for 2024: Overview of different styles of photography and honing your craft to different photography genres
How to find your Photography Style: Identify and develop your photographic vocabulary. A guide for you to create a visual narrative and cohesive portfolio
Discover the art of creative photography. Find the right creative photography workshop for your skill level and embrace a transformative photographic journey.
Photography is an Art of Observation: Discover how to develop your photographic eye and visual awareness skills to change how you see rather than what you see,


Free printing guide and calculator for photo print sizes, DPI/PPI and aspect ratios. Check max print size, pixels needed & quality. Download the cheat-sheet