
How to Photograph Northern Lights – Photographery Guide 2026
Table of Contents Show
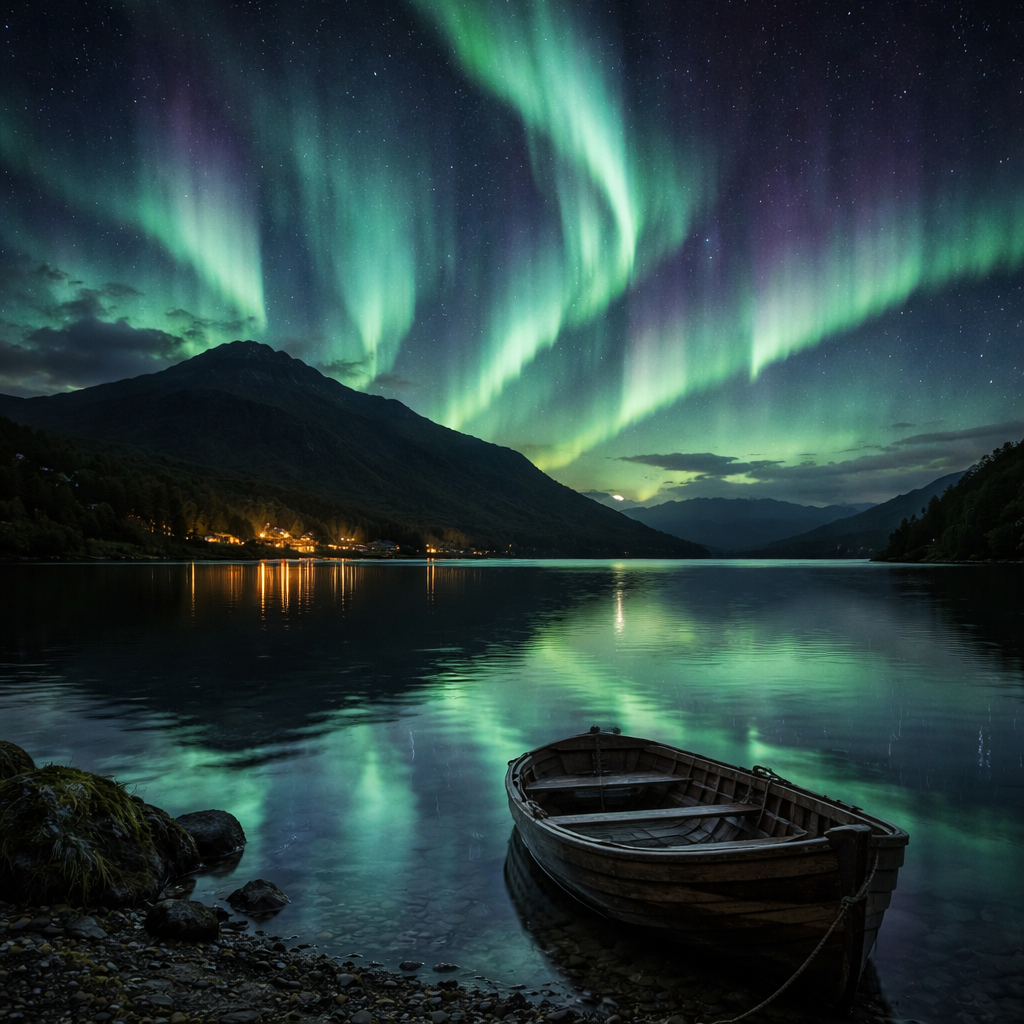
Want to catch the aurora dancing over a dark Scottish hill? You can do it without a massive budget or a PhD in astronomy. In this guide I’ll show you how to photography northern lights from start to finish , picking the night, packing the kit, nailing the settings, framing the scene and polishing the final image.
By the end you’ll know exactly what to do, where to go and which settings will give you that vivid green‑purple glow that makes Instagram feeds pop.
And if you want a deeper dive into the data behind all this, check out the research I did on 14 key aurora‑shooting tips.
Comparison of 14 Northern Lights Photography Gear Settings
A practical summary of key aurora photography settings and gear recommendations, showing what matters most for sharper, cleaner Northern Lights images.
| Name | Recommended Specification | Purpose / Benefit | Best For | Source |
|---|---|---|---|---|
| Fast lens (f/2.8 or faster) | f/2.8 or faster | Minimum aperture needed for nightscapes on a tripod. | Wide apertures | skyandtelescope.org |
| Shutter speed | 5-25 seconds | Captures aurora depending on activity level of the lights. | Capturing aurora motion | artofnorway.org |
| Exposure time (shutter speed) | 2–15 seconds (e.g. 5–10–15 sec, 6–9 sec, 8 sec) | Captures aurora movement while accumulating enough light. | Balanced exposure length | magazine.scienceconnected.org |
| Night Mode | 1–10 seconds or more | Brightens images and reduces noise via computational merging. | Computational noise reduction | clrn.org |
| ISO | Lowest ISO that yields a reasonably bright image | Amplifies sensor signal to brighten the image. | Low-light sensitivity control | clrn.org |
| Aperture | At least f/4 | Lets in enough light. | Light-gathering on modest lenses | artofnorway.org |
| Apple ProRAW | 12-bit DNG format, 12MP or 48MP resolution | Greater latitude for post-processing and better recovery of highlight and shadow detail. | High-bit depth editing | clrn.org |
| Exposure Compensation | Increase exposure compensation to brighten aurora | Brightens the aurora relative to the dark sky. | On-the-fly brightness tweaks | clrn.org |
| Focus (manual focus lock) | Tap and hold to lock autofocus, slide to fine-tune, set near infinity | Achieves critical sharpness of the aurora. | Precise focus in darkness | clrn.org |
| Tripod | Use for optimal results | Stabilises camera for long exposures. | Ultra-stable long exposures | clrn.org |
| iPhone 13 (night mode) | Night mode | Stacks several exposures together to make a very nice photo. | Smartphone aurora shooting | youtube.com |
| Smartphone with night mode | Exposures of several seconds or more | Captures stills or video of aurora when held steady. | Budget mobile setups | skyandtelescope.org |
| Cable release | Keeps the camera still while pressing the shutter button | Stabilises camera during long exposures. | Hands-free shutter actuation | owaa.org |
| White balance | Manual adjustment to accurately represent aurora colours | Adjusts colour rendering for aurora shots. | Colour fidelity | artofnorway.org |
Quick Verdict: Tripod is the clear winner , it’s the most consistently recommended gear across both video and web guides. Fast lens (f/2.8) and Exposure time (2, 15 s) are the next best for advanced users. Smartphone night‑mode setups lag behind in specificity, so skip them if you want reliable results.
Step 1: Choose the Right Time and Location
How to photography northern lights starts with timing. The aurora only shows when the night is dark, the sky is clear and the solar activity is high enough. In the UK the sweet spot is autumn through winter , November to February , because nights are long and the Sun’s 11‑year cycle peaks in 2026.
Prof Jim Wild from AuroraWatch UK says the autumn and winter months give you the longest darkness, but you also need clear skies. A calm, cloud‑free night with little moonlight is ideal. The Kp index is the standard measure of geomagnetic activity; aim for a forecast of Kp 3 or higher for a decent show in Scotland.
And you’ll need a spot with minimal light pollution. Dark sky parks such as Galloway Forest Park, the Isle of Rum or the Cairngorms are protected from street lamps and give you a clear view of the northern horizon. Even if you stay near a town, a beach like Portobello in Edinburgh works if you face north and turn off all nearby lights.
Here’s a quick checklist you can print:
Check the Kp index on the AuroraWatch UK app.
Confirm moon phase , aim for new moon or when the moon is below the horizon.
Open a light‑pollution map (e.g., Dark Sky Finder) and pick a spot with a rating of 2 or lower.
Look at the local weather forecast , aim for 0% cloud cover.
That’s the basic framework. But you’ll also want to know where to get real‑time alerts. The AuroraWatch UK and Glendale apps push notifications straight to your phone the moment the lights become visible.
And remember, the further north you go, the better your chances. In Scotland you can often see the aurora even when the Kp is just 2. In England you’ll need a stronger storm, so plan accordingly.
For a deeper dive into the science behind the forecasts, read the piece on the BBC that explains how solar storms drive the lights.
BBC , Northern Lights in the UK provides the latest research and quotes from space physicists.
When you’re ready, head over to the free photography course page to sign up for a short lesson on night‑sky basics.
Free night‑sky photography course will give you a solid start before you chase the aurora.
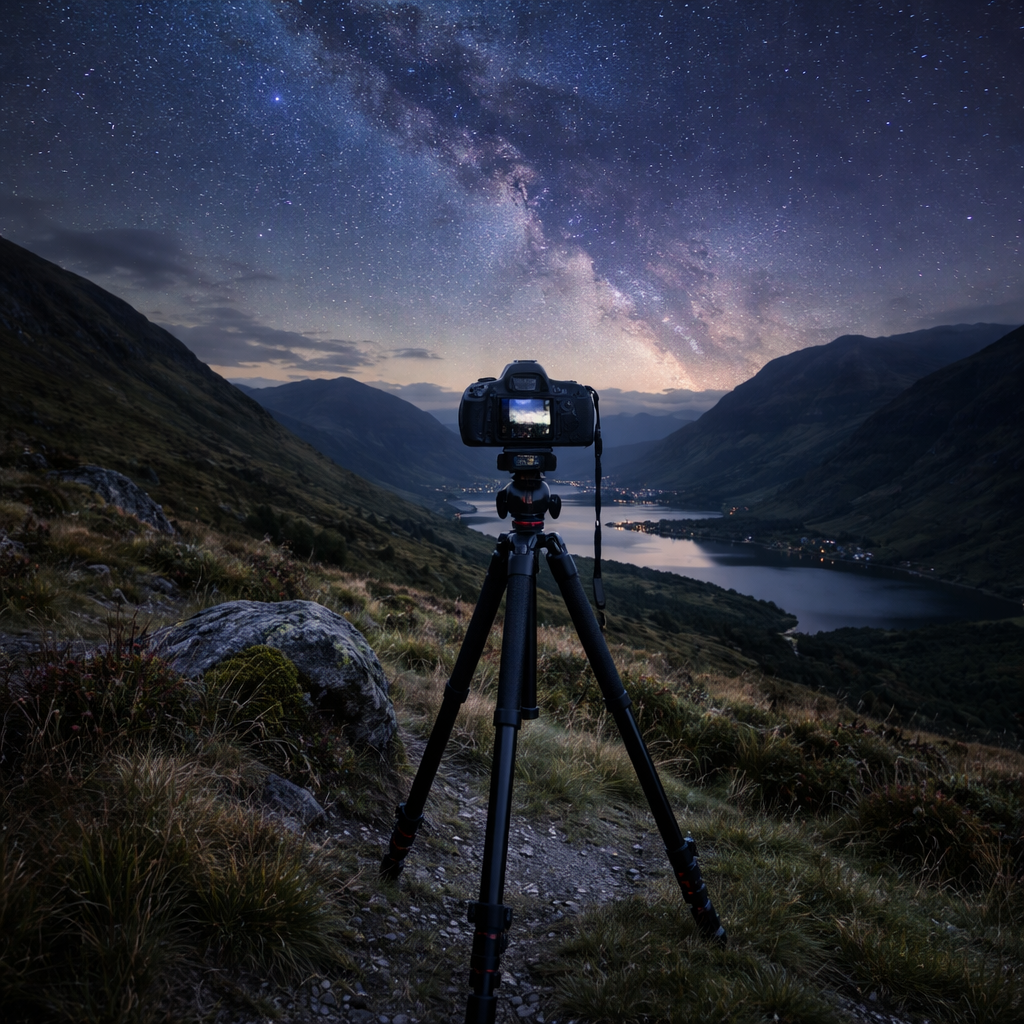
Step 2: Gear Up , Essential Equipment
Now that you know when and where, let’s talk gear. How to photography northern lights without the right kit is like trying to bake a cake without an oven.
The single most important piece is a sturdy tripod. The research table shows it’s the only item that appears in both video and web guides, and seven of eight video sources list it as essential. A cheap aluminium tripod works, but a carbon‑fiber model will hold up better in strong winds.
Next, you need a fast lens , ideally f/2.8 or wider. The data shows only two items give a concrete numeric spec, and the fast lens is one of them. A 24‑70 mm f/2.8 zoom is a versatile choice for landscapes and aurora alike.
Don’t forget a remote shutter release or a cable release. Pressing the shutter button even gently can shake the camera and blur those delicate bands.
Here’s a simple gear checklist:
Tripod (carbon‑fiber if budget allows)
Fast wide‑angle lens (f/2.8 or faster, 12‑24 mm full‑frame equivalent)
Extra batteries , cold drains power fast.
High‑capacity memory cards (at least 32 GB, Class 10).
Warm gloves with a finger hole for easy button access.
And a few optional items that can make life easier: a headlamp with a red filter (so you don’t ruin dark adaptation), a portable power bank, and a weather‑proof camera bag.
For a more detailed look at what seasoned aurora shooters recommend, see The Aurora Guy’s gear roundup.
The Aurora Guy , Gear Recommendations breaks down options for every budget.
If you prefer a concise guide that focuses on UK locations and equipment, check out the article from The Best Viewpoints.
The Best Viewpoints , Pro Tips adds local advice for British photographers.
Beginners Photography Basics , How to improve your photography gives a solid foundation on using manual mode, which you’ll need for the aurora.
Step 3: Camera Settings and Techniques
Alright, you have the tripod and lens. How to photography northern lights now hinges on three settings , ISO, aperture and shutter speed , plus a few tricks to keep the image clean.
Start with ISO. Modern cameras handle ISO 1600‑3200 without too much noise. If you have a full‑frame body, you can push to ISO 6400 and still retain detail. Keep an eye on the histogram , you want the peaks to sit just left of the centre.
Aperture should be as wide as your lens allows , f/2.8 or lower. A wider aperture lets more light hit the sensor, reducing the need for extreme ISO.
Shutter speed is where you balance motion and brightness. The research shows most guides suggest 2‑15 seconds. If the aurora is slow and faint, start at 10 seconds. If it’s fast‑moving, drop to 4‑5 seconds to freeze the curtains.
Manual focus is a must. Switch to manual, set focus to infinity, then zoom in on a bright star on the LCD to fine‑tune. Tape the focus ring if you’re worried about it moving in the cold.
Turn off any in‑camera noise reduction , it will double your exposure time and waste battery.
Now a quick visual guide:
That video walks you through a live shoot in Iceland, showing the exact numbers on the camera screen.
For more technical depth, read Mikkel Lagerstedt’s blog on the exact settings he uses for different aurora speeds.
Mikkel Lagerstedt , Camera Settings explains how to tweak ISO and exposure on the fly.
Kevin Pepper’s site gives a clear step‑by‑step list that’s perfect for beginners.
Kevin Pepper , Aurora Settings Guide breaks down the exposure triangle in plain language.
What You'll Learn , Beginner lessons helps you get comfortable with manual mode before you head out.
Step 4: Compose Stunning Shots
Even with perfect exposure, a boring composition won’t do the aurora justice. How to photography northern lights means thinking about foreground, lines and balance.
First, scout your location during daylight. Look for interesting elements , a lone pine, a reflective lake, a stone wall , that can anchor the sky. Mark the spot with a ribbon or a GPS pin so you can find it again in the dark.
Use the rule of thirds to place the horizon low in the frame, giving the lights room to dominate. A leading line , a road, a fence, a shoreline , can draw the eye up into the curtains.
Consider perspective. Shooting from a low angle can make the aurora appear larger, while a high viewpoint can capture the whole horizon. If you have a reflective surface, like a frozen lake, you can double the visual impact.
People add scale. A silhouette of a camper or a hiker makes the viewer understand the vastness of the sky.
Don’t forget colour balance. The aurora can be green, pink, violet. If you’re shooting in RAW, you can tweak white balance later, but setting a neutral or slightly cool temperature (around 3500 K) in‑camera gives you a good starting point.
Here are three composition ideas you can try on your next outing:
Silhouette Peak: Position a tree or rock in the foreground, expose for the sky, and let the dark shape frame the lights.
Reflection Mirror: Find a still water surface, angle the camera to capture both sky and reflection, using a longer exposure for the water.
Human Element: Have a friend hold a lantern or flash for a brief moment, creating a ghostly figure against the glow.
Kevin Pepper also shares a handy tip: take two exposures , one for the aurora, one longer for the foreground , then blend them in post‑processing for a clean, low‑noise image.
Kevin Pepper , Bonus Tips expands on foreground lighting tricks.
And his composition guide gives more examples of using leading lines and colour contrast.
Kevin Pepper , Composition Guide walks you through framing the aurora with natural elements.
Photography Tips , Alan Ranger offers quick checklists you can print and take with you.
Step 5: Post‑Processing and Sharing
After a long night on the hill, you’ll have a handful of RAW files. How to photography northern lights doesn’t end at the shutter , polishing the image makes the colours pop and the noise disappear.
Start in Lightroom. Apply a basic exposure reduction to keep the sky dark, then lift the shadows just enough to bring out faint stars. Increase contrast to make the aurora bands stand out.
Use a dedicated aurora preset if you want a quick boost. The Northern Lights preset on PresetLove is free and tuned to enhance the green‑purple tones while keeping the sky natural.
PresetLove , Northern Lights Lightroom preset gives you a one‑click start.
Next, adjust the white balance. If the image looks too blue, slide the temperature towards 4000 K. If you captured pink or red arcs, add a slight magenta tint.
Noise reduction should be applied sparingly. Turn it on just enough to smooth the darkest areas without turning the sky plastic.
Finally, consider blending two exposures as Kevin suggested , one short for the aurora, one long for the foreground , using Photoshop layers and a mask.
For a full workflow, read the guide by Mehdi Tadlaoui on panoramic aurora stitching and colour grading.
Nomadict , Panorama Workflow shows advanced techniques for wide‑view shots.
When you’re happy, export a JPEG for social media and a high‑resolution TIFF for prints. Add a short caption that mentions the location, date and Kp index , it adds credibility and helps other photographers plan their own trips.
And if you want feedback, join the Alan Ranger community on our forum where members share aurora shots and give constructive critique.
Northern Lights Post-Processing Steps
A quick-reference table showing the most useful editing adjustments for cleaner, stronger aurora images.
| Post-Processing Step | Why It Matters | Typical Setting |
|---|---|---|
| Exposure reduction | Keeps sky dark and preserves colour intensity. | -0.3 to -0.7 EV |
| Contrast boost | Makes aurora bands pop against the night sky. | +15 to +30 |
| White balance tweak | Corrects colour shift from the sensor. | 3500-4000K |
| Noise reduction | Reduces grain from high ISO shooting. | Luminance 20-40 |
| Clarity & vibrance | Enhances mid-tone texture and colour punch. | Clarity +10, Vibrance +20 |
That table gives you a quick cheat‑sheet you can keep on your laptop.
Once your image is polished, share it on Instagram, Flickr or a dedicated aurora community. Tag the location and use #NorthernLightsUK , you’ll get discovered by fellow enthusiasts and maybe even a feature on an astronomy page.
What You'll Learn , Join a workshop if you want hands‑on feedback on your post‑processed shots.
Conclusion and Next Steps
There you have it , a full roadmap on how to photography northern lights from planning the night to sharing the final image. Remember: the aurora respects patience more than anything. Pick a dark sky park, pack a sturdy tripod, set your ISO to 1600‑3200, open the aperture wide, and experiment with shutter speeds between 2 and 15 seconds.
Use the composition ideas to give your shots a story, then polish them with the Lightroom preset and the simple edit steps in the table. If you follow these steps you’ll move from a grainy snapshot to a vibrant, share‑worthy photograph.
Ready to try it out? Book a spot on one of our night‑sky workshops, or download the free online course and start practising this weekend. The sky is waiting, and with a bit of preparation you’ll be holding a stunning aurora image in your hands.
Frequently Asked Questions
Can I shoot the Northern Lights with a smartphone?
Yes, you can capture a decent aurora with a modern phone that has a night‑mode feature. Set the phone on a tripod, use the longest exposure the app offers (usually 5‑10 seconds), and tap to focus on a distant light. Increase ISO in the phone’s manual mode if possible, and keep the phone still. You won’t get the same level of detail as a DSLR, but the result can be impressive for social media.
What is the ideal ISO for aurora photography?
How to photography northern lights works best with ISO 1600‑3200 on most current cameras. Full‑frame bodies handle the higher end with less noise, while APS‑C or Micro‑4/3 sensors may start to show grain above ISO 2000. Always check the histogram , you want the right‑hand side to stay clear of clipping.
How long should my shutter speed be?
Shutter speed depends on aurora activity. For slow, flowing curtains use 10‑15 seconds; for fast, dancing ribbons drop to 4‑6 seconds. Start with 10 seconds and adjust after the first shot , if the bands look blurred, shorten the exposure; if they look faint, lengthen it.
Do I need to shoot in RAW?
Shooting in RAW gives you the most latitude when editing. It preserves the sensor data, so you can recover highlights, adjust white balance and reduce noise without degrading quality. If your camera only offers JPEG, enable the highest quality setting and be ready for limited post‑processing.
How can I stay warm while waiting for the lights?
Dress in layers , a thermal base, an insulated mid‑layer, and a wind‑proof outer shell. Keep your hands warm with gloves that have a finger opening for camera controls. Pack a hot drink in a thermos, and consider a portable heater in your vehicle if you’re near a car. Warm hands mean steadier shots.
What post‑processing steps matter most?
Start with exposure reduction to keep the sky dark, then boost contrast to make the aurora bands pop. Adjust white balance to 3500‑4000 K for natural colours, apply moderate noise reduction, and add a touch of vibrance. If you have two exposures, blend them to keep the foreground clean while preserving the aurora’s brightness.
Is a high‑end camera worth it for aurora shots?
You don’t need the most expensive gear to capture the lights. A good mirrorless or DSLR with a fast lens and solid low‑light performance will do. The key is to master the settings, use a stable tripod and pick dark, clear skies. Investing in a better lens often gives more benefit than upgrading the body.
How do I know when the aurora will be visible?
Use the AuroraWatch UK app or the My Aurora Forecast app. Both show the current Kp index and a map of where the lights are expected to be visible. Aim for a Kp of 3 or higher for Scotland, 4‑5 for England. Check the forecast a few hours before you head out, and keep an eye on the alerts throughout the night.