
7 most common camera exposure mistakes that Beginners make
Table of Contents Show
7 Most common camera exposure mistakes that beginners make
If you are trying to get off Auto mode but still feel confused by camera settings, you are not alone. Exposure is one of the biggest sticking points for beginners, and it is usually not because photography is too difficult. It is more often because aperture, shutter speed and ISO have not been explained in a simple, practical way.
After more than 15 years of teaching photography, I have found that most beginners make the same small group of mistakes. The good news is that once you understand them, your photography starts to improve much more quickly.
If you want to learn these fundamentals properly at your own pace, you can also work through my free online photography course, where you can access free training based on 15+ years of professional photography teaching experience.

Why exposure feels confusing at first
One of the reasons beginners struggle is that the camera often hides what it is doing. In Auto mode, the camera chooses the settings for you, so although you may get a usable image, you do not learn why it worked.
That is why many people stay stuck on Auto for longer than they want to. The answer is not to memorise technical terms. It is to understand a few simple principles and then practise them in the real world.
1. Relying on Auto mode for everything
Auto mode can be useful at the very start, but it does not teach you control. It makes decisions for you without helping you understand aperture, shutter speed or ISO.
The result is that your images may look acceptable one minute and disappointing the next, especially when the light changes or your subject starts moving. This is often the point where beginners feel frustrated and think they need a better camera, when in reality they need a better understanding of exposure.
What to do instead
A better next step is to move into Aperture Priority or Shutter Priority. These modes still help you, but they also allow you to start making creative decisions for yourself.
If you want a simple way to begin, you can start with my <a href="https://www.alanranger.com/free-photography-course">free online photography course</a>, which is designed to help beginners get off Auto in a structured and practical way.

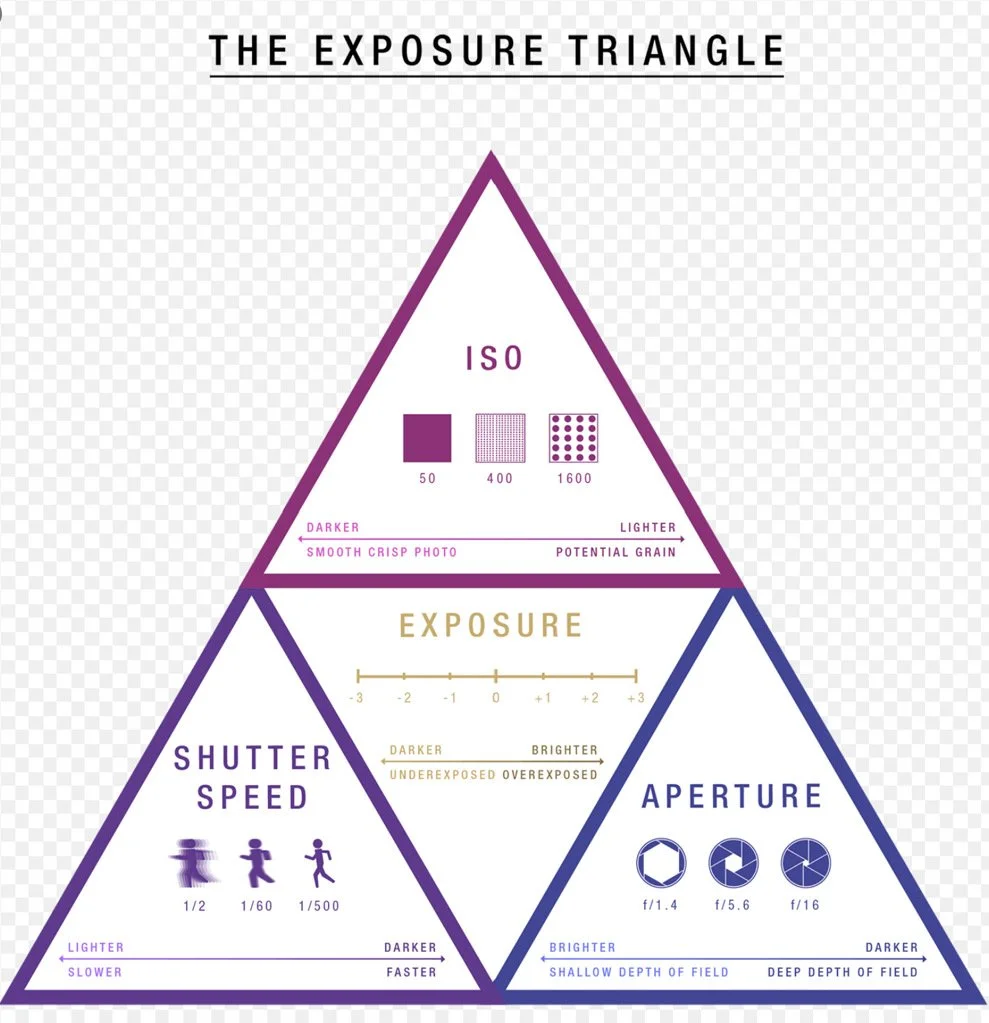
2. Not understanding how aperture, shutter speed and ISO work together
Exposure is controlled by three settings:
Aperture
Controls how much light enters the lens and also affects depth of field.
Shutter speed
Controls how long the sensor is exposed to light and affects movement and sharpness.
ISO
Controls how sensitive the camera is to light, but increasing it can reduce image quality.
A common beginner mistake is learning these as three separate ideas without understanding that they always work together. Change one, and the others may need to change as well.
For example, if you use a faster shutter speed to freeze movement, the image may become darker unless you also widen the aperture or raise the ISO.
Why this matters
Once you understand that exposure is a balancing act, photography becomes much easier. You stop guessing and start making deliberate choices based on the scene in front of you.
3. Using a shutter speed that is too slow
This is one of the most common reasons beginners get blurry photos. If your shutter speed is too slow, even a good camera and lens can produce soft results.
This can happen because:
the subject moves
your hands move slightly while holding the camera
you are using a longer lens that exaggerates shake
Typical examples
A slow shutter speed might be fine for a still landscape on a tripod, but not for handheld shots of people, wildlife or street scenes.
Beginners often do not realise this at first because the blur may not look obvious on the back of the camera. It only becomes clear later when viewed on a larger screen.
What to learn from this
Sharpness often improves more from using the right shutter speed than from buying new gear. It is one of the most important exposure habits to understand early on.

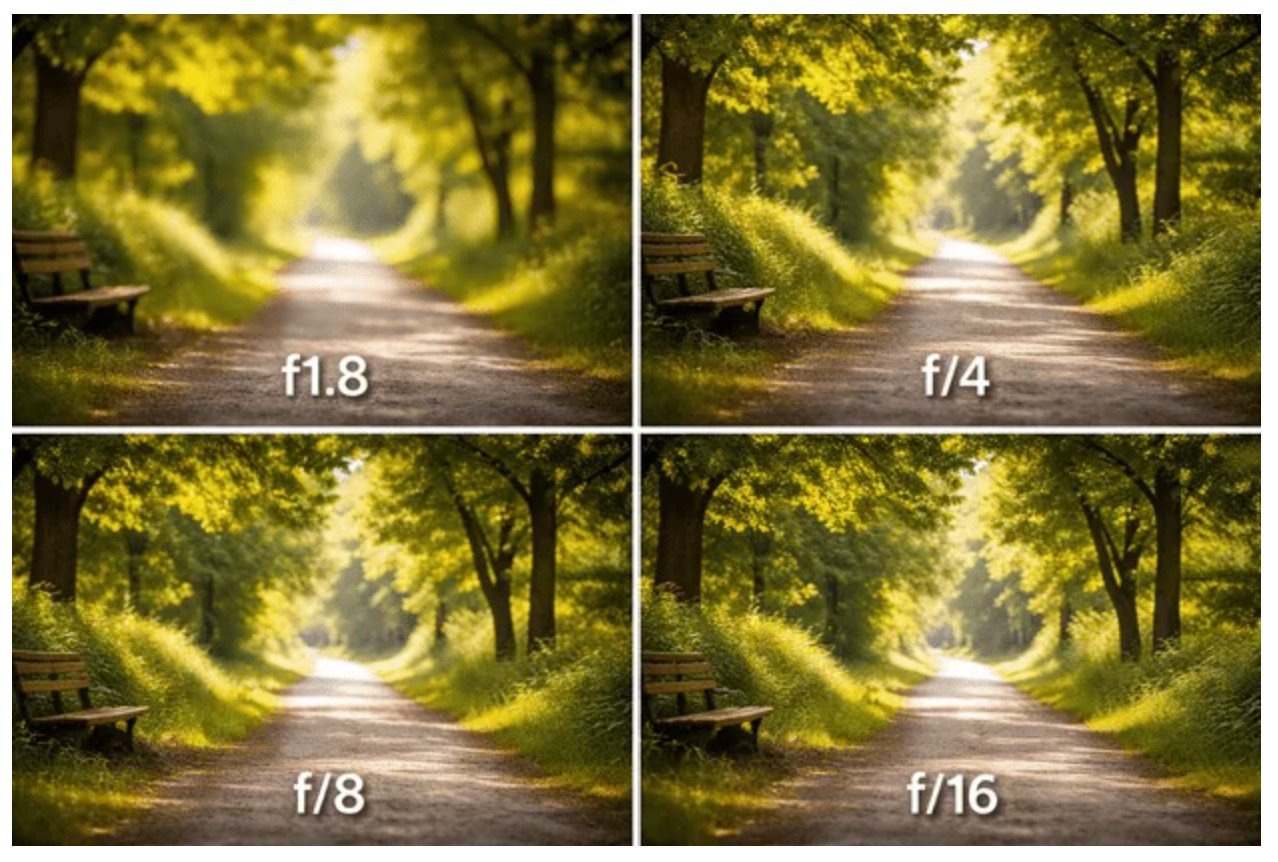
4. Using aperture without understanding depth of field
Aperture is not just about light. It also affects how much of the image appears sharp from front to back.
Many beginners hear that a wide aperture creates a professional look, so they use the lowest f-number possible all the time. Sometimes that works well, especially for portraits, but not always.
Where this goes wrong
If you are photographing a person at a very wide aperture, the eyes may be sharp but other parts of the face may soften. If you are photographing a landscape, a wide aperture may leave foreground or background details softer than expected.
A better approach
Choose aperture based on the result you want:
wider apertures for softer backgrounds and subject separation
narrower apertures when you want more of the scene sharp
This is one of the biggest steps in moving from casual snapshots to more intentional photography.
5. Letting ISO climb too high without noticing
ISO is often the hidden setting that beginners ignore because the camera changes it automatically. The problem is that Auto ISO can push much higher than expected, particularly indoors or in poor light.
A higher ISO can be useful when you need to keep shooting, but it can also introduce grain and reduce image quality.
The beginner mistake
A photo may look fine on the camera screen, but later on a computer it can appear noisier and less detailed than expected. That is often because the ISO was much higher than the photographer realised.
What to do instead
Start checking ISO regularly as part of your shooting habit. The aim is not to avoid high ISO at all costs, but to use it knowingly and only when it makes sense for the situation.

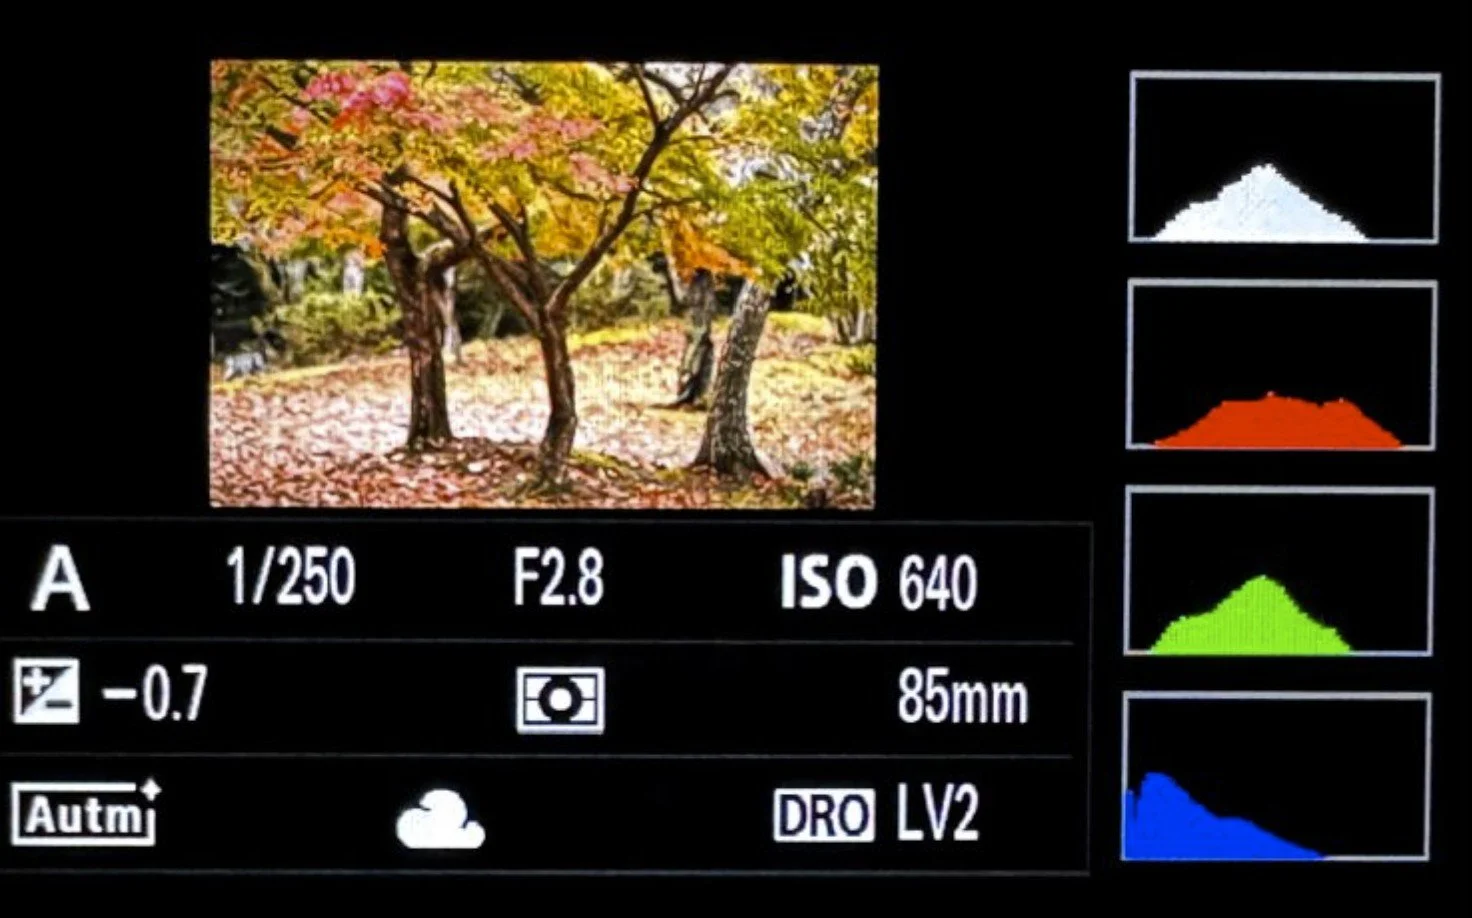
6. Ignoring the histogram and trusting the rear screen too much
The rear screen on your camera is useful, but it can also be misleading. Bright sunlight, reflections and screen brightness settings can all make an image appear lighter or darker than it really is.
That is why many beginners think a photo is exposed correctly in the moment, only to realise later that the highlights were blown or the shadows were too dark.
Why the histogram helps
The histogram gives a much more reliable view of exposure. It shows the tonal range of the image and can help you spot clipped highlights or blocked shadows before it is too late.
At first, the histogram can look technical, but once you understand the basics it becomes one of the most useful tools on the camera.
7. Practising without a clear exercise or goal
A lot of beginners take random photos and hope that practice alone will solve everything. Practice does matter, but random practice is often slow practice.
A better way to improve
Focus on one exposure idea at a time:
spend one session learning aperture and depth of field
spend one session learning shutter speed and movement
spend one session learning ISO in changing light
This kind of structured practice builds understanding much faster than changing everything at once with no clear aim.
That is exactly why I created my free online photography course. It gives beginners a way to learn photography for free and benefit from 15+ years of professional photography teaching experience in a more structured way.
The simplest way to start getting off Auto
You do not need to learn everything at once. In fact, trying to learn too much too quickly is often part of the problem.
A better approach is to:
learn one setting at a time
practise it in real situations
review the result
repeat until it feels natural
If you want a free starting point, my free online photography course is designed to help beginners understand camera settings and exposure in a practical, straightforward way.
Learn with more support
If you would like more help beyond the free course, you may also find these useful:
Final thoughts
Getting stuck on Auto mode is extremely common, but it does not mean photography is beyond you. Most beginners are only a few key ideas away from making much better decisions with their camera.
Once you understand how aperture, shutter speed and ISO work together, and once you practise with a bit more structure, things start to make a lot more sense.